background image


Page 23 / 47 

3 000 068 637 éd03 / 514 

INSTALLATION GUIDE 


CONTENTS 

1.


4Safety instructions ............................................................................... 25


2.


Keypad key assignments....................................................................... 26


3.


Daily use.................................................................................................. 26


4.


Unpacking. Product contents................................................................ 28


5.


Battery cover flap ................................................................................... 28


5.1.


Opening..................................................................................................................... 28


5.2.


Closing ...................................................................................................................... 28


6.


(De-)installation of SAM1 and SAM2 modules ..................................... 29


7.


CAM2 cover flap (secondary reader) .................................................... 29


7.1.


Opening..................................................................................................................... 29


7.2.


Closing ...................................................................................................................... 29


8.


(De-)installation of SAM3 and SAM4 (or SIM) modules ....................... 30


9.


(De-)installation of MMC or SDCARD.................................................... 30


10.


Secondary smart card reader ................................................................ 31


11.


Installation............................................................................................... 31


11.1.


Installing EFT930 on its base.................................................................................... 31


11.2.


Base wire connections .............................................................................................. 32


11.3.


Portable connections ................................................................................................ 35


11.4.


Connecting the battery.............................................................................................. 36


11.5.


Charging the Battery ................................................................................................. 36


11.6.


Adjusting the contrast ............................................................................................... 37


11.7.


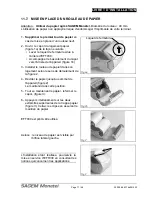
Installing a roll of paper............................................................................................. 37


12.


Maintenance............................................................................................ 39


12.1.


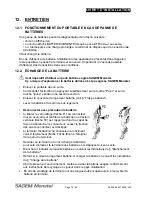
Operating the Portable in case of battery failure ...................................................... 39


12.2.


Changing the Battery ................................................................................................ 39


12.3.


Lithium Battery .......................................................................................................... 40


12.4.


Cleaning the unit ....................................................................................................... 40


13.


Transport and Storage ........................................................................... 40


14.


Characteristics of the EFT930 ............................................................... 41


15.


Annex ...................................................................................................... 42


15.1.


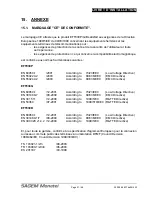
CE MARKING (CONFORMITY)................................................................................ 42


15.2.


FCC compliance........................................................................................................ 43


15.3.


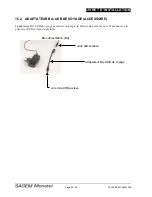
BA-USB travel adapter.............................................................................................. 44


Summary of Contents for EFT930

Page 1: ...LIVRET D INSTALLATION Installation guide EFT930 Terminal portable Portable terminal 251360915 3 000 068 637 d04 542...

Page 2: ...ARD 9 10 Lecteur secondaire de carte puce 10 11 Installation 10 11 1 Installation d EFT930 sur son socle 10 11 2 Branchements sur le socle 11 11 3 Branchements sur le portable 14 11 4 Branchement de l...

Page 3: ...RANTIE SECURITE Afin de b n ficier de la garantie attach e cet appareil et afin de respecter les consignes de s curit nous vous demandons d utiliser uniquement des batteries agr es SAGEM Mon tel et de...

Page 4: ...s la batterie et aux lecteurs SAM1 et SAM2 situ e sous l appareil doit tre en place au cours de l utilisation normale de l appareil Voir chapitres D s installation des modules SAM1 et SAM2 et Branche...

Page 5: ...uche Correction Jaune Touche Validation Vert 3 UTILISATION JOURNALIERE Sens d introduction et de lecture des cartes Introduction d une carte puce Puce visible sur le dessus fl che 2 Lecture de la pist...

Page 6: ...r s son utilisation et si ses batteries sont d charg es le terminal se met automatiquement en arr t Son cran s teint On peut aussi forcer son arr t en appuyant simultan ment sur la touche Point et sur...

Page 7: ...a notice d installation 5 TRAPPE BATTERIE La trappe batterie se trouve sous l appareil Pr caution Mettre hors tension avant d ouvrir le portable 5 1 OUVERTURE 1 Retourner le PORTABLE sur la table face...

Page 8: ...ficult on peut s aider d un ruban adh sif pour d sinstaller un SAM 7 TRAPPE CAM2 LECTEUR SECONDAIRE La trappe CAM2 se trouve sous l appareil Pr caution Mettre hors tension avant d ouvrir le portable 7...

Page 9: ...coin coup comme indiqu sur la figure ci contre La position du coin coup figure aussi sur le capot inf rieur Refermer la trappe d acc s CAM2 9 DES INSTALLATION MMC OU SDCARD L acc s au logement de la...

Page 10: ...re compl tement la carte puce dans le lecteur dans le sens suivant puce vers l avant avec la puce non visible puce sur la face inf rieure piste magn tique visible sur la face sup rieure croquis ci con...

Page 11: ...r seau t l phonique Connecter la prise t l phonique C associ e ventuellement un conjoncteur normalis dans le pays d utilisation au r seau t l phonique D Raccorder l autre extr mit du cordon la prise G...

Page 12: ...r EFT930G sans l option Modem L aspect ext rieur du socle G est identique celui du socle P Les connecteurs visibles ne sont cependant pas fonctionnels l exception du jack alimentation A Prise d arriv...

Page 13: ...cteur du t l phone selon pays C raccordement au r seau t l phonique D prise arriv e r seau t l phonique E prise d arriv e du r seau lectrique F bloc alimentation G liaison r seau t l phonique H entr e...

Page 14: ...Ethernet Liaison s rie suppl mentaire Ethernet Liaison s rie Entr e alimentation Liaison USB 11 3 BRANCHEMENTS SUR LE PORTABLE Connecteur mini USB h te Connecteur mini USB esclave pour adaptateur BA U...

Page 15: ...e Voir Trappe batterie 2 Prendre le pack batteries et rep rer le d trompage du connecteur de la batterie ainsi que celui du connecteur de la carte qui appara t au fond du logement batteries figure 1 3...

Page 16: ...leil endroit confin temp rature comprise entre 15 C et 25 C Comment charger Via le socle Poser le PORTABLE sur son socle S assurer que le symbole d une prise lectrique appara t sur l cran du portable...

Page 17: ...vers l arri re de l appareil figure 1b 3 Installer le rouleau de papier dans son logement selon le sens de d roulement de la figure 2 4 D vider le papier jusqu au sommet de l appareil figure 2 Le mai...

Page 18: ...ant une seconde environ Enlever le couvercle du logement batterie voir Trappe batterie Lever la batterie et la sortir de son logement D connecter avec pr caution la batterie a lib rer le verrouillage...

Page 19: ...icro poussi res et votre appareil pr senter en cons quence le ou les d fauts suivants m me pos sur son socle le terminal ne se recharge pas ne charge pas le terminal ne voit pas la ligne t l phonique...

Page 20: ...mes Voir en annexe le marquage CE de conformit aux normes Conditions d exploitation Mat riel de classe II R seau lectrique 100 240VCA 50 60 Hz Consommation 150 mA Bloc alimentation prise 2 p les 2 5 A...

Page 21: ...A2 2003 According to 89 336 EEC EMC Directive EN 55024 A2 2003 According to 89 336 EEC EMC Directive EFT930G EN 60950 1 12 2001 According to 73 23 EEC Low Voltage Directive EN 301489 7 08 2000 Accordi...

Page 22: ...ADAPTATEUR BA USB DE VOYAGE ACCESSOIRE L adaptateur BA USB de voyage permet de recharger la batterie du portable en se branchant sur la prise mini USB esclave du portable Bloc alimentation BA vers min...

Page 23: ...MC or SDCARD 30 10 Secondary smart card reader 31 11 Installation 31 11 1 Installing EFT930 on its base 31 11 2 Base wire connections 32 11 3 Portable connections 35 11 4 Connecting the battery 36 11...

Page 24: ...GUARANTEE AND SAFETY In order to benefit from the guarantee on this equipment and in order to follow the safety instructions we ask you to use only SAGEM Monetel approved batteries and to entrust disa...

Page 25: ...place during the normal operation of the terminal See sections De Installation of SAM1 and Sam2 modules and Connecting the battery F Cover flap for CAM2 SAM3 and SAM4 or SIM reader The cover flap for...

Page 26: ...key Red Correction key Yellow Validation key Green 3 DAILY USE Card insertion and reading direction Inserting a chip card Chip facing up arrow 2 Reading the magnetic stripe on a swipe or chip card Po...

Page 27: ...s socket after it has been used and if its battery is empty the terminal automatically shuts off The screen is turned off It may also be forced stopped by pressing simultaneously Point and Yellow keys...

Page 28: ...The battery cover flap is located under the portable Caution Switch off the machine before opening the cover 5 1 OPENING Turn the PORTABLE over on the table with the bottom side facing up figure oppo...

Page 29: ...al easier 7 CAM2 COVER FLAP SECONDARY READER CAM2 cover flap is located under the portable Caution Switch off the machine before opening the cover 7 1 OPENING Turn the PORTABLE over on the table with...

Page 30: ...he cut corner as indicated on the figure opposite The position of the cut corner is also engraved on the lower housing Close the flap cover 9 DE INSTALLATION OF MMC OR SDCARD To gain access to the MMC...

Page 31: ...lap Position the smart card with the chip in the position shown in figure opposite chip forward but not visible facing down magnetic stripe visible facing up Insert the card fully home into the slot C...

Page 32: ...Connect telephone plug C equipped if necessary with user country specific telephone plug to the telephone network D Connect the other end of the wire to the base socket G Connect the mains power suppl...

Page 33: ...068 637 d04 542 G base for EFT930G without the Modem option The G base looks the same as the P base However except for the power supply jack the visible connectors are not functional A Mains power so...

Page 34: ...ble telephone handset B telephone connector country specific C connection to the telephone network D telephone network socket E mains power socket F power adapter G telephone network port H power inpu...

Page 35: ...ing B base for EFT930B Ethernet Additional serial port Ethernet Serial port Power input USB port 11 3 PORTABLE CONNECTIONS Host Mini USB connector Slave Mini USB connector for travel BA USB adapter PC...

Page 36: ...battery pack in its compartment figure 2 5 Close the battery compartment cover flap red wire fig 1 fig 2 11 5 CHARGING THE BATTERY When is the battery to be charged On initial start up charge the bat...

Page 37: ...rging 11 6 ADJUSTING THE CONTRAST If you wish to modify the contrast of the characters displayed on the screen simply press and hold the Point and or Point and keys as long as necessary to obtain a sa...

Page 38: ...ners of the paper flap arrows on figure 3 until it clips into position and holds the paper The EFT930 terminal is now ready for use Handy tip the amount of paper remaining can be checked by looking th...

Page 39: ...and the yellow key during about one second Remove the cover of the battery housing see Battery cover flap Lift battery and remove it from its housing Carefully disconnect battery following the instruc...

Page 40: ...terminal base connection may become contaminated by dust and your unit could then show the following faults Even when put on the base the terminal does not recharge or charge The terminal does not de...

Page 41: ...100 g Standards See in appendix the EC standard compliance marking Operating conditions Class II Electrical network 100 240VAC 50 60 Hz Consumption 150 mA Power supply block 2 pole socket 2 5 A Ambien...

Page 42: ...irective EN 55024 A2 2003 According to 89 336 EEC EMC Directive EFT930G EN 60950 1 12 2001 According to 73 23 EEC Low Voltage Directive EN 301489 7 08 2000 According to 89 336 EEC EMC Directive EN 301...

Page 43: ...re standard for wireless equipment employs a unit of measurement known as the Specific Absorption Rate or SAR The SAR limit set by the FCC and by the Canadian regulatory authorities is 1 6 W kg 1 Test...

Page 44: ...Safety Code 6 and the Industry Canada Radio Standards Specification RSS 102 for General Population Uncontrolled exposure For body worn operation this phone has been tested and meets FCC RF exposure g...

Page 45: ...INSTALLATION GUIDE Page 45 46 3 000 068 637 d04 542 Notes...

Page 46: ...descriptions photographies et caract ristiques figurant sur ce document sont donn es uniquement titre d information et non d engagement contractuel SAGEM Mon tel SAS se r serve le droit d effectuer sa...

Reviews: