background image


INSTRUCTION MANUAL 

FOR 

TOUCH PANEL MONITORING UNIT 

CMT-240-K


Summary of Contents for CMT-240-K

Page 1: ...INSTRUCTION MANUAL FOR TOUCH PANEL MONITORING UNIT CMT 240 K ...

Page 2: ...please inform our sales department Any unauthorized transfer or copying of this document in part or in whole is prohibited Shinko Technos is not liable for any damages or secondary damages incurred as a result of using this manual including any indirect damages SAFETY PRECAUTIONS Be sure to read these precautions before using our products The safety precautions are classified into two categories W...

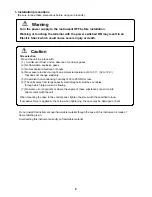
Page 3: ...ient temperature of 0 to 50 32 to 122 that does not change suddenly 5 An ambient non condensing humidity of 35 to 85 RH or less 6 The units away from large capacity electromagnetic switches or cables through which large current is flowing 7 No water oil or chemicals or where the vapors of these substances can come into direct contact with the unit When mounting the case to the control panel tighte...

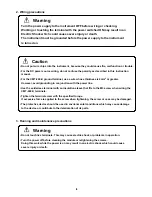
Page 4: ... or greater However avoid grounding in conjunction with the power line Use the solderless terminal with an insulation sleeve that fits to the M3 screw when wiring the CMT 240 K terminals Tighten the terminal screw with the specified torque If excessive force is applied to the screw when tightening the screw or case may be damaged The protective device should be used in environmental conditions whi...

Page 5: ... manual number is noted at the lower right corner of the back cover Print date Manual number Revision Jan 2001 CMT22E1 2001 01 First edition May 2001 CMT22E2 2001 05 2nd edition Spelling grammar and terminology revision ...

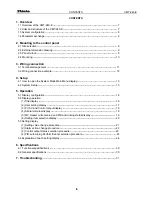
Page 6: ... 4 2 System Setup 13 5 Operation 5 1 Display configuration 16 5 2 Display operation 1 Title display 16 2 User setting display 17 3 PV SV and Control output display 18 4 All alarm status display 19 5 MV Heater current value and PID auto tuning status display 19 6 Setting item selection display 20 5 3 Setting display 1 Setting value change procedure 21 2 Alarm action change procedure 22 3 Control ou...

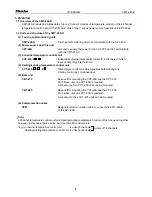
Page 7: ...t or output type is the same 4 Heating cooling temperature control unit CCT 235 D Temperature control unit which enables both Heating and Cooling control by 1 channel input 5 Base unit CBT 210 Base unit for mounting the CPT 20A and the CCT 235 For 1 Base unit one CPT 20A is required A maximum of ten CCT 235 units can be mounted CBT 205 Base unit for mounting the CPT 20A and the CCT 235 For 1 Base ...

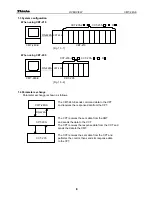
Page 8: ...exchange Parameter exchange is shown as follows The CMT 240 K sends command data to the CPT CMT 240 K and receives the response data from the CPT The CPT receives the sent data from the CMT CPT 20A and sends the data to the CCT The CPT receives the response data from the CCT and sends the data to the CMT The CCT receives the sent data from the CPT and CCT 235 performs the control then sends its re...

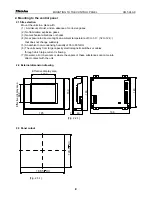
Page 9: ...ature of 0 to 50 32 to 122 that does not change suddenly 5 An ambient non condensing humidity of 35 to 85 RH 6 The units away from large capacity electromagnetic switches or cables through which large current is flowing 7 No water oil or chemicals or where the vapors of these substances can come into direct contact with the unit 2 2 External dimension drawing Fig 2 2 1 2 3 Panel cutout Fig 2 3 1 1...

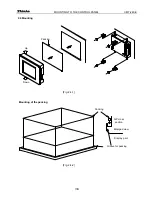
Page 10: ...10 10 MOUNTING TO THE CONTROL PANEL CMT 240 K 2 4 Mounting Fig 2 4 1 Mounting of the packing Fig 2 4 2 Packing Up Down Groove for packing Packing AIP cross section Enlarged view Display part ...

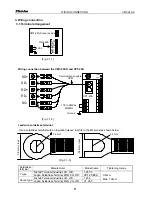
Page 11: ...g 3 1 3 Solderless terminal Manufacturer Model name Tightening torque Nichifu Terminal Industries CO LTD 1 25Y 3 Japan Solderless Terminal MFG CO LTD VD1 25 B3A Nichifu Terminal Industries CO LTD 1 25 3 Japan Solderless Terminal MFG CO LTD V1 25 3 Y type 0 6N m Max 1 0N m Round type 3 2mm 5 8mm or less 3 2mm 5 8mm or less RS 422A CMT 240 K reverse side FG SG RD RD SD SD 24Vdc SG RD RD Communicatio...

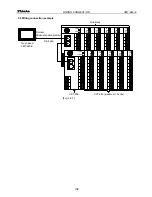
Page 12: ...le Fig 3 2 1 TX PW 01 02 TX PW 01 02 TX PW 01 02 TX PW 01 02 TX PW 01 02 TX RX POWER RS 422A Touch panel CMT 240 K One block CPT 20A CCT 235 maximum 10 units TX PW 01 02 TX PW 01 02 TX PW 01 02 TX PW 01 02 TX PW 01 02 TX RX POWER Protocol Shinko standard protocol ...

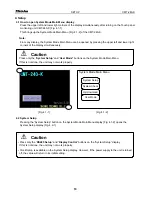
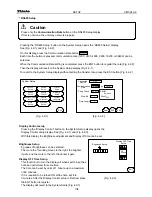
Page 13: ... only the System Setup and User Mode buttons on the System Mode Main Menu If this is not done the unit may not work properly Fig 4 1 1 Fig 4 1 2 4 2 System Setup Pressing the System Setup button on the System Mode Main Menu display Fig 4 1 2 opens the System Setup display Fig 4 2 1 Caution Press only the RS485 Setup and Display Control buttons on the System Setup display If this is not done the un...

Page 14: ...isplay See Fig 4 2 1 and Fig 4 2 3 With this display the Brightness adjustment and Display off time can be set Brightness Setup 8 grades of brightness can be selected The more the marking moves to the right the brighter it gets and the more to the left the darker it gets Display OFF Time Setup This function is to turn the display off when switch input has not been performed for some time The time ...

Page 15: ...he RS485 Setup and Display Control setup are finished press the END button Fig 4 2 1 The display will revert to the System Mode Main Menu Then press the User Mode Fig 4 1 2 This brings up the Title display Fig 4 2 4 and the control starts Fig 4 2 4 ...

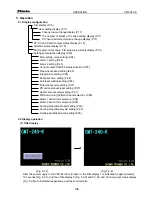
Page 16: ...setting P 25 Integral time setting P 26 Derivative time setting P 26 Anti reset windup setting P 26 Proportional cycle setting P 27 PD action manual reset setting P 27 Heater burnout alarm setting P 27 PID Auto tuning Perform Cancel selection P 28 Alarm 1 action form selection P 28 Alarm 2 action form selection P 28 Cooling proportional band setting P 29 Cooling proportional cycle setting P 29 Ove...

Page 17: ...arts 2 The number of the blocks of C series setting Set the number of the blocks by pressing the Change button on the lower right of the User setting display Fig 5 2 3 Block 1 and 2 will be displayed alternately if the Change button is pressed Press the Register button on the upper right of the User setting display Fig 5 2 3 after the number of blocks of C series has been set Title display 2 Fig 5...

Page 18: ...e buttons for opening following displays Fig 5 2 5 1 PV SV Opens the PV and SV and Control output status display 2 ALM Opens All alarm status display Fig 5 2 6 3 MV CT Opens MV Heater current value and PID auto tuning status display Fig 5 2 7 4 Setting Opens Setting item selection display Fig 5 2 8 5 Next Opens the display for CH21 to CH40 However when only 1 block has been set when setting the nu...

Page 19: ...ale high limit value it is indicated by a red light DOW If the sensor input exceeds the rated scale low limit value it is indicated by a red light 5 MV Heater current value and PID auto tuning status display Fig 5 2 7 MV heater current value and PID auto tuning status are indicated on the display Fig 5 2 7 Display details are as follows AT While PID auto tuning is performing a yellow light blinks ...

Page 20: ...isplay Integral time Integral time setting display Derivative time Derivative time setting display Anti reset windup Anti reset windup setting display Proportional cycle Proportional cycle setting display Manual reset PD action manual reset setting display Heater burnout Heater burnout alarm setting display Auto tuning PID auto tuning Perform Cancel selection display Alarm 1 action form selection ...

Page 21: ...channel to be changed on the Main setting value display Fig 5 3 2 The display will be switched to the Setting value change display Fig 5 3 3 2 Using the or key change the figure of each digit When the change is completed press the ENTER key Fig 5 3 3 The setting value will be transferred to the CCT 235 and the display will revert to the Main setting value display Fig 5 3 2 3 Repeat procedure 1 and...

Page 22: ... for all channels are completed 4 If the setting value of all channels are changed press the RETURN key The display will revert to the Setting item selection display Fig 5 3 1 Fig 5 3 4 Fig 5 3 5 3 Control output status selection procedure When control output status is on ON is indicated in the frame next to the channel number When control output status is off OFF is indicated in the frame next to...

Page 23: ...me next to the channel number and PID auto tuning starts After that when PID auto tuning is completed OFF is automatically indicated in the frame next to the channel number 2 When changing PID auto tuning status from ON to OFF press the button of the channel to be turned off OFF is indicated in the frame next to the channel number and PID auto tuning status is turned off However the values P I D a...

Page 24: ... TC RTD or TC with decimal point High limit alarm with standby 200 to 200 200 0 to 200 0 Low limit alarm with standby 200 to 200 200 0 to 200 0 High Low limits with standby 0 to 200 0 0 to 200 0 High Low limit range with standby 0 to 200 0 0 to 200 0 Process high alarm with standby Input range minimum to input range maximum value Process low alarm with standby Input range minimum to input range ma...

Page 25: ...strument is supplied The function is used when required to halt the control action or when the unit is not being used in multiple units Notice Once the Control output OFF function is enabled the function cannot be released even if the power to the unit is turned OFF and turned ON again To cancel the function go to the Control output ON OFF status selection display again and press the button of the...

Page 26: ...ff when set to 0 h Derivative time setting display Sets the derivative time for all channels For details of the derivative time refer to the instruction manual for the C series Setting range 0 to 3600 seconds Off when set to 0 h Anti reset windup setting display Sets the anti reset windup for all channels For details of the anti reset windup refer to the instruction manual for the C series Setting...

Page 27: ...nge for TC and RTD input 199 9 to 999 9 The range for DC input 1999 to 9999 h Heater burnout alarm setting display Sets heater current value of Heater burnout alarm for all channels The setting is available only when the option W is applied to the CCT 235 For Heater burnout alarm action drawing refer to the instruction manual for the C series Setting range Rating 20A 0 0 to 20 0A Rating 50A 0 0 to...

Page 28: ...For alarm action drawing refer to the instruction manual for the C series Table 5 4 2 Alarm action form Character No alarm High limit alarm H High limit alarm with standby H W Low limit alarm L Low limit alarm with standby L W High Low limits alarm HL High Low limits alarm w standby HL W High Low limit range alarm WID High Low limit range alarm w standby WIDW Process high alarm PH Process high ala...

Page 29: ...onal cycle setting display Sets the cooling proportional cycle However this item is available only when the CCT 235 is specified as Heating Cooling Setting range 1 to 120 seconds h Overlap band Dead band setting display Sets the Overlap band and Dead band for Heating and Cooling control outputs setting value Dead band setting value Overlap band However this item is available only when the CCT 235 ...

Page 30: ...esistance 20M or greater at 500Vdc between power terminal and ground Environment specification Ambient temperature 0 to 50 32 to 122 Ambient humidity 15 to 85 RH Non condensing Vibration proof Based on JIS C0911 5 to 55Hz 2G X Y Z each direction for 2 hours Impact proof Based on JIS C0912 10G 12ms or less X Y Z each direction Noise proof power source 1000VP P Pulse width 100ns 1000ns common mode N...

Page 31: ...40 K P 25 Problem Setting from the CMT 240 K is impossible Presumed cause Solution Auto tuning is performing Cancel the auto tuning P 28 Problem Communication is impossible Serial COM Error is indicated on the display Presumed cause Solution Data transfer rates of CMT 240 K and CPT 20A do not concur Set the same transfer rate to both P 13 14 Setting the number of blocks of C series from the CMT 24...

Page 32: ...us know the details of malfunction if any and the operating conditions No CMT22E2 2000 05 SHINKO TECHNOS CO LTD OVERSEAS DIVISION Reg Office Mail Address URL E mail 2 48 1 Chome Ina Minoo Osaka Japan P O Box 17 Minoo Osaka Japan http www shinko technos co jp overseas shinko technos co jp Tel Fax 81 72 721 2781 81 72 724 1760 ...

Reviews: