background image

Aircraft Information

23

24

This car bed is not certified for aircraft use.

WARNING: 

ELR lap-only belts MUST NOT be used 

with this car bed.

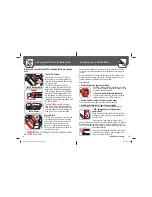
• Switchable Retractor

These belts switch from ELR to ALR (Automatic Locking Retractor). You 

MUST

 have the vehicle belts in the locking mode to use them. 

With a switchable retractor, pull the shoulder belt all the way out to 
switch the retractor into the ALR mode before tightening. 

Feed the slack back into the retractor while tightening. 

• ALR (Automatic Locking Retractor)

These belts lock after pulling the webbing out and letting the belt go 
back into the retractor an inch or two. 

With an ALR belt, pull the belt all the way out before threading through 
the car bed.

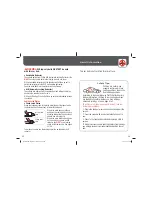
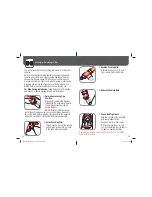
Vehicle Latch Plates

• Check Latch Plates

Grasp the tongue portion of the latch plate (the part that goes inside 
the buckle) and pull straight out, in line with the lap belt. 

If the latch plate does not slide up 
and down the vehicle belt, you have 
a locking latch plate. You should not 
need to use a locking clip. 

If the latch plate slides up and down 
on the belt, and you have an ELR 
retractor, you


MUST

 use a locking 

clip to install the car bed. See pages 
31-32.

You may not need to use the locking clip with a switchable or ALR 
retractor.

Locking Latch 
Plate

Sliding Latch 
Plate

Safety Tips:

Children are safer when 
properly restrained in rear 
seating positions than in the 
front seating positions.

According to National Highway Traffi c Safety Adminis-
tration information, children in rear seating positions 
are statistically safer, whether you have air bags, 
advanced air bags, or no air bags at all.

To avoid your child being seriously burned, take the 
following precautions:

1.

 Park in the shade or where sun does not directly hit the 

car bed

.

2. 

Cover the 

car bed

 with a sheet or blanket when not in 

use.

3.

 Check for hot seat and buckles before placing child in 

car bed

.

To help protect your vehicle seat’s upholstery from damage, 
use a single layered towel underneath and behind the 

car 

bed

.

4358-6748 Dream Ride LATCH.indd   27-28

4358-6748 Dream Ride LATCH.indd   27-28

4/7/15   4:48 PM

4/7/15   4:48 PM

Summary of Contents for Dream Ride LATCH

Page 1: ..._ ______________ Instructions 0 00 X______ ______________ 2 are required to use this car bed Merchandise Total ________________ Shipping and handling ________________ Sales Tax _______________ Arizona...

Page 2: ...n 24 Safety Tips 24 Side Facing 25 LATCH Installation 26 Vehicle Belt Installation 29 General Information 31 Using a Locking Clip 31 Dorel Juvenile Group Information 33 Registration and Safety Notices...

Page 3: ...rap Adjustment Slides under Car Bed I LATCH Hooks J LATCH Adjusters 1 2 Front View B A C E D F G H K Harness Adjustment Slides under pad L Harness Strap End M Instruction Manual Storage N Locking Clip...

Page 4: ...Harness and Buckle Strap Lengths The buckle should lay at mid chest even with armpits and away from the infant s neck Try to pinch the harness at the shoulders vertically between index finger and thum...

Page 5: ...e to follow these steps can result in serious injury or death To Remove Infant From Car Bed 1 Unbuckle Harness 2 Move Harness Away 3 Remove Infant 1 Locate Buckle Strap Adjustment Slides on the Bottom...

Page 6: ...ch the buckle strap correctly can result in serious injury or death 1 Locate Harness Strap Adjustment Slides Under the Pad 2 Unlace Free End of Harness Strap from Adjustment Slides 3 To Shorten Move t...

Page 7: ...e Pull handle out from shell on both sides Rotate up or down to desired location Make sure both sides of handle are locked before using Handle MUST be upright AND locked when carrying and when install...

Page 8: ...on beds sofas or other soft surfaces Strangulation Hazard Children have STRANGLED in loose or partially buckled harness straps Fully restrain the child even when carrier is used outside the vehicle Fa...

Page 9: ...top of shell Make sure harness and buckle straps are not twisted Reattach elastic to plastic buttons on sides of shell WARNINGS Do not use the car bed without the seat pad or foam inserts Failure to...

Page 10: ...belt to one side as far as possible 6 Slide Top of Clip Inside the LATCH Belt Loop 8 Pull LATCH Belts Out of Slots 9 Thread LATCH Vehicle Belt Loops into Slots 10 Thread LATCH Belts into Slots on Opp...

Page 11: ...rts Do not use cut frayed or damaged harnesses Do not substitute parts or try to modify the car bed in any way Do not lubricate buckles and fasteners Do not use any car bed accessory except those appr...

Page 12: ...Inspection Station Go to http www safercar gov cpsApp cps index htm to find your closest station Check the vehicle belt or LATCH belt before each use Use only if the belt is tightened properly and se...

Page 13: ...h car beds This is your best source for information concerning your vehicle Not all vehicle belts will work with this car bed This car bed must be tightly locked in place at all times You must determi...

Page 14: ...a locking latch plate You should not need to use a locking clip If the latch plate slides up and down on the belt and you have an ELR retractor you MUST use a locking clip to install the car bed See p...

Page 15: ...r more information about airbag car bed use 5 20 lb 2 3 9 kg 26 in 66 cm or less and under 1 year of age Lap Belt Safety Tip Make sure harness and buckle fit your child correctly before installing the...

Page 16: ...bed 4 Tighten Belt Lay your forearm across the car bed while pulling up on free end of LATCH belt to tighten Repeat for other LATCH belt 27 28 2 Place Car Bed Side Facing in the Back Seat with Child...

Page 17: ...see pages 14 17 4 Check Belt Tightness Hold the car bed at the belt path with your weakest hand Push and pull from side to side If it moves more than 1 in 2 5 cm try reinstalling the car bed try anoth...

Page 18: ...elt path with your weakest hand Push and pull from side to side If it moves more than 1 in 2 5 cm try reinstalling the car bed or try another seating location 32 You will rarely need to use a locking...

Page 19: ...M EST FRI from 8 A M to 4 30 P M EST Mailing Address Dorel Juvenile Group Inc Consumer Relations Department P O Box 2609 Columbus IN 47202 2609 Fax 1 800 207 8182 Registration and Safety Notices If y...

Page 20: ...he part or model has been discontinued To make a claim under this warranty you may email us at consumer djgusa com fax us at 1 800 207 8182 24 hours a day write to DJG Consumer Relations Department P...

Reviews: