background image

12

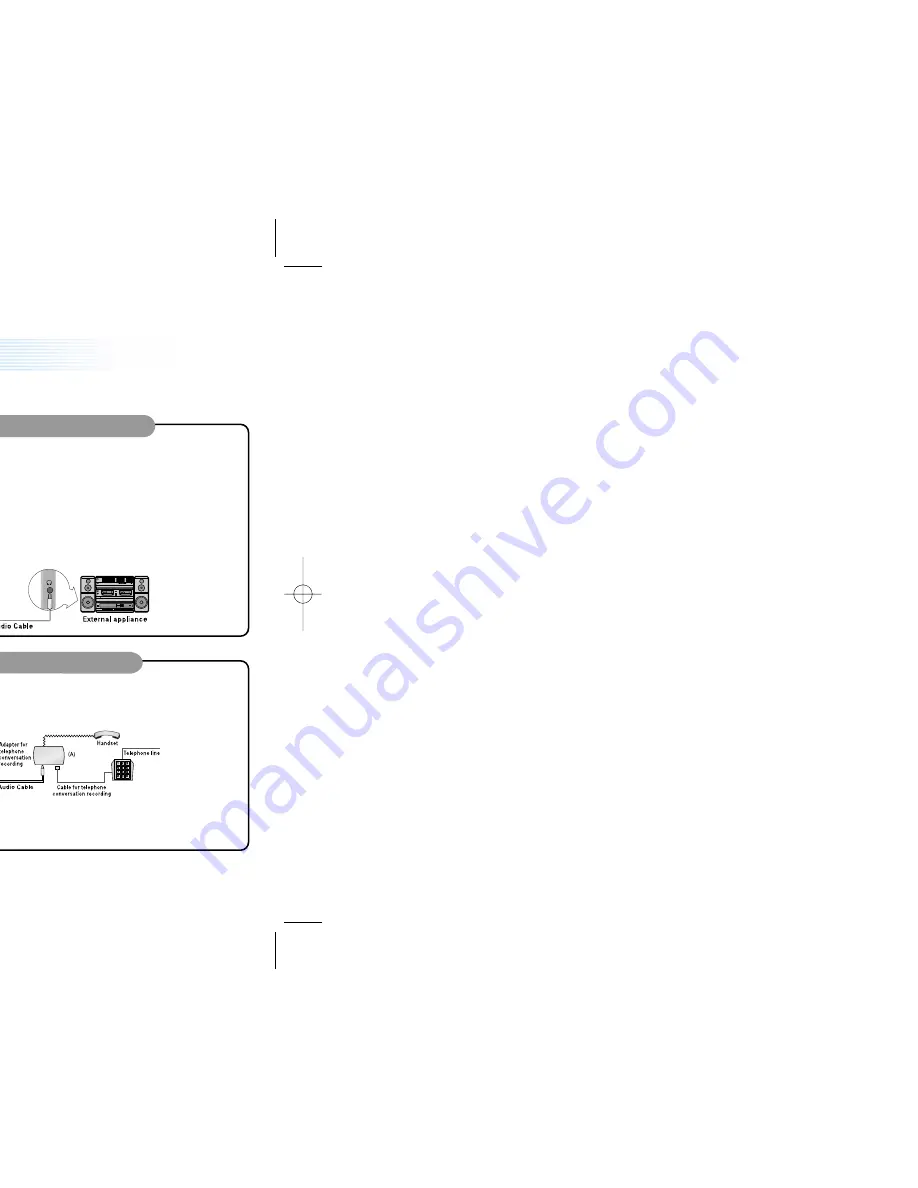
Recording the general telephone conversation

1. Connect the audio cable in the Sound MAP Audio Cable Connector(LINE). Connect the adapter

and the telephone with the cable for telephone conversation recording. Then, connect the
handset cable of the telephone to the adapter.

2. Follow the same procedure as with the built-in microphone (See page 11).

It may be necessary to change the direction of installation of the adaptor (marked by (A)) depending 

on your particular model of telephone.

2

Recording from external appliances (Audio, PC)

Set the recording speed (SP and LP), file, and VOR function before you start recording (see pages 15 and 16).
Sound can be distorted during playback if the volume control is set too high during recording.

1. Sound can be distorted during recording if the volume control of the external appliance is

set too high.

2. Connect one end of the audio cable to the Audio Cable Connector(LINE) of your Sound MAP

and the other end to the external appliance (Audio or PC).

3. Plug in the earphone to listen to the sound input from the external appliance.

4. The sound from the earphone may change slightly when recording starts. However, this will

not have any effect on the actual recording.

5. Follow the same procedure as with the built-in microphone (See page 11).

1

Recording with line-in

11

Recording with the Built-in microphone

Set recording sensitivity, file, VOR function and speed (SP or LP) before you start recording (see Pages 15 and 16).

1 Direct the product's built-in microphone towards the source of the sound.

2. Press the REC/PAUSE button to start recording. The red LED will illuminate (Figure 7 and 8).

3. Press REC/PAUSE button to stop the recording for a short moment. The red LED will flash. 

(Figure 9)

4. Press REC/PAUSE button again to continue the recording. The red LED will light again.

5. Press the STOP/DEL button during recording or during standby mode to stop recording. 

1

1. Connect the external microphone supplied with your Sound MAP to the Audio Cable

Connector(LINE).

2. Follow the same procedure as with the built-in microphone.

2

Voice Recording

(Figure 7)

(Figure 8)

(Figure 9)

Recording with the external microphone

Summary of Contents for IRS-1610L

Page 1: ...User s Manual 10L AP e your Sound MAP ...

Page 2: ...appliances Audio PC 12 ecording the general telephone onversation 12 ayback 13 ormal Playback 13 ow speed Playback 13 igh speed Search 13 ayback on other Indexes 14 epetition Playback 14 enu 15 ic Recording Sensitivity 15 OR Function 15 eep Setting 16 ecording Time Setting 16 dex Introduction 16 lete Function 17 o delete a particular index 17 o Delete a File 17 ving into the external appliance 18 ...

Page 3: ... accessories to any e it to malfunction come deformed or malfunction due to heat remove the batteries from the and disconnect any external cables force to the LCD screen It may cause cause it to malfunction duct to direct sunlight or any source of eriod f you do not intend to use this product od of time ory wires earphone earmic or audio force ecifications of the Sound MAP are subject r notice ...

Page 4: ... time indicator menu change ng Low sensitivity recording mode indicator Repeat one index Mode Section Repeat A B Playback state indicator File repeat playback mode indicator isplay User s manual CD ROM Cable for telephone conversation recording ...

Page 5: ...h line in 12 om external appliances Audio PC 12 e general telephone conversation 12 13 back 13 ayback 13 earch 13 other Indexes 14 ayback 14 15 g Sensitivity 15 n 15 16 me Setting 16 ction 16 n 17 articular index 17 ile 17 external appliance 18 he external audio such as rder 18 a PC 18 ...

Page 6: ...the index you cannot continue recording Figure 5 ecordings or move them to an external appliance audio or ecording This may cause the product to malfunction If you intend to first replace the batteries while the unit is in standby mode or power hile you are recording via the built in Microphone This may cause g paused when the level of sound Figure 6 r a short period while VOR mode is low sensitiv...

Page 7: ...A depending nal appliances Audio PC VOR function before you start recording see pages 15 and 16 volume control is set too high during recording ecording if the volume control of the external appliance is able to the Audio Cable Connector LINE of your Sound MAP l appliance Audio or PC the sound input from the external appliance ay change slightly when recording starts However this will l recording ...

Page 8: ...ng playback he current index will be repeated 10 times n during playback Figure 13 press and hold the FILE REPEAT whole indices of the current file will be on to stop playback want to start the section repetition indicator flashes Figure 11 PEAT button again where you want to stop uously the selected section will be o stop playback Figure 11 Figure 12 Figure 13 Figure 14 ...

Page 9: ...on k or stop will continue in the ecording mode ve times during N button to play he first index of the ree times in Record Playback Stop r BACK button P OFF OFF BEEP and BEEP ON 20 N or STOP DELETE button to select ng playback or stop will continue mode Figure 19 Figure 20 Figure 21 Figure 23 Figure 24 Figure 22 ...

Page 10: ...al audio appliance xternal audio appliance and the play button on your Sound ording able to the LINE jack of your Sound MAP and the other end to d card d card settings and saving method he USB ports of your Sound MAP and the PC ram installation details and saving method the provided audio cable does not fit the input jack of the external ...

Page 11: ...eplacethebatterieswithnewones Insertthebatterieswithrightpolarity Release the lock mode Replace the batteries with new ones Delete any unnecessary recordings Release the lock mode Replace the batteries with new ones Check the recording number Adjust the volume control Pull out the earphone Adjust the volume control Fully plug in the earphone Adjust the volume control ked HOLD ON mode dead r or rec...

Page 12: ...d Service Guide eriod nly in the country of purchase form and keep it at the safe place l dealer when any problem occurs to this product s negligence uthorized modification or repair ral hazards such as fire seawater flood or war iod is expired uide SOUND MAP yr mon day Warranty Period 1 year Paid Amount A MEDIA Co Ltd Smart Audio Future Audiopia ...

Reviews: