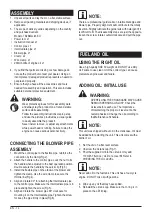
Sabre 4SISON BLB4QL-M Operator'S Manual Download Page 38

EN - 14

ASSEMBLY

1.  Unpack all parts and lay them on a flat, stable surface:

2.  Remove all packing materials and shipping devices, if 

applicable.

3.  The scope of delivery varies depending on the country 

and purchased variant:

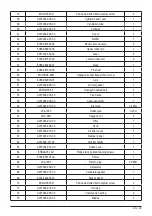
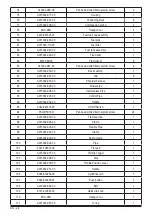
      Model of  BLB4QL-M-EU

 •  Power tool  x1

 •  Instruction manual  x1

 •   Control pipe  x1

 •   Intermediate pipe  x1

 •   Blower pipe  x1

 •   Clamp   x2

 •   Wire clamp   x1

 •  200ml bottle of engine oil  x1

4.  If you find that parts are missing or show damage do 

not use the product but contact your dealer. Using an 

incomplete or damaged product represents a hazard to 

people and property.

5.  Ensure that you have all the accessories and tools 

needed for assembly and operation. This also includes 

suitable personal protective equipment.

WARNING:

Wear protective gloves for this assembly work 

and always lay the product on a flat and stable 

surface while assembling.

Follow the assembly instructions step-by-step 

and use the pictures provided as a visual guide 

to easily assemble the product!

Never install, remove, or adjust any attachments 

while power head is running. Failure to stop the 

engine can cause serious personal injury.

CONNECTING THE BLOWER PIPE 

ASSEMBLY

1.   Mount the control pipe to the flexible pipe. reinforce the 

connection by the clamp(Fig.2).

2.   Attach the handle to the control pipe. Lock the nut to fix 

the handle when adjusted to the best operation position. 

Double secure the handle by the quick clip (Fig.3).

3.   Install the flexible pipe on the elbow of the blower and 

tighten the clamp. Use the wire clamp to secure the 

throttle line(Fig.4).

4.   Align and rotate 90° for attaching the Intermediate pipe 

to the control pipe. Make sure the Intermediate pipe is in 

place and tighten the screw (Fig.5).

5.   Align and rotate the  blower pipe 90° clockwise for 

mounting it on the Intermediate pipe. Tighten the screw 

for keep the pipe firmly in place(Fig.6).

NOTE:

There are professional guide rails on intermediate pipe and  

blower pipe. Properly alignment will contribute to the totally 

insertion. Slightly lubricate the guide rails with detergent if it 

is difficult to fit. The disassembly steps are just the opposite, 

loosen the screw, rotate counterclockwise and pull the pipe 

out.

FUEL AND OIL

USING THE RIGHT OIL

Use a high-quality SAE 30 weight oil. DO NOT use dirty 

oil. Failure to use clean oil of the correct type can cause 

premature engine wear and failure.

ADDING OIL: INITIAL USE

WARNING:

OVERFILLING THE CRANKCASE MAY CAUSE 

SERIOUS PERSONAL INJURY. Check the 

oil level before each use. The importance 

of maintaining the proper oil level cannot be 

overemphasized. Change the oil according to 

the Maintenance Schedule.

NOTE:

This unit was shipped without oil in the crankcase. Oil must 

be added before starting the unit. This unit comes with a 

bottle of oil.

1.  Set the unit on a flat, level surface.

2.  Unscrew the oil tank cap (Fig.7).

3.  Pour the supplied oil into the oil tank. Only add 

170ml(5.7 fluid oz.) oil. Do not overfill. Refer to 

CHECKING THE OIL LEVEL.

NOTE:

Never add oil to the fuel tank. This unit has a four-cycle 

engine. DO NOT mix oil with gasoline.

4.  Wipe up any oil that may have spilled.

5.  Reinstall the oil tank cap. Make sure the O-ring is in 

place on the oil fill plug.

WWW.SABREITALIA.COM

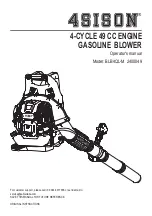
Summary of Contents for 4SISON BLB4QL-M

Page 1: ...e dell Operatore Per l assistenza clienti chiamare il numero 39 0444 977655 o inviare una e mail a service sabreitalia com ATTENZIONE PRIMA DI UTILIZZARE QUESTO SOFFIATORE LEGGERE QUESTO MANUALE E SEG...

Page 2: ...1 2 3 4 5 6 7 8 9 10 11 12 15 17 16 14 13 1 2 3 IT 2 WWW SABREITALIA COM...

Page 3: ...4 6 9 7 5 8 IT 3 ABREITALIA COM WWW S...

Page 4: ...1 4 5 6 2 3 1 2 3 4 1 2 3 10 11 13 15 12 14 IT 4 WWW SABREITALIA COM da mm 0 60 a 0 80 0 025 in 0 31 in...

Page 5: ...a Indossare protezioni per l udito Indossare una protezione per gli occhi visiera oppure occhiali Indossare una maschera antipolvere Indossare guanti protettivi Indossare calzature robuste e antiscivo...

Page 6: ...ne le istruzioni Acquisire familiarit con comandi e corretto uso dell unit 2 Non utilizzare questa unit se stanchi malati o sotto l influenza di alcool droghe o farmaci 3 Ispezionare l unit prima di o...

Page 7: ...appositi contenitori progettati e approvati per lo stoccaggio 2 Arrestare sempre il motore e lasciarlo raffreddare prima di riempire il serbatoio Non rimuovere mai il tappo del serbatoio del carburant...

Page 8: ...re e s se em mp pr re e i il l c ca av vo o d da al ll la a c ca an nd de el la a 1 10 0 U Ut ti il li iz zz za ar re e i il l s so of ff fi ia at to or re e s so ol lo o i in n o or ra ar ri i r ra a...

Page 9: ...sia spento e che tutte le parti in movimento siano ferme 25 Se si colpisce o si rimane impigliati con un oggetto estraneo arrestare subito l unit e verificare la presenza di danni Non utilizzare l uni...

Page 10: ...serire nulla nelle aperture dell aria nel tubo del soffiatore o nell ugello Non utilizzare l unit se le aperture o i tubi dell aria sono ostruiti da polvere lanugine capelli e qualsiasi altra cosa che...

Page 11: ...soffiatore fornite anche questo manuale 11 L unit progettata per soffiare materiale secco come foglie erba piccoli ramoscelli e pezzi di carta Non tentare di aspirare detriti bagnati e o acqua poich c...

Page 12: ...e revisionato 2 Lesioni e danni alla propriet causati da accessori rotti o da impatto improvviso di oggetti nascosti durante l uso 3 Pericolo di lesioni e danni materiali causati da oggetti volanti IN...

Page 13: ...lio Motore 170 ml Peso 8 8 kg 430x510x350 mm Dimensioni Imbragataura a Zaino Tappo Serbatoio Carburante Tappo Serbatoio Olio Motore Bulbo del Primer Impugnatura Avviamento Coperchio Filtro Aria Coperc...

Page 14: ...acceleratore Fig 4 4 Allineare e ruotare di 90 per fissare il tubo intermedio al tubo di controllo Assicurarsi che il tubo intermedio sia inserito posizionare e quindi serrare la vite Fig 5 5 Allinea...

Page 15: ...o Tenere scintille e fiamme libere a debita distanza dall area AVVERTENZA Rimuovere lentamente il tappo del serbatoio del carburante per evitare lesioni dovute agli spruzzi di carburante Non utilizzar...

Page 16: ...hi La protezione degli occhi deve soddisfare i requisiti ANSI Z87 1 e CE Per ridurre il rischio di lesioni associate all inalazione di polvere utilizzare una mascherina con filtro per le vie respirato...

Page 17: ...ALIA COM WWW S NOTA NOTA NOTA NOTA AVVERTENZA 5 Guardare nel foro di riempimento dell olio utilizzare una torcia a batterie se necessario Aggiungere olio dal foro di riempimento dell olio fino a quand...

Page 18: ...ta del cilindro Serrare la candela correttamente non stringere eccessivamente 7 Rimontare il cappuccio della candela e richiudere il coperchio candela PULIZIA Per evitare gravi lesioni personali spegn...

Page 19: ...gli sul riciclaggio Smaltimento della batteria difettosa o usata Scaricare la batteria azionando l utensile quindi rimuovere la batteria dall utensile Coprire i collegamenti della batteria con nastro...

Page 20: ...co a Marchio Livello pressione sonora 78 5dB A K 3dB A Livello potenza sonora misurato 93 3dB A K 1 92dB A Livello potenza sonora garantito 97dB A Livello Vibrazioni K 1 5 m s2 0 689m s2 Fascicolo Tec...

Page 21: ...IT 21 ESPLOSO RICAMBI WWW SABREITALIA COM...

Page 22: ...i carter motore lato avviamento 1 20 8202 986501 00 Rondella 1 21 8216 986501 00 Vite 1 22 8CA 32B Anello di tenuta 1 23 A037006 198 00 Paraolio 1 24 A073002 045 00 Rocchetto avviamento 1 25 A073002 0...

Page 23: ...rante 0 23m 57 8NA 05D Dado 2 58 A073002 012 00 Elemento filtrante 1 59 A015003 099 00 Pomolo filtro aria 1 60 A073002 010 00 Coperchio filtro aria 1 61 A073002 013 00 Ghigliottina chiusura aria 1 62...

Page 24: ...ensione e spegnimento 1 94 8SJJB50 16D Vite a brugola 24 95 A073002 033 00 Cavo di massa 1 96 A073002 056 00 Fascetta 1 97 A073002 025 00 Tubo flessibile 1 98 A073002 054 00 Fascetta 1 99 A073002 030...

Page 25: ...ENGINE GASOLINE BLOWER Model BLB4QL M 2400049 Operator s manual For customer support please call 39 0444 977655 or send email to SAVE THIS MANUAL FOR FUTURE REFERENCE ORIGINAL INSTRUCTIONS service sa...

Page 26: ...1 2 3 4 5 6 7 8 9 10 11 12 15 17 16 14 13 1 2 3 EN 2 WWW SABREITALIA COM...

Page 27: ...4 6 9 7 5 3 EN 8 WWW SABREITALIA COM...

Page 28: ...1 4 5 6 2 3 1 2 3 4 1 2 3 10 11 13 15 12 14 EN 4 0 025 in 0 31 in WWW SABREITALIA COM mm 0 60 a 0 80...

Page 29: ...t least 15 m away Wear hearing protection Wear eye protection Wear a dust mask Wear protective gloves Wear Sturdy non slip footwear Always use clean fresh unleaded fuel Refer to operator s manual for...

Page 30: ...attached and in the position recommended by the manufacturer Never allow children to operate the unit Teens must be trained accompanied and supervised by an adult Never allow adults to operate the uni...

Page 31: ...wear hearing protection and protective gloves to prevent ears and hands when operating this machine due to vibration and noise can cause personal injury If any foreign object is hit thrown or become...

Page 32: ...protection Eye protection should meet the requirements of EN 15503 To reduce the risk of injury associated with the inhalation of dust use a face filter mask in dusty conditions Wear heavy long pants...

Page 33: ...if any of the air openings or tubes are blocked Keep the air avoid serious injury do not operate the unit while on a ladder or a roof Keep hands face and feet away from all moving parts Do not touch o...

Page 34: ...le animals windows or automobiles Use extra caution when blowing debris near solid objects such as trees walls fences etc When possible blow away from such objects not toward them Take care when worki...

Page 35: ...hand refer to the Operation Instructions in this manual To reduce the risk of hearing loss associated with sound level hearing protection is required in the tank inside a building where fumes may reac...

Page 36: ...er tubes RESIDUAL RISKS Even if you are operating this product in accordance with all the safety requirements potential risks of injury and damage remain The following dangers can arise in connection...

Page 37: ...NOISE VIBRATION INFORMATION The declared vibration total value and the declared noise emission value have been measured in accordance with a standard test method and may be used for comparing one tool...

Page 38: ...ire clamp to secure the throttle line Fig 4 4 Align and rotate 90 for attaching the Intermediate pipe to the control pipe Make sure the Intermediate pipe is in place and tighten the screw Fig 5 5 Alig...

Page 39: ...oke while filling the tank Keep sparks and open flames at a distance from the area WARNING Remove the fuel tank cap slowly to avoid injury from fuel spray Never operate the unit without the fuel tank...

Page 40: ...without guard s in place Operate power equipment only at reasonable hours not early in the morning or late at night when people might be disturbed Comply with times listed in local ordinances Usual r...

Page 41: ...the engine is still warm The oil will flow freely and carry away more impurities 1 Unscrew the nut in oil drain hole Fig 12 2 Tip the unit vertically to pour the oil out of the oil drain hole and into...

Page 42: ...unit especially the air filter 5 Store the unit in a dry well ventilated place away from smoke open flames or sparks Store the unit out of reach of children and lock up it to prevent unauthorized use...

Page 43: ...ve or used battery pack Discharge your battery pack by operating your tool then remove the battery pack from the tool Cover the battery pack connections with heavy duty adhesive tape to prevent short...

Page 44: ...rand Sound pressure level 78 5dB A K 3dB A Measured sound power level 93 3dB A K 1 92dB A Guaranteed sound power level 97dB A Vibration level K 1 5 m s2 0 689m s2 Technical File and Certification carr...

Page 45: ...EN 21 PARTS VIEW WWW SABREITALIA COM...

Page 46: ...216 986501 00 Bolt 1 22 8CA 32B Circlip for hole 1 23 A037006 198 00 Oil seal 1 24 A073002 045 00 Start dial 1 25 A073002 061 00 Damping pad 2 26 A073002 019 00 Recoil Starter Handle 1 27 A073002 068...

Page 47: ...D Hexagon nut 2 58 A073002 012 00 Filter 1 59 A015003 099 00 Knob 1 60 A073002 010 00 Air filter cover 1 61 A073002 013 00 Damper panel 1 62 A073002 011 00 Air filter holder 1 63 A073002 014 00 Choke...

Page 48: ...16D Pan head slotted internal plum screw 24 95 A073002 033 00 Flameout line 1 96 A073002 056 00 Clamp 1 97 A073002 025 00 Flexible Pipe 1 98 A073002 054 00 Clamp 1 99 A073002 030 00 Spring clamp 1 10...

Reviews: