background image


24 


  The “GMT Offset” item is valid only when the setting 

of “GMT Usage” is “Yes”. You can 

press[Left/Right]keys to switch “GMT Offset” value, 

and the range is “-12:00 ~ +12:00”, increase each 

half hour progressively. 

  You can press [Left/Right] to control Summer time 

on or off.   

  “Date” and “Time” items are valid only when the 

setting of “GMT Usage” is “No”. You can press 

[Left/Right] keys to moving highlight and use 

number keys to input directly. 

  Press [MENU]key to draw back from “Local Time 

Setting” Menu. 


11.5  Timer   

Press [OK] key to open timer menu. 

  Current time information will display on the first 

column; if the current time is incorrect, please modify 

the time information in “Time” item. 

  Timer Number: You can press [Left/Right]keys to set 

Timer number, and there are 8 timers in total. 

  Timer Mode: There are several modes for Timer to 

setting, include Off, Once, Daily, Weekly and 

Monthly . 

  Timer Service: There are two options for “Timer 

Service”, include “TV Channel” and 

Radio Channel” 

(timer setting for channel change and 

Wakeup/Sleep) and "Record Radio" and "Record 

TV" (Timer setting for Record the TV or Radio 

program to USB Hard Disk) and Message (reminding 

message). 

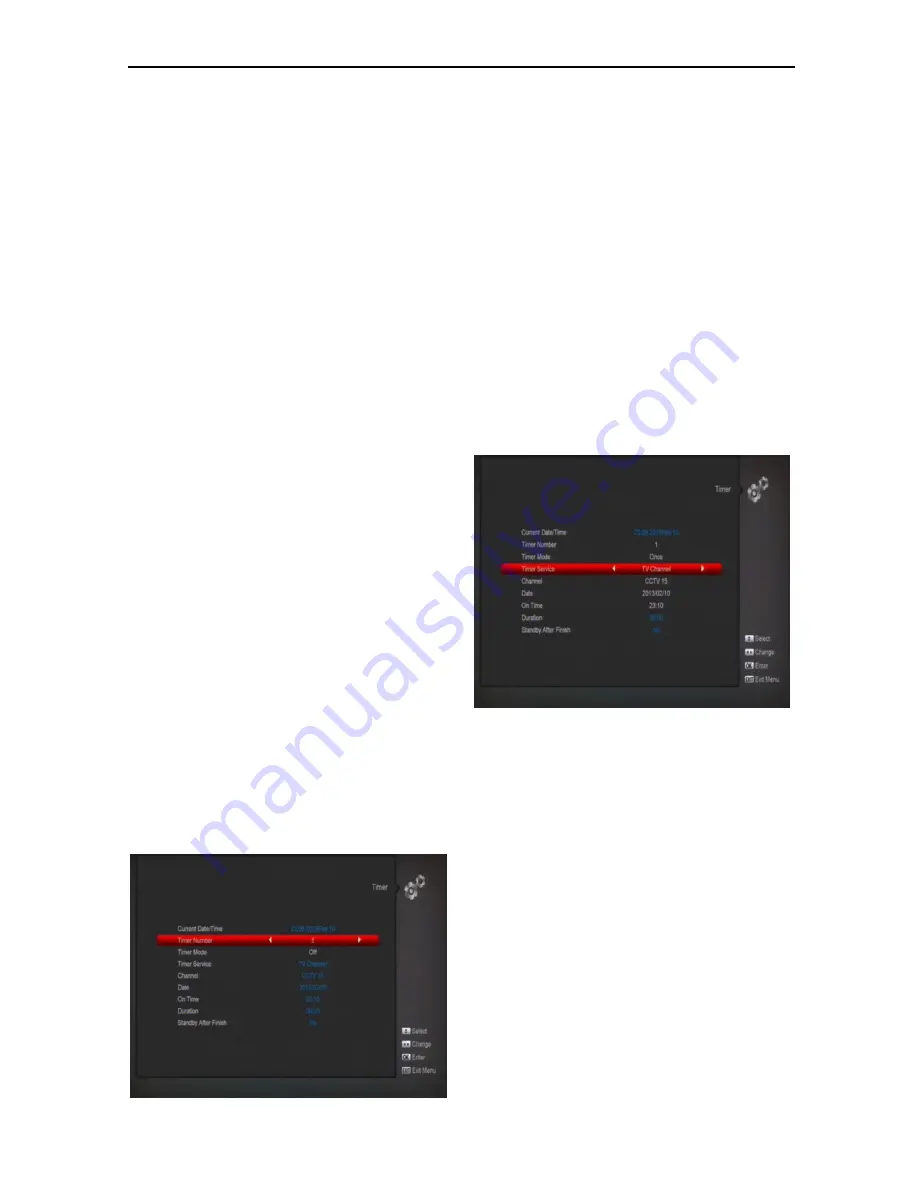
  When you select “Channel” (timer setting for channel 

change and Wakeup/Sleep) option in “Timer 

Service”, the screen will display like below: 


i. 

Channel: press [OK] key to enter channel list 

and select channel that you want to setting. 

ii. 

Date: use number keys to input your wakeup 

date. 

iii. 

On Time: use number keys to input your wakeup 

time. Once the time’s up, no matter what the 

system is in standby mode or in playing mode, 

the system will automatically switch to the 

channel you want and start to play.


iv. 

Duration: After you set a time for “Duration” item, 

once the time’s up, the system will automatically 

switch to standby mode. If you want not work this 

function, set the duration is 

00:00

  When you select “Message” (reminding 

message) option in “Timer Service”, the screen 

will display like below: 


v.  Wakeup Message: press [Left/Right] key to select 

reminding message as Birthday, Anniversary and 

General. 

vi.  Date, you can use number key to input your 

wakeup date. 

vii.  On Time: use number keys to input your wakeup 

time. Once the time’s up, no matter what the 

system is in standby mode or in playing mode, 

the system will automatically pop a reminding 

message. 

viii.  The message will always display on the screen, 

you can press [Exit] key to close it. 

ix.  Standby After Finish: You can press [Left/Right] 

to control the system is in standby mode or in 

playing mode after the record stopped. 

x.  Extend Record Time : Press [left/right] button or 

input the number using numeric keys to set the 

Summary of Contents for Titan III Combo HD

Page 1: ...MATION 11 8 12 EPG 11 8 13 TV RADIO 12 8 14 CHANNEL LIST 12 8 15 SLEEP 13 8 16 PAGE UP PAGE DOWN 13 8 17 TEXT 14 8 18 SUBTITLE 14 8 19 FIND 14 8 20 ZOOM 14 8 21 TV SAT 14 8 22 MENU 14 8 23 VIDEO FORMA...

Page 2: ...NDITIONAL ACCESS 29 12 1 CA SETTING 29 12 2 COMMON INTERFACE 30 13 MEDIA 30 13 1 RECORD 30 13 2 MOVIE 30 13 3 MUSIC 31 13 4 IMAGE 32 13 5 PVR SETTING 34 13 6 DISK MANAGE 34 13 7 REMOVE USB DEVICE SAFE...

Page 3: ...HE TV Disconnect the HD Receiver from the mains before connecting or disconnecting the cable from the satellite dish FAILURE TO DO SO CAN DAMAGE THE TV EARTHING The LNB cable MUST BE EARTHED to the sy...

Page 4: ...list editing True color On Screen Display OSD Full Picture In Graphic PIG function Electronic Program Guide EPG for on screen channel information Subtitle supported Teletext supported by VBI insertion...

Page 5: ...ft or right in the menu v KEY To change channels or to move cursor up or down in the menu PAGE PAGE To move up the cursor to the next or previous page in the menu or channel list REC Has different fun...

Page 6: ...rd files Stop To stop the Time Shift recording or MP3 JPEG player PAUSE Used to select the freeze function Press once to freeze the screen picture FB To start Fast Backward function FF To start Fast F...

Page 7: ...ram above for all possible connections of your receiver Do not connect the unit to the mains socket until all other connections have been made and checked LNB IN 13 18V 400mA MAX This port is to conne...

Page 8: ...ystem the receiver has been provided with RCA connector at the back of the receiver marked with AV OUT Connect an RCA cable from the AV OUT jack on the back of the receiver to the LINE AUX SPARE OR EX...

Page 9: ...list 2 Security Type WEP This product supports WEP 40 128bit ASCII and WEP 40 128bit HEX The security type of the Wi Fi and the product shall be set the same 3 Password When using the security type y...

Page 10: ...ls for technical service 3 You use the Dual LNB and you need Modify LNB Type 8 2 Power 1 Press Power Key can enter the Standby state 2 In Standby state press Power Key again can call back the unit and...

Page 11: ...key and modify the audio mode by press left right key 3 Mode Left Right Stereo Mono 8 11 Information In full screen press INFO key press INFO key and RED key can open information screen in the window...

Page 12: ...o record timer list directly by press REC button 6 In EPG menu press Exit to close EPG screen 8 13 TV RADIO In TV mode pressing TV RADIO key can switch to Radio mode In Radio mode press TV RADIO key t...

Page 13: ...channel will at the rear of channel list Lock Accumulated all locked channels and list in the last of TV Channel List Name A Z Sorting in Alphabetical Order ignore symbol Name Z A Sorting in Alphabet...

Page 14: ...ut and list the matched channel 3 Move highlight to OK and press OK key can close Find window and you can select channel from the channels list directly 8 20 Zoom 1 The ZOOM key allows you to magnify...

Page 15: ...hannel Down key and OK key to select the programs which you want to edit 2 You can press Page Up Page Down key to implement the Page Up Page Down function 3 You can use Red key to switch different Gro...

Page 16: ...Channel Down key and OK key 4 Lock the channel by press OK key Like the following picture Delete 1 Select the channels which you want to edit in channel list by press OK key or other select mode 2 Th...

Page 17: ...o the preferred position in Favorite List 5 Rename Select the desired FAV List by press FAV button using buttons to choose Rename mode and press OK button to display keyboard and rename it 6 Group Opt...

Page 18: ...tem Left Right key to switch Auto H V functions LNB Power In LNB POWER item you can press Left Right key to switch On Off functions TP Edit When you enter to TP Edit menu there will display the screen...

Page 19: ...ted TP Automatic Scan means blind scan It is no need existed TP info and NIT Search on off After you set up press OK key to start scanning 2 Press White key into the blind scanning immediately TP Scan...

Page 20: ...and satellite 5 Press Exit key to draw back to Main Menu 10 5 Terrestrial Installation Press OK key to enter the selected item 1 You can select the Bandwidth according different country 2 You can set...

Page 21: ...ns of languages include French English Spanish Russian German Greek Italian Portuguese Arabic Polish etc 2 First Audio Some channels have more than one audio language for choosing by this function you...

Page 22: ...lay but need to see a 4 3 full display picture System will force press wide screen picture to be narrow and there re black band on left and right site Auto means system won t do any aspect ration tran...

Page 23: ...g to your IP address 4 WiFi Manager Insert WiFi equipment first then search available Enter net signal input the password to connect with network 5 3G Network a When you inset the 3G dongle the screen...

Page 24: ...Wakeup Sleep option in Timer Service the screen will display like below i Channel press OK key to enter channel list and select channel that you want to setting ii Date use number keys to input your w...

Page 25: ...er you filled in 4 digital numbers the highlight will auto skip to Confirm Password and ask you to input the new password again If the password is correct the screen will show up a message of Saving D...

Page 26: ...select the Upgrade Mode and Upgrade File press OK button on Start item the receiver can upgrade automaticlly Note You must put the upgrade file on the ROOT DIRECTORY of the USB storage 11 8 2 Http Upg...

Page 27: ...the USB equipment 1 In Backup file you can press OK key to edit the file name Press Left Right button select USB A or USB B 2 In Backup to USB you can press OK to start backup software a Upgrade By S...

Page 28: ...default password is 0000 2 After you input the correct password there will show a warning message to inquiry you The operation will load default and erase all the channels that user added continue 3...

Page 29: ...r to use Receiver has build in smart card module with CONAX system By using cards in this system provided by operators it is possible to watch many scrambled channels coded in this system This menu sh...

Page 30: ...en detected by the receiver and is available now CI Message It is used to turn on or turn off the CI info display function by using buttons or OK button to select ON To display the CI info OFF Don t d...

Page 31: ...want to visit Then Press ok button to enter the music list In this menu you can select the MP3 file to play by press OK key or PLAY key Also you can setting the play list Red key Show play list as th...

Page 32: ...he beginning of file list if play is over 3 seconds or jump to previous file if play less than 3 seconds Press NEXT button to go to the next file Press FORWARD button to forward 4S Press BACKWARD butt...

Page 33: ...image operation menu if Image function is selected Red Key Move the selected file by press Red key and UP DOWN key Green Key Delete the selected file by press Green key Yellow Key Press Yellow Key wil...

Page 34: ...You can select the record type by press left right key 5 Jump Step You can select the jump time by press left right key 6 Record Path You can select the record path by press left right key 7 Timeshif...

Page 35: ...he USB disk speed 13 7 Remove USB Device safely Use this menu you can remove the USB Device safely 14 Application If you enter to the Application Menu you will see the picture like the below 14 1 Yout...

Page 36: ...y the top video These are top favorites top rated most views most recent and so on 9 Press FIND key in full screen to open the Find window You can press keys to move highlight and press ENTER key to i...

Page 37: ...ete current city Blue key To switch other temperature mode 14 4 Google Maps Inside the menu can browse Google Maps 14 5 FTP When connected to the Internet receiver can download some files such as soft...

Page 38: ...eft or right Channel Up Rotate clockwise Channel Down Faster drop OK Pause Play the game Exit Quit game and draw back to Game menu 15 2 Snake a Moving highlight to Setup and press left right key to se...

Page 39: ...he Time Shift info bar will displayed as the following picture 1 You can press button to pause the video 2 You can press or button to Fast Backward or Fast Forward 3 You can press or button to Slow Ba...

Page 40: ...4 You can press or button to Fast Backward or Fast Forward 5 You can press or button to Slow Backward or Slow Forward 6 Press left or right button to jump to different position then press OK button to...

Page 41: ...y Connected short circuit or open circuit The position of dish is aligned incorrectly Receiver is on but no picture or sound except the following messages NO TV program Channel is not available Channe...

Page 42: ...4 4 5 5 6 8 9 9 10 Tuner Type DVB T2 T C Input Connector IEC type Connector Female Frequency Range 47MHz 862MHz Input Level 82 0dBm and 20 0dBm Active ANT Power DC 5V at max 75 mA Overload protection...

Page 43: ...deo CVBS output Audio L R output IR 38Khz RS 232 Transfer rate 115 2Kbps 9 pin D sub Type LAN 100M USB Two USB 2 0 slot Compatible HDMI VER1 3 Type A PHYSICAL SPECIFICATION Size W H D 220 169 46mm Net...

Reviews: