background image

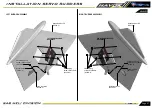
Number 1

Collar must be in

contact with the

lower part of the

landing gear

 22mm 

 9mm 

 32mm 

 38mm 

 26mm 

Number 2

S0242 CUT

Socket Head Cap

Screw M3x8mm

(HC050-S)

Flat Head Cap

Screw M3x10mm

(HC548-S)

Drill the holes following the drawing 

quotes, if necessary widen the holes 

until they match with fuselage holes.

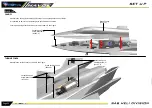
S0242 CUT

Socket Head Cap

Screw M3x14mm

(HC064-S)

Spacer

3D Printed

3D Printed

M3x30mm

(HC090-S)

[H0007-S]

S0242 CUT

[S0241]

BAG11

Page 36

REAR LANDING GEAR DOOR

Summary of Contents for Antartica M169 Havok

Page 1: ......

Page 2: ......

Page 3: ...lopments SAB Avio cannot be held responsible for issues arising with your model and will not provide support unless you register your serial number Thank you for your purchase we hope you will enjoy y...

Page 4: ...CONTRACT WARRANTY NEGLIGENCE OR STRICT LIABILITY Further in no event shall the liability of SAB Avio exceed the individual price of the Product on which liability is asserted As SAB Avio has no contr...

Page 5: ...scribed in the following chapters Each chapter provides you with the bag number you will need for that chapter The information is printed in a red box in the upper right corner of the page at the begi...

Page 6: ...ight Canard Vector BAGS LIST LANDING GEAR DOORS The system needs 3 micro servos 12x23 mm If you want to use the landing gear doors go to page 36 and check the assembly instructions In this case we sug...

Page 7: ...Connect the front Fuselage with the main Fuselage Align the two parts and tighten the screws If you decide to glue the 2 parts best rigidity it need to sand the 2 joining surfaces Washer HC184 Nylon...

Page 8: ...Cap Screw M3x6mm HC044 S Uniball M3 H0065 S Ball Linkage M3 H0402 S Linkage M3x50mm H0417 S Self Tapping Screw 3x12mm HC549 S Servo Spacer H0075 S SERVO ASSEMBLY Servo BAG2 Metal Servo Horn M3 Ball Li...

Page 9: ...SX S0219 S Canard DX S0220 S LINKAGE ASSEMBLED BAG2 Set Screw M4x6mm HC153 S Canard Arm S0108 S Uniball M3 H0065 S Uniball M3 H0065 S LINKAGE ASSEMBLED Washer 10x 16x1mm HC230 S Page 7 CANARD INSTALL...

Page 10: ...e is suggested Self Tapping Screw 3x12mm HC549 S NOTE A 2mm hole is suggested Servo Spacer H0075 S SERVO ASSEMBLY BAG3 It is suggested metal servo horn with M3 hole Uniball M3 H0065 S SERVO ASSEMBLY S...

Page 11: ...TOR LINKAGE ASSEMBLY NOTE Please allow plenty of time for the glue to cure before inserting plastic ball link onto the threaded rod Metal uniball M3 Thread rod M3x97mm Carbon Rod 3x 5x590mm Thread rod...

Page 12: ...Wing Wire Rudder Wire Rudder Wire Wing Wire NOTE Protect properly all cables from contact with internal frames Page 10 WING RUDDER WIRE INSTALLATION...

Page 13: ...Landing Gear Wire Servo Wire Servo Wire Landing Gear Wire NOTE Protect properly all cables from contact with internal frames Page 11 SERVO VECTO LANDING GEAR WIRE...

Page 14: ...Turbine Wire Fuel Pipe NOTE Protect properly all cables from contact with internal frames Page 12 TURBINE FUEL WIRE...

Page 15: ...S Self Head Cap Screw 3x10mm HC136 S BAG4 Fix the Tube 4 6mm inside the vector flange as shown in Figure 1 Hold in this position with the 2 Aluminum parts S0268 CONE S0080 S Alu Plate S0268 S Page 13...

Page 16: ...screws shoulder M3x20 HC082 S Finishing Washer M3 H0007 S Socket head cap screws shoulder M3x20mm HC082 S Finishing Washer M3 H0007 S NOTE Use loctice 243 glued in all screws Socket head cap screws M...

Page 17: ...pacer H0075 S Servo Servo Block H0392 S Socket head cap M2 5x12mm HC026 S Steering Servo Support S0075 S FRONT RETRACT GROUP ASSEMBLED S0085 S SERVO GUIDE ASSEMBLED Plastic Uniball H0403 S Plastic Uni...

Page 18: ...Loctite in all screws Washer 3 2x 6x0 5mm HC180 Washer 3 2x 6x0 5mm HC180 Socket Head Cap Screws M3x10mm HC056 S Washer 3 2x 6x0 5mm HC180 Washer 3 2x 6x0 5mm HC180 NOTE You can adjust the canopy Clam...

Page 19: ...under the surface to increase the tightness of the screws Self Tapping Screw 3x10mm HC136 S NOTE You can glue a small piece of wood under the surface to increase the tightness of the screws Self Tappi...

Page 20: ...The Following drawing shows a typical installation NOTE We recommend the most advanced possible positioning of the components to optimize the CG Page 18 COMPONENTS...

Page 21: ...ed to use 1 battery for the turbine 2 batteries for the RX system and 1 battery for Landing Gear System We recommend the most advanced positioning of the batteries to optimize the CG Option 2 is recom...

Page 22: ...S BAG6 The Following drawing shows a typical solution for kerosene aspiration NOTE After preparing of the tank check the absence of air leaks Breather M0038 Tigon Tube HC564 Fuel Tube Brass Tube Page...

Page 23: ...Socket head cap screws shoulder M4x40mm HC560 S Block Nut M4 S0234 S Main Tank BAG6 Socket head cap screws shoulder M4x40mm HC560 S Block Nut M4 S0234 S Page 21 TANK ASSEMBLY...

Page 24: ...ssembly centerdistance of your own turbine Use this dimensions to define the drilling position of the aluminum support Drill the red hole 5mm diameter NOTE We recommend installing the turbine the most...

Page 25: ...BAG7 Block Nut M4 S0234 S Socket Head Cap Screws M4x22mm HC104 S Glue the threaded nuts on the support It will be more easy to assembly disassembly the turbine Page 23 INSTALLATION OF THE TURBINE...

Page 26: ...ASSEMBLY Metal Servo Horn Suggested 2mm Hole This model has the possibility of having the aileron elevator control managed by a single servo or if you prefer having the two separate controls managed...

Page 27: ...er H0075 S Servo Servo Arm Servo Mount S0041 S BAG8 SERVO RIGHT WING ASSEMBLY x2 Socket Head Cap Screw M3x6mm HC044 S Flat Head Cap Screw M2 5x8mm HC125 S Socket Head Cap Screw M2 5x10mm HC022 S Nut M...

Page 28: ...25 S Servo Mount S0043 S Alu Servo Mount S0044 NOTE Use loctice in all screws Clevis M3 S0230 S Thread lock M3x55mm Plastic Uniball M3 H0403 S RIGHT SERVO RUDDER ASSEMBLY BAG9 Socket screw M2 5x8mm HC...

Page 29: ...0215 S Havok Rudder SX S0214 S RIGHT RUDDER ASSEMBLY RIGHT RUDDER SERVO ASSEMBLY Flat Tapping Screws M3x10mm HC548 S Socket Head Cap Screws M2 5x15mm HC136 S Socket Head Cap Screws M2 5x15mm HC136 S M...

Page 30: ...MAIN FUSELAGE ASSEMBLED RIGHT WING ASSEMBLED Wing Knob HC561 S BAG10 To secure the 2 wings in position use the 2 knobs code HC561 LEFT WING ASSEMBLED CF Washer Page 28 WINGS INSTALLATION...

Page 31: ...RIGHT RUDDER ASSEMBLED Socket Head Cap Screws Shoulder M3x16mm HC074 S BAG10 To secure the 2 Rudder in position use the 2 M3x16 screws LEFT RUDDER ASSEMBLED Page 29 RUDDERS INSTALLATION...

Page 32: ...ase its incidence as in figure Set minimum two flight conditions indicated in table below AILERON ELEVATORS CANARD SETUP LOW SPEED CONDITION HIGH SPEED CONDITION Deflection Exponential Deflection Expo...

Page 33: ...e rudder with 30mm external 50 mm internal The extra movment internal can be used for to create breake function Mix the rudder function with Vector function Angle Exponential VECTOR 25 0 Angle Exponen...

Page 34: ...the best connection Ensure positioning with the M4 front screw as shown in the Figure Socket Head Cap Screw M4x15mm HC103 S Drake Canopy S0217 S Socket Head Cap Screw M4x15mm HC103 S Drake Turbine Co...

Page 35: ...all parts Before the first flight do accurate check of CG position CENTER OF GRAVITY POSITION Set the Battery in order to get the correct position of the Center of Gravity CG shown The right CG posit...

Page 36: ...in landing gear box using epoxy If necessary adjust sand the parts until the door fit perfectly in the gear box Cut the gearbox wall following the servo slot Cut along the pre cut and get 5 parts Glue...

Page 37: ...5x20mm HC140 S LINKAGE ASSEMBLY x2 LINKAGE ASSEMBLY SERVO ASSEMBLY Self Head Cap Screw M2 2x6mm HC490 S Glue the door along the central wall Take care of the perfect alignment Be careful not to block...

Page 38: ...d Cap Screw M3x8mm HC050 S Flat Head Cap Screw M3x10mm HC548 S Drill the holes following the drawing quotes if necessary widen the holes until they match with fuselage holes S0242 CUT Socket Head Cap...

Page 39: ...or Arm Glue the braket with epoxy in the position showed below Glue the front landing gear door with epoxy Take care of the perfect alignment Be careful not to block the movement with the glue Uniball...

Page 40: ...ervo wing support 4 x Aluminum Servo Wing Mount 4 x Servo Spacer 8 x Socket Head Cap Screws M2 5x10mm 8 x Flat Cap Screws M2 5x8mm 2 x CF Servo rudder support 4 x Aluminum Servo Rudder Mount 4 x Servo...

Page 41: ...COMPONENTS SUPPORT S0238 S HAVOK REAR DOOR S0240 S 1 x Havok G10 Plate Components support 1 x SET Havok Rear Door HAVOK FRONT DOOR S0241 S HAVOK LINKAGE S0232 S HAVOK HARDWARE S0232 S 1 x SET Havok F...

Page 42: ...ITH PYLON S0080 S 1 x SET Wings Tank With Pylon 1 x SET Retract Group 1 x SET Landing Gear Wheels LANDING GEAR WHEELS S0085 S LANDING GEAR LEGS S0083 S 1 x SET Landing Gear Legs 1 x SET Wings Rocket W...

Page 43: ......

Page 44: ......

Reviews: