background image

15

MAiNTENANCE

WARNiNG:

When  servicing,  use  only  identical  replacement  parts. 
Use  of  any  other  parts  may  create  a  hazard  or  cause 
product damage.

WARNiNG:

Always wear safety goggles or safety glasses with side 
shields during inflator operation or when blowing dust. If 
operation is dusty, also wear a dust mask.

WARNiNG:

To  avoid  serious  personal  injury,  always  remove  the 
battery pack from the inflator when cleaning or perform-
ing any maintenance.

GENERAL MAiNTENANCE

Avoid  using  solvents  when  cleaning  plastic  parts.  Most 
plastics are susceptible to damage from various types of 
commercial solvents and may be damaged by their use. Use 
clean cloths to remove dirt, dust, oil, grease, etc.

WARNiNG:

Do not at any time let brake fluids, gasoline, petroleum-
based products, penetrating oils, etc., come in contact 
with  plastic  parts.  Chemicals  can  damage,  weaken  or 
destroy  plastic  which  may  result  in  serious  personal 
injury.

BATTERiES

The battery pack for this inflator is equipped with nickel-cad-
mium rechargeable batteries. Length of service from each 
charging will depend on the type of work you are doing.
The batteries in this inflator have been designed to provide 
maximum trouble-free life. However, like all batteries, they 
will eventually wear out. 

Do not 

disassemble battery pack 

and  attempt  to  replace  the  batteries.  Handling  of  these 
batteries, especially when wearing rings and jewelry, could 
result in a serious burn.
To obtain the longest possible battery life, we suggest the 
following:

  Remove the battery pack from the charger once it is fully 

charged and ready for use.

For battery storage longer than 30 days:

  Store the battery pack where the temperature is below 

80°F. 

  Store battery packs in a “discharged” condition.

BATTERY PACk REMOvAL AND PREPARATiON 
fOR RECYCLiNG

To  preserve  natural  resources,  please 
recycle  or  dispose  of  batteries 
 properly.
This product contains nickel-cadmium 
batteries.  Local,  state  or  federal  laws 
may prohibit disposal of nickel-cadmium 
batteries in ordinary trash.

Consult your local waste authority for information regarding 
available recycling and/or disposal options. 

WARNiNG: 

Upon  removal,  cover  the  battery  pack’s  termi-
nals  with  heavy-duty  adhesive  tape.  Do  not  at-
tempt  to  destroy  or  disassemble  battery  pack  or 
remove  any  of  its  components.  Nickel-cadmium 
batteries must be recycled or disposed of properly. Also, 
never  touch  both  terminals  with  metal  objects  and/or 
body parts as short circuit may result. Keep away from 
children.  Failure  to  comply  with  these  warnings  could 
result in fire and/or serious injury.

Only the parts shown on the parts list are intended to be 
repaired or replaced by the customer. All other parts should 
be replaced at an Authorized Service Center.
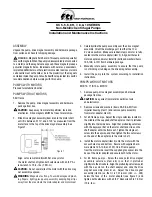
REPLACEMENT fUSE

See Figure 16.

A  fuse  has  been  supplied  with  the  inflator  to  replace  the 
inflator fuse when needed. 

  Remove battery pack from the inflator.

  Remove the current fuse and discard. 

  A  replacement  fuse  was  supplied  with  the  inflator.  

Use this fuse to replace the blown fuse. 

NOTE:

 Use only 0 amp JAT blade type automotive fuses 

for replacement.

Fig. 16

REPLACEMENT 

FUSE

FUSE  

HOUSING

Summary of Contents for P730

Page 1: ...to our high standard for dependability ease of operation and operator safety When properly cared for it will give you years of rugged trouble free performance WARNING To reduce the risk of injury the user must read and understand the operator s manual before using this product Thank you for your purchase BATTERIES AND CHARGERS SOLD SEPERATELY ...

Page 2: ...years HOW TO GET SERVICE Just return the power tool properly packaged and postage prepaid to an Authorized Service Center You can obtain the location of the Service Center nearest you by contacting a service representative at One World Technologies Inc P O Box 1207 Anderson SC 29622 1207 by calling 1 800 525 2579 or by logging on to www ryobitools com When you request warranty service you must als...

Page 3: ...to guard against flying fasteners and debris which could cause severe eye injury Do not wear loose clothing or jewelry Contain long hair Loose clothes jewelry or long hair can be drawn into air vents Do not use on a ladder or unstable support Stable footing on a solid surface enables better control of the inflator in unexpected situations TOOL USE AND CARE Do not force the tool Use the correct too...

Page 4: ...eck damaged parts Before further use of the infla tor or air tool a guard or other part that is damaged should be carefully checked to determine that it will operate properly and perform its intended function Check for alignment of moving parts binding of mov ing parts breakage of parts mounting and any other conditions that may affect its operation A guard or other part that is damaged should be ...

Page 5: ...and or serious personal injury Before using battery charger read all instructions and cautionary markings in this manual on battery charger battery and product using battery to prevent misuse of the products and possible injury or damage CAUTION To reduce the risk of electric shock or damage to the charger and battery charge only nickel cadmium rechargeable batteries as specifically designated on ...

Page 6: ...ction min Per Minute Revolutions strokes surface speed orbits etc per minute Wet Conditions Alert Do not expose to rain or use in damp locations Read The Operator s Manual To reduce the risk of injury user must read and understand operator s manual before using this product Eye Protection Always wear safety goggles or safety glasses with side shields and as necessary a full face shield when operat...

Page 7: ...e product to the nearest AUTHORIZED SERVICE CENTER for repair When servic ing use only identical replacement parts WARNING To avoid serious personal injury do not attempt to use this product until you read thoroughly and understand com pletely the operator s manual If you do not understand the warnings and instructions in the operator s manual do not use this product Call Ryobi customer service fo...

Page 8: ...ations DIGITAL Gauge The digital gauge measures and displays air pressure moni tors pressure output and is used to set pressure type HIGH PRESSURE HOSE The high pressure hose can easily inflate high pressure items like motorcycle car and bicycle tires HOSE STORAGE AREA The inflator has twin storage compartments located on each side of the inflator that allow easy storage of both hoses lock on butt...

Page 9: ... side shields when operating inflators Failure to do so could result in objects being thrown into your eyes resulting in possible serious injury WARNING Do not leave items to be inflated unattended while inflator is in use These items can burst and could cause serious injury APPLICATIONS You may use this inflator for the purpose listed below Inflating air mattresses sports balls tires floats and t...

Page 10: ... on until the battery pack is removed from the charger or charger is disconnected from the power supply If both yellow and green LEDs come on this indi cates a deeply discharged or defective battery pack Allow the battery pack to remain in the charger for 15 to 30 minutes When the battery pack reaches normal voltage range the red LED should come on If the red LED does not come on after 30 minutes ...

Page 11: ...epress both sides to release battery pack Remove battery pack from the inflator WARNING Improperly attached hoses or adaptors can become detached under pressure and cause serious injury Possible air leaks can cause faulty pressure readings Make sure all connections are tightly secured END CAP REMOVAL See Figure 5 To access the inflator hoses the end caps must be removed To remove the end caps turn...

Page 12: ...e switch trigger lock on button See Figure 7 The inflator is equipped with a lock on button for continuous inflating over extended periods of time The lock on button is located on top of the handle To lock on Depress the switch trigger Push the lock on button forward Release the switch trigger and the inflator will continue running To release the lock depress the switch trigger again INFLATING WIT...

Page 13: ...edle into sports ball valve and in flate Remove sport ball needle after inflation NOTE Pressure required for most sports balls is too low for accurate reading on gauge The Presta valve adaptor can be used for Presta valve stems as described below See Figure 12 Before inflating a tire with a Presta valve loosen the locking nut on the valve stem to inflate Once inflation is complete tighten the lock...

Page 14: ... been set pressure setting stays in the gauge memory for 120 seconds To recall the previous pressure setting for up to 120 seconds after infla tion press the or button To reset preset pressure press and hold the ON RESET button INFLATING MANUALLY FOR HIGH AND LOW PRESSURE APPLICATIONS Connect either high or low pressure hose to item to be inflated Depress and hold switch trigger until desired pres...

Page 15: ...attery life we suggest the following Remove the battery pack from the charger once it is fully charged and ready for use For battery storage longer than 30 days Store the battery pack where the temperature is below 80 F Store battery packs in a discharged condition BATTERY PACK REMOVAL AND PREPARATION FOR RECYCLING To preserve natural resources please recycle or dispose of batteries properly This ...

Page 16: ...ed below HOW TO ORDER REPAIR PARTS When ordering repair parts always give the following information MODEL NUMBER SERIAL NUMBER Ryobi is a registered trademark of Ryobi Limited used under license WARNING Some dust created by power sanding sawing grinding drilling and other construction activities contains chemicals known to cause cancer birth defects or other reproductive harm Some examples of thes...

Reviews: