


6
7
Russound MBX-AMP Installation Guide
Step 1. Connect your Loudspeakers to your MBX-AMP
Speakers connect to the MBX-AMP using two wires, a positive
(+) and a negative (-). Remove approximately 3/8" (10mm) of
insulation from the ends of both conductors of the speaker
wire and twist the bare wires of each cable tightly. Loosen the
right positive speaker terminal and insert the corresponding
bare speaker wire into the gap on the side of the terminal.
Tighten the terminal. Repeat for the right negative terminal
and then repeat the process for the left positive and negative
terminals.
Make certain that no bare cable strands touch any additional
speaker terminals or wires.
Step 2.
Insert the power cable into the rear socket of the MBX-AMP
and insert the other end into your AC wall outlet.
The MBX-AMP will take about 30 seconds to fully power
up. When ready, the front panel LED will illuminate either
green or yellow. Green means that a network connection
has been made and yellow means that the unit is ready but
not yet connected to a wired or wi-fi network. See below for
Network Connection information.
Step 3. Network Connections
The MBX-AMP requires a network connection in order
to use the Russound app or an XTS5.5 touchscreen for
system control. The network connection is also used for
accessing all streaming audio sources other than Bluetooth
or any connected USB drives. The MBX-AMP works with
Wired Ethernet connections (preferred) or with wireless
connections using Wi-Fi.
A. Wired Ethernet Connection (Preferred)
Connect an Ethernet cable from an open network port to
the port labeled “LAN” on the rear of the MBX-AMP. The
front panel LED of the MBX-AMP will turn green when the
network connection is successfully established.
B. Wi-Fi Connections
The MBX-AMP can also be connected to the network utilizing
Wi-Fi. There are four ways to configure the Wi-Fi settings.
The easiest method is using a phone/tablet to transfer
existing Wi-Fi settings.
Option B1 Recommended for all systems
The MBX-AMP can be quickly added to an existing Wi-Fi
network by utilizing the Google Home app. The Google
Home app is also used to configure the MBX-AMP for
Chromecast Built-in for Audio. If you do not yet have the
Google Home app on your device, download and install it
from the Google Play Store or Apple App Store.
Open the Google Home app and it will automatically
discover the MBX-AMP on your network. It will be listed as
“MBX-AMP-XXXX”, with XXXX being the last 4 digits of the
MAC ID of the MBX-AMP. This is done in order to make it
easier to identify multiple MBX devices when configuring a
large system in a home.
1. From the Google Home app, find your MBX-AMP either
on the main screen or under “Devices” and choose “Set Up”.
2. Choose a name for the MBX-AMP. The name you
choose will be name that is visible within the Russound
app and any other network based interface to identify the
MBX-AMP. There is a list of possible room names as well
as an option to use a custom name “Add a custom room”.
Sample Google Home screen
showing a newly discovered MBX-AMP
INSTALLATION
Russound MBX-AMP Installation Guide
INSTALLATION OVERVIEW
Important Considerations
1. Disconnect the power cord before making any wiring
connections to the MBX-AMP.
2. Verify that all connections and polarity are correct.
3. Keep all power cords away from all signal cables to prevent
humming caused by induced noise.
4. Label wires appropriately, on both ends of the wire run.
5. Avoid running signal cables close to house electrical wiring
for any distance. If you have to run them parallel, make sure to
space the wires at least two feet from the AC line. If you need
to cross an AC line it should be at a 90° angle.
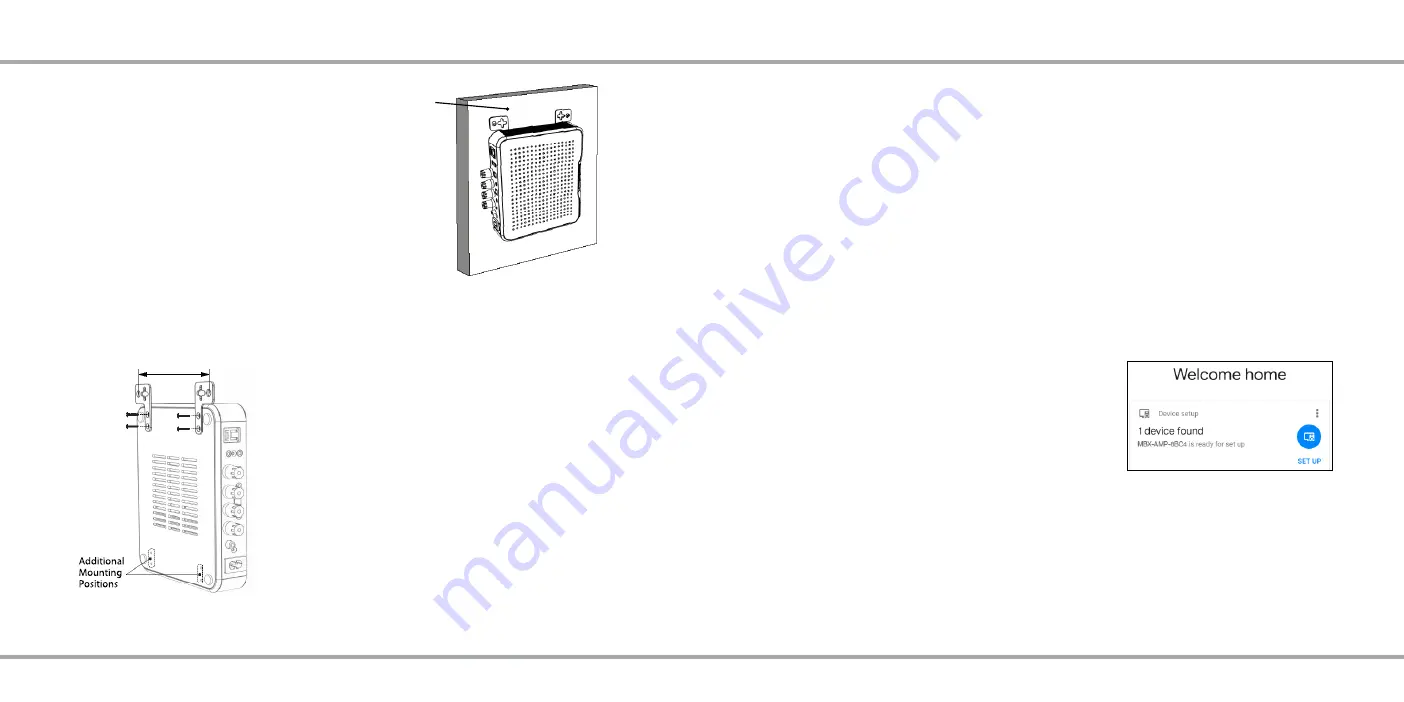
Mounting Options
The MBX-AMP can be mounted on a table-top or shelf, but
can also be wall-mounted using the included brackets or
mounted in a rack by using a 2U or larger rack shelf. A 2U
or larger rack shelf is required to assure that there is proper
ventilation and airflow above the unit.
The MBX-AMP can also be mounted into a structured wiring
can. When installed, the mounting brackets have a 6" on-
center separation between the mounting holes.
Note: If using Chromecast (Recommended), open your Google Home
app on your phone/tablet and follow the prompts to add your MBX-
AMP to your list of devices.
6"
Wall
When mounting the unit, mount it so that the brackets are at
the top and the MBX-AMP hangs from the brackets.