background image


The cabinet should be properly grounded. 

 Ventilation 

Requirements 

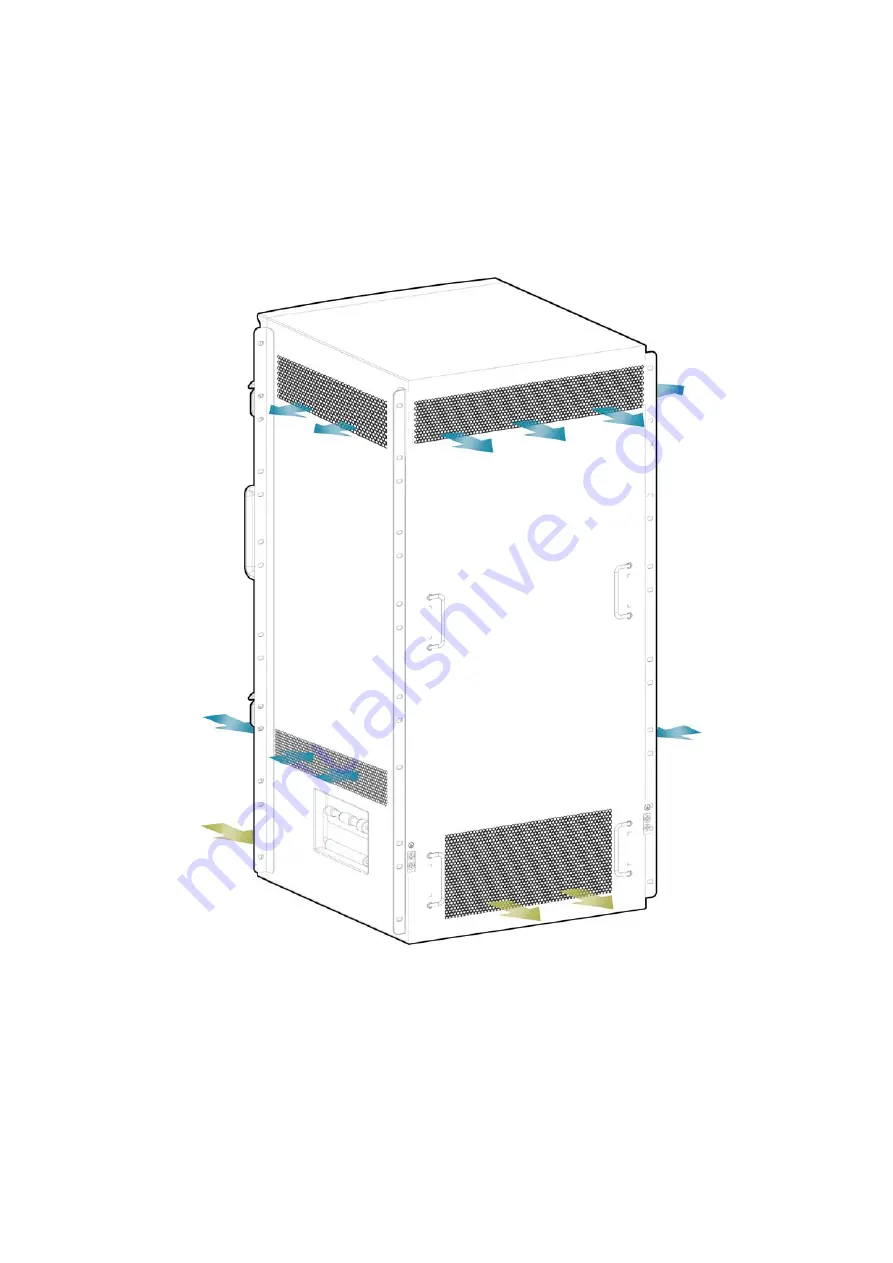
Figure 4-1 shows the ventilation of RG-S12000. You must ensure that sufficient spacing is 

reserved at the ventilation openings to ensure normal heat dissipation. After various cables have 

been connected, they should be arranged into bundles or placed on the cabling rack, to avoid 

blocking the air inlets. 


For RG-S12010 and RG-S12006 ventilation, refer to the following Figure 4-1, 4-2. 


Figure 4-1 Ventilation of RG-S12010 


Summary of Contents for RG-S12000 Series

Page 1: ...RG S12000 Series Switches Quick Installation Guide V1 22...

Page 2: ...ten consent of Ruijie Networks is prohibited are registered trademarks of Ruijie Networks Counterfeit is strictly prohibited Exemption statement This document is provided as is The contents of this do...

Page 3: ...ocuments Documents Description Configuration Guide Describes network protocols and related mechanisms that supported by the product with configuration examples Command Reference Describes the related...

Page 4: ...tion Requirements 8 Checking Before Installation 10 Fan 11 Power Supply 11 Specification 11 Precaution 11 System Grounding 11 Grounding Requirements 11 Grounding description 12 Rack grounding pole 12...

Page 5: ...rectly looking at the optical interfaces or fibers may damage your eyes Serial Interface Safety Warning Hot plugging in a serial interface may damage your terminal Please power off the terminal before...

Page 6: ...ngine modules and provides 4 service module slots Safety Precautions for Movement RG S12000 Series is large and heavy When you carry them please pay attention to the following requirements Remove all...

Page 7: ...damage you must pay attention to the following Proper grounding of the switch and floor Dust prevention measures are taken in the room An appropriate humidity is maintained Do not wear loose clothes...

Page 8: ...l fibers and distribution cables Connect the interfaces Ruler long tapeline marker pen Measure the installation position Common tools Bolts diagonal pliers straps Mount the chassis Anti static tool Pr...

Page 9: ...ent spacing is reserved at the ventilation openings to ensure normal heat dissipation After various cables have been connected they should be arranged into bundles or placed on the cabling rack to avo...

Page 10: ...not grounded reliably or the ground is wet Keep the switch away from wet or liquid Be aware of the emergent power switch in the room Once an accident occurs shut down the power switch Make sure that...

Page 11: ...bles to connect power modules The dust in the air may block the air outlet of an air filter after the air filter is used for a long time thus affecting system ventilation and heat dissipation It is re...

Page 12: ...bank Lightning prevention ground prevents lightning shock The lightning prevention system of general equipment is a separate system composed of lightning rod down conductor and grounding system Figure...

Page 13: ...ounding pole of the chassis The antistatic wrist strap jack is located on the front panel of the chassis marked with yellow ESD 4 The antistatic wrist strap is grounded well and the DC electric resist...

Page 14: ...d the Alarm LED is red Troubleshooting 1 Check if the supervisor engine gets loose If so install the supervisor engine again and ensure that it is inserted tightly before you tighten the fastening scr...

Page 15: ...Input delete config text Press Enter 5 The Are you sure you want to delete config text No yes is shown on the interface Input y and press Enter to delete it 6 Input dir to view current file configurat...

Page 16: ...connected to the receiving end of the other optical interface You can check by changing the sequence in which the two optical fibers are connected on the optical module 2 Check whether the optical mod...

Reviews: