


v
4
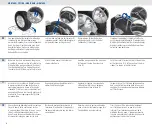
Eine geordnete Kette erleichtert die Montage.
Schieben Sie Ihre Kette mit dem orange
markierten Ringende (1) voran hinter dem Rad
durch. Der Ring (2) sollte danach nahe hinter
dem Reifen liegen. Greifen Sie beide Enden
des Ringes und ziehen Sie diese entlang der
Reifenlauffläche nach oben.
Make sure the chain is placed on the ground
in an orderly manner in order to facilitate the
fitting. Hold the orange cable end (1) and pull
the chain behind the tyre. Grab both ends of
the cable (2) and lift them up to the tyre tread.
Assicurarsi che la catena sia disposta a terra
in maniera ordinata in modo da facilitare il
montaggio. Impugnare il cavo all´estremità
arancione (1) e far passare la catena dietro al
pneumatico Afferrare le estremità del cavo (2)
e sollevarle fino a raggiungere il battistrada
del pneumatico.
Une chaîne neige démélée facilite le montage.
Placer d´abord, votre chaîne avec les fins
d´arceau orange (1) derrière la roue. L´arceau
(2) devra être positionné derrière prés du
pneu. Prenez les deux extrèmités des anneaux
et amener les le long du pneu vers le haut.
Jetzt werden die Teile des Verschlusses (3)
ineinander gehakt. Das Detailbild zeigt wie
der geschlossenen Seilring aussieht.
Attach the two ends of the cable (3) as
shown in the figure.
Agganciare le due estremità del cavo (3)
come illustrato nella figura.
Maintenant, encliquez les parties de la
fermeture (3) entre elles. L´image détail-
lée vous montre le cable une fois fermer
correctement .
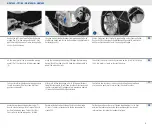
Nun im oberen Teil des Rades den
orangen Haken (4) in das Ende der
Seitenkette (5) einhängen.
Hook the orange hook of the side chain
(4) to one of the two free side chain
links (5).
Agganciare il gancio arancione della
catena laterale (4) ad una delle due
maglie libere catena laterale (5).
Désormais, dans la partie supérieur du
pneu, accrocher le crochet orange (4) á
l´extrémité de la chaîne latérale
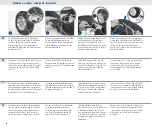
Schieben Sie den Ring (2) über die Lauffläche
nach hinten bis die Seitenkette (5) oberhalb der
Mitte der Reifenflanke liegt. Das kleine Bild zeigt
die nicht sichtbare innere Reifenflanke mit der
korrekten Lage des Ringes.
Push the cable (2) inside the tyre till the outside
of the side chain (5) is at the centre of the tyre
sidewall as shown in the illustration.
Spingere il cavo (2) all´interno del pneumatico
fino a che il laterale esterno della catena sia al
centro del fianco del pneumatico come indicato
nell´illustrazione.
Tirer l´anneau (2) de la bande de roulement
vers l´intérieur jusqu´à ce que la la chaîne
latérale (5) soit positonnée au dessus de la
moitié du flanc du pneu. L´image vous montre
la partie non visible de l´intérieur du pneu et le
positionement correct de l´anneau.
DE
EN
IT
FR
MONTAGE • FITTING • MONTAGGIO • MONTAGE
1
2
3
4


