background image

13

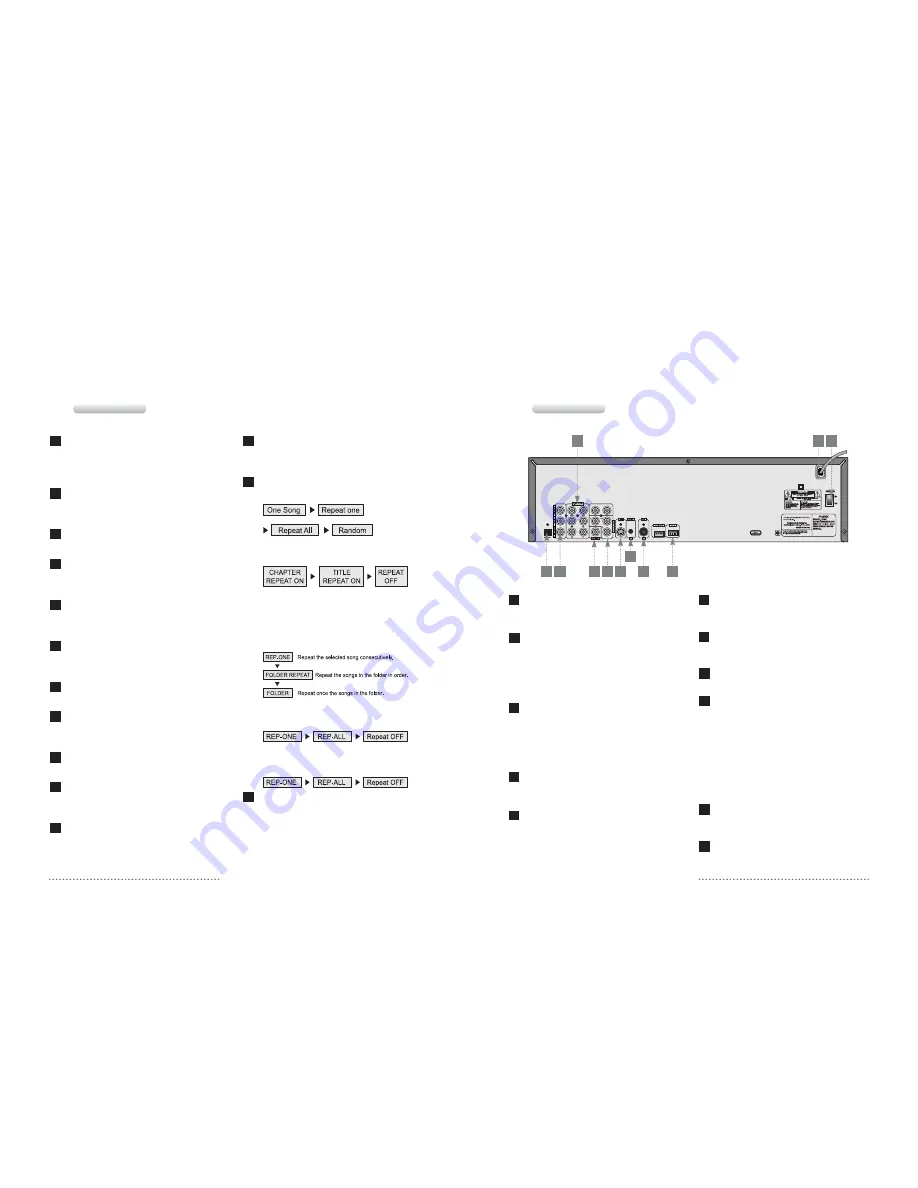
3.1 Name of Each Part

Power Input

Connect this power cord to the wall outlet of 110V
to 220V.

Optical Audio Output Terminal

Connect this terminal to digital amplifier which has
optical audio input terminal. In the case of DVD
and VIDEO CD, signal is output from this terminal
but no operation can be performed in the case of
Karaoke.

Coaxial Audio Output Terminal

Connect this terminal to digital amplifier which has
coaxial digital input terminal. In the case of DVD
and VIDEO CD, signal is output from this terminal
but no operation can be performed in the case of
Karaoke.

5.1ch Analog Audio Output Terminal

Connect this terminal to amplifier which has 5.1ch
analog input terminal.

Composite Video Output Terminal

Connect this terminal to composite input terminal
of TV or monitor.

Component Video Output Terminal

Connect this terminal to component input terminal
of TV or monitor.

S-Video Output Terminal

Connect S-video input terminal of TV to view a
superior image.

External Microphone input

It is connected to external wireless microphone.

USB Host

Ү

File playing when no disc

1. Connect USB memory stick.
2. SMART NAVI is displayed.
3. Select the file that you want to play.

Ү

File playing when the disc is playing

1. Connect USB memory stick and stop the disc

playing.

2. Press GOTO button and select USB DEV1.
3. Select the file that you want to play.

Remote In Terminal

Insert the remote sensor that is offered on option to
Remote In Terminal.

Power Switch

You can switch AC power on and off.

11

10

9

8

7

6

5

4

3

2

1

Rear Panel

2

4

1 11

3

5 6 7

10

8

9

3.1 Name of Each Part

Front Panel

12

Delete button 

It is for canceling the reserved songs.
If you want to cancel the reserved song, press the
song number and the press this button.

Pause button 

Press this button to pause the current playing. To
play again, press the Replay/Start button.

Open /Close button

Use when you open or close the tray.

Search button 

Use this button to scan the contents of disc rapidly
during replay DVD/Video CD/CD.

Skip button 

When play DVD, it skips the chapter. When play
VCD/CD, it skips the track.

Play/Start button

Press this button to play again from the pause
status.

Stop/Cancel button

Press this button to stop play.

Tempo button

You can speed up or slow down the song, when
play karaoke.

Volume button

You can adjust the volume up/down.

Key control button

To increase tone, press # button, to decrease
tone, press 

Ⱦ

button.

Copy button

This button is used for copying the discs.
(DVD/VCD/CDG/NEO+G)

MPX button

Use to select the audio output(left, right and
stereo). If the disc or song contains the contents.

Repeat button

Ү

Karaoke

: There are four kinds of modes.

Ү

DVD 

: Press this button while the disc is being

read.

You will have the options below at each time
you press the button.

Ү

MP3 

: You can use REPEAT function as follows

by pressing this button while the disc is being
read.

Ү

VCD 

: You can activate repeat only after you set

PBC off by pressing the PBC button.

Ү

CD 

: By pressing REPEAT during the playback,

you can repeat desired pieces as follows:

Mode button

This button is used for changing devices.
(HDD/DVD/USB)

23

22

21

20

19

18

17

16

15

14

13

12

11

10

Summary of Contents for HD 787

Page 1: ...t defeat the safety purpose of the polarized or grounding type plug 09 A polarized plug has two blades with one wider than the other 09 A grounding type plug has two blades and a third grounding prong 09 The wide blade or the third prong is provided for your safety 09 When the provided plug does not fit into your outlet consult an electrician for replacement of the obsolete outlet 10 Protect the p...

Page 2: ...rent from that to which the receiver is connected Consult the dealer or an experienced radio TV technician for help FCC Caution To assure continued compliance follow the attached installation instructions and use only shielded cables when connecting to other devices Also any changes or modifications not expressly approved by the party responsible for compliance could void the user s authority to o...

Page 3: ...ay ְ Keep away from water and magnets Keep the unit away from flower vases tubs sinks etc If liquids are spilled into the unit serious damage could occur Keep magnetic objects such as speakers at a distance from the player ְ Stacking Place the unit in a horizontal position and do not place anything heavy on it Do not place the unit on amplifiers or other equipment which may become hot ְ Condensati...

Page 4: ...nds for Digital Versatile Disc or Digital Video Disc is a storage media can be recorded as much as 135minutes video maximum 8 languages audio sound track and also record 32 languages subtitles It has MPEG 2 more than LD level video quality and Dolby Digital surround You can enjoy Home theater environments ְ Compatible Discs DVD Video CD CD CDG NEO G WMA MP3 can be played in this machine ְ Dolby Di...

Page 5: ...bit component signal to 10 bit signal and replays same as the original one Notes This unit is designed for home appliance with good appearance high quality function and userŖ s convenience also 1 1 Features Check and identify the supplied accessories Ӑ Remote Control Unit 1 Ӑ Batteries for remote control unit SizeŗAAAŘ 2ea Ӑ Video Audio Cable 3 Terminal 1 set Ӑ User s Manual 1 vol Ӑ Songbook 1 vol...

Page 6: ...tric shock ҮDo not install in the severe temperature change area If not It may cause fire electric leakage or electric shock ҮDo not plug the power cord before the installation Finished It will be caused fire or unit malfunction ҮDo not install under the direct ray of lights It will be caused electric leakage electric shock Also caused deformation or discoloration of the product ҮDo install TV set...

Page 7: ... from electric leakage ҮDo not unplug the power cord with cord itself use cord head It may cause fire electric leakage or electric shocks due to the power cord trouble ҮDo not utilize the damaged the power cord or the outlet is not fixed firmly It may cause fire electric leakage or electric shocks ҮDo not put the product on amplifier Also it may cause fire electric shock from the flame of the comp...

Page 8: ...ut numbers what you want Reserve button This button is used for reserving the next songs If you want to reserve the next song press the song number and then this button You can reserve maximum 99 songs 9 8 7 6 5 4 3 2 1 Front Panel 2 3 When Cleaning Unplug the power cord ҮWhen you clean the exterior of the unit Do not use water gasoline benzene or thinner Also do not spray Insecticide around the u...

Page 9: ...u can switch AC power on and off 11 10 9 8 7 6 5 4 3 2 1 Rear Panel 2 4 1 11 3 5 6 7 10 8 9 3 1 Name of Each Part Front Panel 12 Delete button It is for canceling the reserved songs If you want to cancel the reserved song press the song number and the press this button Pause button Press this button to pause the current playing To play again press the Replay Start button Open Close button Use when...

Page 10: ... the discs DVD VCD CDG NEO G Modify Display button ҮKaraoke To modify the song list registered ҮDVD VCD Press this button to display information of title or chapter 25 24 23 22 21 20 19 18 17 16 15 14 13 12 11 Remote Controller Power button This button converts standby mode and power on Mute button You will have mute on off alternatively at each time you press this button Open Close button Use to ...

Page 11: ...tereo If the disc or song contains the contents ҮDVD If the disc contains sequences recorded from different audio language the kinds of Audio appears showing the number of available audios and the audio being shown You can change the audio language if you wish ҮYou can select the vocal mode for VOB files in HDD Repeat button ҮKaraoke There are four kinds of modes ҮDVD Press this button while the d...

Page 12: ...ter Song numbers It displays the title chapter Song numbers of the disc which is running Microphone Music Level Meter It displays the levels of the microphone music volume Disc rotation It shows that the disc is running 4 3 2 1 3 1 Name of Each Part FND Display 1 4 3 3 2 3 1 Name of Each Part Remote Controller ...

Page 13: ...er via the VCR Connecting to a Audio Equipment ҮEnsure that the power switch of other equipment be connected is set to off before commencing connection ҮDo not block ventilation holes of any of the equipments so that air can circulate freely ҮRead the instructions before connecting other equipments ҮEnsure that you observe the color coding when connecting audio and video cables ҮSelect the appropr...

Page 14: ...gital bitstream is output from player s OPTICAL digital audio output connector When the player is connected to a Dolby Digital decoder you can enjoy theater quality audio in your home An OPTICAL digital audio cable optional is required when an optional Dolby Digital decoder is used Connecting to the Amplifier has 5 1ch Input 3 2 Basic Connection ...

Page 15: ...oder you will obtain the full benefit of Pro Logic from the same DVD movies that provide full 5 1 channel Dolby Digital soundtracks as well as from titles with the Dolby Surround mark When connecting the optical digital audio cable ҮConnect the terminal and cable exactly Connecting the audio output from the unit s optical digital audio output connector ҫ CAUTION for the OPTICAL digital audio outpu...

Page 16: ...or immediately Caution Warning ҮDo not use unauthorized batteries Do not mix old and new batteries The leak of electrolyte may cause the injury environmental pollution ҮDo not attempt to short circuit the leak of electrolyte may cause the injury ҮDo not attempt to disassemble or throw into fire or water The leak of electrolyte may cause the injury environmental pollution Prohibit ҮInsert the batte...

Page 17: ...CDs have Playback Control PBC which is a predefined playback sequence stored on the disc Audio CDs contain music TRACKs only You will recognize CDs by their logo 1 Playing a DVD Video Disc 2 Playing a Video CD 3 Playing an Audio CD The CDG is audio CD that is added the words of a song You can use like karaoke The NEO G is compressed CDG A DVD disc contains 1500 songs The disc is Automatically work...

Page 18: ...deo CD CD has more than one TRACK you can move to another CHAPTER or TRACK as follows Press ȞȞ during play to step forward to the next CHAPTER or TRACK Skip leftward while being played Press ȜȜ button to move to the current CHAPTER for DVD and to the initial position of the current track for VIDEO CD and CD When elapsed time of currently selected CHAPTER of track is less than 3 seconds it skips to...

Page 19: ...s ZOOM If in STILL mode move to the desired scene position by using the direction buttons To return to the normal size scene press ZOOM again ҫ Note The zoomed scene may tremble depending on the discs 6 Zoom DVD Video CD Press MENU button either at STOP and PLAY mode Press Ɗ or ƌ to choose items Press ENTER or PLAY buttons to carry out the function of selected item Press MENU to return to the MENU...

Page 20: ... button the song plays faster By pushing the TEMPO button the song plays slower The tempo varies by pressing each button 4 Tempo Control Press the song number using numeric buttons Press PLAY or ENTER buttons to start the song 1 Play Press STOP button while the song is playing This function cancels the song currently playing STOP button stops the current song being played Press STOP button in case...

Page 21: ...e state you should escape the HDD karaoke mode using mode or open button Automatically change to DVD player state using open button If you are on DVD player state you should change device using the mode button on remote controller and then you can select the HDD karaoke state 12 How to change the HDD karaoke operation If the disc contains chorus or singer songs which is divided into left or right ...

Page 22: ...y singer Virtual keypad Press the keypad button to use the virtual keypad 5 3 Special Operations ҮYou can enter the character by pressing enter and direction button ҮIf Press the play button the song is played and you can reserve ҮYou should go out this state by pressing stop or cancel button If you want to move the data of disc to HDD press copy button DVD VCD CDG NEO G 2 How to copy disc Insert ...

Page 23: ...button Select a desired setting by pressing Ɗor ƌ buttons and press ENTER button to apply it You can come out of the detailed settings page by pressing Ȝ button 5 3 Special Operations The function is only available with HDD Karaoke mode Various functions of the HDD Karaoke can be set as desired along with Karaoke INITIAL SETUP function Enter your PASSWORD Initial password is 0000 Displayed on the ...

Page 24: ... low volume at night You can adjust the Compression effect which being greater of smaller PRO LOGIC SETTING There are three modes of OFF ON Auto LPCM OUTPUT LPCM OUTPUT SETTING It uses the LPCM 48K LPCM 96K format of Audio data 6 2 DVD Initial settings Speaker settings DOWNMIX AUDIO CHANNEL COMPOSITION This allows you to have a proper Audio output when the Audio channel composition recorded in the...

Page 25: ... SETTING You can set the subdivision grades up to 9 levels Higher levels are for the adults PASSWORD SETTING You set a password Initial value is 3308 DEFAULTS SETTING You can restore the settings to initial state of purchase SMART NAV MP3 NAVIGATION MENU You set the MENU contents for MP3 Press SETUP button in stopped or playback state Point out the SETUP by Ɗ or ƌ buttons and press ENTER button Se...

Page 26: ...l is effective On Screen Menu lcons not displayed or only partially displayed on the TV Screen Insert the AC power plug securely into the power outlet Condensation has formed wait about 1 to 2 hours to allow the player to dry out This player cannot play discs other than DVDs Video CDs and CDs The disc may be dirty and may require cleaning Ensure that the disc is installed with the label side up En...

Page 27: ...ssification Description System Compatible Discs Input Terminal Output Terminal Power Supply Size Weight Karaoke Player DVD CDG NEO G Video CD 1 1 Video CD 2 0 PBC Function SVCD Audio CD MP3 CD MIC 10mV 600ѳ 2EA Video Out Terminal 1Vp p 75ѳ S VHS Y 1Vp p 75ѳ Video C 0 286Vp p 75ѳ Y 1Vp p 75ѳ Component Pb 0 7Vp p 75ѳ Pr 0 7Vp p 75ѳ Audio 2Vrms Supply Voltage AC 110V 220V 50 60Hz Power Consumption 30...

Reviews: