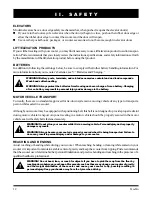
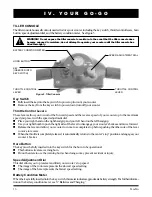
background image

16

Go-Go

TILLER CONSOLE

The tiller console houses all controls needed to drive your scooter, including the key switch, throttle control levers, horn

button, speed adjustment dial, and the battery condition meter.  See figure 5.

WARNING!  Do not expose the tiller console to moisture. In the event that the tiller console does

become exposed to moisture, do not attempt to operate your scooter until the tiller console has

dried thoroughly.

I V .   Y O U R   G O - G O

Key Switch

n

Fully insert the key into the key switch to power up (turn on) your scooter.

n

Remove the key from the key switch to power down (turn off) your scooter.

Throttle Control Levers

These levers allow you to control the forward speed and the reverse speed of your scooter up to the maximum

speed you preset with the speed adjustment dial.

n

Place your right hand on the right handgrip and your left hand on the left handgrip.

n

Use your right thumb to push the right side of the lever to disengage your scooter’s brakes and move forward.

n

Release the lever and allow your scooter to come to a complete stop before pushing the other side of the lever

to move in reverse.

n

When the throttle is completely released, it automatically returns to the center “stop” position and engages your

scooter’s brakes.

Horn Button

The key must be fully inserted into the key switch for the horn to be operational.

n

This button activates a warning horn.

n

Do not hesitate to use the warning horn when doing so may prevent accident or injury.

Speed Adjustment Dial

This dial allows you to preselect and limit your scooter’s top speed.

n

The image of the tortoise represents the slowest speed setting.

n

The image of the hare represents the fastest speed setting.

Battery Condition Meter

When the key is fully inserted into the key switch, this meter indicates approximate battery strength. For further informa-

tion on the battery conditon meter, see V. “Batteries and Charging.”

BATTERY CONDITION METER

HORN BUTTON

KEY
(INSERTED INTO
KEY SWITCH)

SPEED ADJUSTMENT DIAL

THROTTLE CONTROL
LEVER

Figure 5. Tiller Console

THROTTLE CONTROL
LEVER

Summary of Contents for Go Go

Page 1: ...In Style Performance Owner s Manual ATTENTION Please read the content of your owner s manual before operating your scooter Unit 106 Heyford Park Camp Road Upper Heyford Oxfordshire OX25 5HA www pride...

Page 2: ...pon yourown good judgement and or common sense as well as that of your provider caregiver and or healthcare profes sional Pride is not responsible for injuries and or damage resulting from any person...

Page 3: ...FETY 6 III SPECIFICATIONS 14 IV YOUR GO GO 16 V BATTERIES AND CHARGING 19 VI OPERATION 23 VII COMFORT ADJUSTMENTS 24 VIII DISASSEMBLY AND ASSEMBLY 25 IX OPTIONAL ACCESSORIES 28 X BASIC TROUBLESHOOTING...

Page 4: ...erature issued by Pride or contained on the Pride Scooter itself This owner s manual is compiled from the latest specifications and product information available at the time of publication We reserve...

Page 5: ..._______________________________________ Quick Reference Information Scooter Model ________________________________________________________________________ Serial Number _______________________________...

Page 6: ...es As you begin using your scooter during daily activities you will probably encounter situations in which you will need some practice Simply take your time and you will soon be in full and confident...

Page 7: ...mage GETTING ONTO AND OFF OF YOUR SCOOTER Getting onto and off of your scooter requires a good sense of balance Please observe the following safety tips when getting onto and off of your scooter n Pow...

Page 8: ...lowest speed setting to ensure a safely controlled descent See IV Your Go Go n Avoid sudden stops and starts When climbing an incline try to keep your scooter moving If you must stop start up again sl...

Page 9: ...slows the vehicle to near stop or when power is removed from the system for any reason WARNING Do not exceed the incline guidelines or any other specifications presented in this manual CORNERING INFO...

Page 10: ...driving surface avoid that surface STATIONARY OBSTACLES STEPS KERBS ETC Always approach a kerb straight on whether ascending or descending it See figures 3 and 3A WARNING Donotdrivenear raisedsurface...

Page 11: ...r scooter into and out of freewheel mode See IV Your Go Go WARNING Do not use your scooter in freewheel mode without an attendant present Personal injury may result WARNING Do not attempt to personall...

Page 12: ...d with a positioning belt this belt is not designed to provide proper restraint during motor vehicle transport Anyone traveling in a motor vehicle should be properly secured in the motor vehicle seat...

Page 13: ...cian if you are taking prescribed or over the counter medication or if you have certain physical limitations Some medications and limitations may impair your ability to operate your scooter in a safe...

Page 14: ...cm 30 5 cm 33 cm 16 40 60 cm 43 cm 17 19 48 25 cm 3 Wheel 94 cm 37 4 Wheel 99 cm 39 4 Wheel 109 cm 43 Turning Radius 3 Wheel 81 cm 32 Turning Radius Figure 4 Go Go Dimensions I I I S P E C I F I C A T...

Page 15: ...25 in Weight Capacity 113 kg 250 lbs Seating Standard Type Foldable Dimensions 43 cm 17 in width x 40 60 cm 16 in depth usable x 34 25 cm 13 5 in height usable Material Black Vinyl Optional deluxe sea...

Page 16: ...er to disengage your scooter s brakes and move forward n Release the lever and allow your scooter to come to a complete stop before pushing the other side of the lever to move in reverse n Whenthethro...

Page 17: ...freewheel lever while seated on the scooter or when the scooter is on an incline OPERATING THE MANUAL FREEWHEEL LEVER n Only put the scooter in freewheel mode when on a flat surface with the key remo...

Page 18: ...motor and electronics from damage n The main circuit breaker reset button pops out when the breaker trips n When the breaker trips the entire electrical system of your scooter shuts down n Allow a mi...

Page 19: ...te 6 When the batteries are fully charged unplug the off board charger power lead from the wall outlet and then from the charger power lead receptacle 7 Replace the charger power lead receptacle cover...

Page 20: ...afulldayofservice Werecommendthatyouchargeyourscooter sbatteriesfor8to14 hoursafterdailyuse n Ifyouuseyourscooteronceaweekorless chargeitsbatteriesatleastonceaweekfor12to14hoursatatime n Keepyourscoot...

Page 21: ...harged infrequentlycharged or storedwithoutafullchargemaybepermanentlydamaged causingunreliableperformanceandlimitedservicelife How should I store my scooter and its batteries See XI Care and Maintena...

Page 22: ...ries to be replaced Battery Replacement 1 Put the new battery or batteries back into the battery pack battery terminals facing up 2 Reconnect the two 2 battery leads to the battery terminals n Red lea...

Page 23: ...n Is your proposed path clear of people pets and obstacles n Have you planned your route to avoid adverse terrain and as many inclines as possible OPERATING YOUR SCOOTER Afterplanningyourroute n Set t...

Page 24: ...crements 1 Pull up slightly on the seat 2 Rotate the seat 90 or 180 to the right or left to the desired position 3 Lower the seat and be sure it is locked into position SEAT HEIGHT ADJUSTMENT The seat...

Page 25: ...hescooter removethekeyandplacethemanualfreewheelleverintherearward drive position 1 From the unlocked position see figure 12 lock the front wheel by pushing the tiller lock knob in and turning it cloc...

Page 26: ...iner See figure 15A 3 Remove the battery pack n The battery pack is held in place by a reusable fastener Use the battery pack handle to pull the battery pack up and away from the scooter See figure 13...

Page 27: ...5 Carefully lift the front section away from the rear section See figure 18 ASSEMBLY 1 Positionthefrontandrearsectionsofyourscooterasshowninfigure18 2 Alignthelower curved locking bracketsofthefronts...

Page 28: ...es contact your authorised Pride Provider Double Cane Crutch Holder Oxygen Tank Holder Walker Holder Safety Flag Rear Basket Front Basket Quad Cane Holder ALSO AVAILABLE BUT NOT SHOWN Single Crutch Ho...

Page 29: ...then reinsert the key n n n n n n n 7 Throttle trip Throttle potentiometer fault or speed potentiometer fault Call your authorised Pride Dealer for assistance n n n n n n n n 8 The scooter s motor is...

Page 30: ...ATURE Your scooter is equipped with an energy saving automatic power down timer feature designed to preserve your scooter s battery life If you mistakenly leave the key in the key switch but do not us...

Page 31: ...help the shroud retain its high gloss WIRING HARNESS n Regularly check the front to rear harness insulation for wear or damage n Have your authorised Pride Provider repair or replace any damaged conn...

Page 32: ...enders the guarantee void on that item NOT COVERED UNDER WARRANTY This guarantee does not extend to those items which may need replacement due to normal wear and tear tyres belts bulbs upholstery plas...

Page 33: ...Unit 106 Heyford Park Camp Road Upper Heyford Oxfordshire OX25 5HA www pridemobility com...

Reviews: