background image


 69/74 

Switch  on  again  the  meter  and  verify  that  the  initial  splash  screen  displays  the  new  firmware 
version. 
 
If  you  find  some  troubles  during  the  upgrade  procedure  or  the  meter  doesn't  upgrade  correctly, 
please  contact  our  Customer  Support  Department  at  (+39)0309198299  or  by  e-mail  at 
[email protected] 


Channel Plans upgrade 

 
The channel plans upgrade is very similar to what has been described in the section above. 
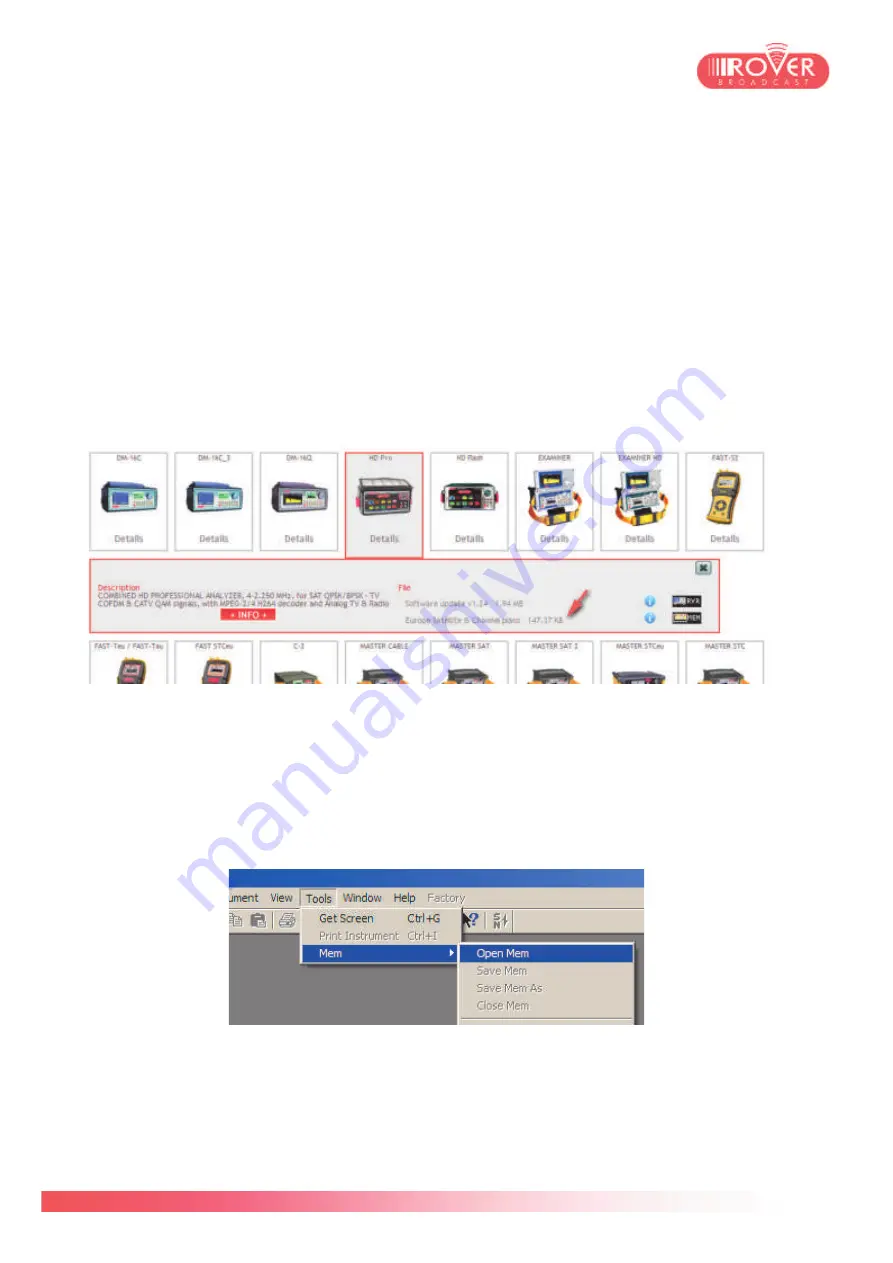
Once logged in into the Upgrade SW area and identified your meter, in the pop-up information box 
you'll find the available channel plans just under the firmware upgrade package: 


To  download  it  on  your  Personal  Computer,  click  on  the 

MEM

  icon.  Once  the  download  has 

finished,  connect  the  meter  to  your  Personal  Computer  via  the  USB-A  /  micro-USB  cable  and 
launch the S.M.A.R.T. software. 
 
In the toolbar, select the Connection command icon and once the meter is connected (you'll see 
meter's model, serial number and firmware version in the bottom status bar) go to 

Tools

 menu and 

select 

Open Mem

 function: 


Now  browse  your  PC  to  the  download  location  where  you  stored  the 

MEM

  file  downloaded  from 

corporate  website  and  confirm  the  selection  by  pressing  the 

Open

  icon  in  the  dialog  window 

appeared. 

Summary of Contents for HD PRO TAB

Page 1: ...HD PRO TAB User Guide Version 2 4 Released March 2014 ...

Page 2: ...2 74 Blank page ...

Page 3: ...ted on the invoice receipt 2 The guarantee covers the replacement free of charge of parts only when malfunctioning is solely due to manufacturing faults The faults must be indentified and defined by ROVER personnel only 3 The guarantee is void if a the equipment is tampered with or repaired by non authorized personnel b damage is found caused by the incorrect use of the equipment without following...

Page 4: ... the instrument is not under guarantee after repair the equipment will be returned by courier service with the amount to be paid by the customer shown on the invoice The guarantee does not cover compensation for direct or indirect damages of any kind to people or goods caused by the use of the equipment and or compensation caused by the suspension of use due to eventual repairs RO VE R Laboratorie...

Page 5: ...les and the point where they exit from the apparatus 10 Only use attachments accessories specified by the manufacturer 11 Unplug this apparatus during lightning storms or when unused for long periods of time 12 Refer all servicing to qualified service personnel Servicing is required when the meter has been damaged in any way such as the power supply cord or plug is damaged liquids or objects have ...

Page 6: ...6 74 Blank page ...

Page 7: ...t 42 9 1 Decoding the signal content 42 9 2 Streaming the content over IP and USB 45 Bar and Tilt Graph 46 10 1 Basic functions of the BAR GRAPH 46 10 2 LTE Interference Analysis 47 Performing Transport Stream Analysis 48 11 1 Introduction to the ASI analyzer 48 11 2 Transport Stream Template monitoring 48 11 3 TR101290 Analysis 49 11 4 Network Delay measurement 50 11 5 IP Layer analysis 50 Using ...

Page 8: ...0V 240V AC to 12 VDC Power Adapter Use AC DC power with DC cable shorter than 3m Composite A V cables A CD R containing the S M A R T application and its documentation Meter s USB driver and MIB file Warranty and After Sale Support information Note To maintain your eligibility for software upgrades register your product on the software upgrades page at www roverinstruments com 2 Right and Left pan...

Page 9: ...nd with an optical input along with one of the two other RF inputs available either 50Ω N connector or 75Ω F connector A specific Optical Measurement Interface will then be accessible in the Meter s Home page 3 4 Common Interface HD PRO TAB is equipped with a Common Interface slot compliant with EN50221 standard DVB CI capable to manage both consumer single service decryption CAM and professional ...

Page 10: ...the S M A R T software USB A connector supports the USB on the go standard to connect external USB drives suitable for Logger Test Drive and ASI Analysis data storage 3 9 Ethernet connector HD PRO TAB is equipped with a standard 10 100 Base T Ethernet connector supporting both DHCP and static IP configurations Through the IP interface is possible to stream one Elementary Stream selected among the ...

Page 11: ...meter 2 Switch on the meter and press the button until you hear a buzzer that confirms the restore defaults operation has been taken into account in meter s power on procedure Pressing the CONFIG button will display meter s basic parameters such as volume screen brightness and contrast ASI output status etc and gives the access to the complete configuration menu see the next chapter for detailed i...

Page 12: ...age conversely if the LED is OFF no DC supply is given by the meter MAINS and BAT CHRG are linked each other and depending on their status the meaning can be different Hereunder you can find a table that summarizes LED statuses and the corresponding meaning INSTRUMENT CONNECTED TO THE MAINS POWER SUPPLY LED MAINS LED BAT CHRG NOTES OFF NO OFF OFF Battery charged ON NO OFF OFF Battery operation OFF...

Page 13: ...utonomy between a minimum of 6 hours and a maximum of 10 hours depending on the following conditions LNB power consumption Single Dual or Quadruple External temperature with temperatures of less than 10 C 20 of the capacity is lost Age of the batteries a 10 loss in efficiency each year could be observed in case of frequent charge discharge Usage of battery saving and auto off functions that can sa...

Page 14: ... screen touching the bar on the right side of the cursor will increase the volume touching it on the left side of the cursor will decrease the volume Touching each parameter of the menu will result in entering the edition mode thus being able to change the parameter s value For ON OFF parameters touching the actual value will result in toggling it to its opposite ON OFF INT EXT etc Pressing once t...

Page 15: ...crypted service RF IN by default is set to N 50Ω It can be switched to F 75Ω to change the meter s RF input interface LTE FILTER by default is set to OFF LTE Filter is used in Spectrum Analysis and Measurement Interface to assure the Meter is capable to receive and decode correctly all TV signals even those near to the band above 800MHz allocated to the LTE carriers Scope of the filter is to simul...

Page 16: ...f after a certain inactivity period This parameter can be configured to OFF 5min default and 10 min UNIT it represents the measurement unit for RF level to be displayed in the measurement interface I can be configured to dBm dBµV and dBmV LANGUAGE HD PRO TAB has 6 embedded language maps that can be applied on the fly simply changing the selection here The available languages are ITALIAN ENGLISH FR...

Page 17: ...ercentage The 3 last digits 732 in the picture represents the estimated charge duration in minutes CALIBRATE TOUCHSCREEN this option activates the touch screen calibration function As soon as you select the option an empty screen with 4 small squares on the corners of the screen appears Touch each of them to calibrate the meter s touch screen After this operation the meter comes back to the Home s...

Page 18: ...18 74 ...

Page 19: ...d be set to both TERRESTRIAL ONLY or to TERR CABLE If set to Terrestrial Only it means that the Auto discovery function will look only for terrestrial DVB T T2 when set to Terr Cable the Auto discovery function will look also for DVB C channels FIELD STRENGHT is set to OFF by default It should be configured when the meter is used to perform field measurement campaigns using an external antenna Thi...

Page 20: ...Hz D I S Eq C 1 and D I S Eq C 2 could be set to A B C D and determines wich D I S Eq C will be assigned to the two satellites used in the Dual LNB mode Dual LNB by default is set to VARIABLE it can assume also the values 9 13 or 13 19 and 19 23 It determines the satellites couple to be addressed during the measurements on Dual LNB installations and on which is applied the D I S Eq C 1 and D I S E...

Page 21: ...TV configuration menu Selecting TV from the left menu will open the TV parameters configuration screen LNB L O is set to 0 by default It should be set to the desired value if it is necessary to down convert the signal frequency into the TV band VHF or UHF before starting the measurements C N TYPE by default is set to OUT BAND and can be also set to IN BAND or AUTO This parameter is used during Ana...

Page 22: ... allows the user to receive A V through a Unicast or Multicast IP stream The configurations to be set are 2 LAN IPTV which corresponds to the physical Ethernet interface of the board IP ADDRESS PORT which contains the IP stream configuration parameters This function requires a specific hardware option Please contact us for option availability and upgrade information ...

Page 23: ...is menu it is possible to verify if the CAM module inserted in the meter is powered up and responsive and also the CAM manufacturer and firmware version 5 8 DIAGNOSTIC This screen gives a summary on the status of the different meter s hardware and software modules Each module s status could be OK if it is working correctly or NOT OK if the module doesn t behave properly ...

Page 24: ... access the Transport Stream decoding function directly With this function is possible to see the list of services in the stream and decode both audio and video contents for the selected service This function is accessible also through the measurement interface The GPS function activates the embedded GPS receiver It is possible to visualize the quality of the GPS signal and the constellation of av...

Page 25: ...its 6 sections 1 Satellite tuning parameters here the user can find the frequency the modulation and the polarization parameters for the received satellite signal as well as the chosen satellite plan and transponder number Once the signal is locked the modulation type DVB S DVB S2 Single Multi stream DSS and Symbol Rate are automatically detected If the signal is Multi stream and the correct PLS h...

Page 26: ...tream Touching the screen over the Video will result in switching to the full screen visualization on the bottom of the screen the Video and Audio encoding information will be displayed Touching the screen on the Vpid and Apid row will result in switching to the MPEG SERVICE LIST screen see chapter 8 for detailed information Touching again the Vpid and Apid row the meter goes back to the measureme...

Page 27: ...ontextual menu is also possible to set change the value of the Local Oscillator in MHz and to access to the Channel Logger and the Visualize NIT functions The channel logger allows the user to visualize and record RF measurements for the tuned channel Depending on which is the selected time span from 30 min to 7 days the refresh speed of the diagram may vary It is also possible to save the logger ...

Page 28: ...lization plan to be used the terrestrial measurement interface appears The terrestrial measurement interface is composed by four screens In the first screen the basic measurement parameters are displayed At the top of the screen the user can find the channel tuning parameters Modulation type Channel bandwidth frequency and channel number In case the signal is received through a centralized distrib...

Page 29: ...s back to the measurement interface Touching the screen over measurement bars or pressing again the TV button on the keyboard will result in switching the view to the second measurement screen The second measurement screen contains the constellation diagram and the information related to the modulation parameters Code Rate FEC Constellation type etc Again the ZOOM function will let the user to mag...

Page 30: ...he filename and start logging the measurements The third measurement screen represents the SFN Echo diagram At the top of the screen the meter provides the channel tuning parameters along with the diagram type Distance or Delay modes and a marker which could me moved along the diagram either touching it over the grid or rotating the mechanical encoder over the keyboard The value displayed in the M...

Page 31: ...66 133 32k 448 224 112 28 532 266 Via the MENU contextual menu is possible to activate the micro echoes visualization this will result in a magnification of the diagram around the Guard Interval section and will visualize all detected micro echoes The fourth measurement screen visualizes the MER per Carrier This function allow the user to measure the MER value for each one of the carriers composin...

Page 32: ...als the marker is by default positioned at the center of the envelop Using the MENU contextual menu the user can select the number of carriers to be displayed specifying from which carrier to start to plot and at which carrier to stop In this menu is also possible to visualize the graph in normal spectrum view or reverse spectrum view Similarly to what has been described for the SAT measurements a...

Page 33: ...deo carrier level on the right side the A V content is automatically decoded and visualized Touching the screen over the measurement bar or pressing TV button on the keyboard will switch to the second screen On the left side three measurement bars appear RF Video carrier level signal to noise ratio and Audio to Video carrier ratio in case of stereo audio also the A V ratio for the second audio car...

Page 34: ...owing the user to appreciate the signal envelope and identify the different components video audio etc On the right side of the screen as usual the channel video is decoded in real time To access the other measurement pages the user can either press the TV or CATV button on the keyboard or press the SNR WFM and TXT buttons shown in the main measurement page see above picture In the SNR measurement...

Page 35: ...tent of the Teletext carried by the signal In the top menu using the mechanical wheel or selecting each parameter through he touch screen is possible to set the desired page the characters encoding EASTERN or WESTERN and the page visualization mode TOTAL which fits the entire Teletext page in the screen TOP which will zoom on the upper half of the selected Teletext page BOTTOM which will zoom on t...

Page 36: ...first for the RF measurements and A V decoding the second for constellation diagram and modulation parameters view To pass from the first to the second measurement screen the user should touch the screen over the measurement bars or press again the CATV button on the keyboard The HD PRO TAB provides other measurements for CATV networks such as the INGRESS TEST and LEAKAGE TEST to verify the confor...

Page 37: ...nt Entering the optical measurement interface will automatically toggle the view to the following Moving the selector over WAVELENGTH will let the user modify the value of the selected wavelength on which the meter will perform the measurement HD PROTAB is capable to receive the following wavelengths 1310nm 1490nm and 1550nm The power level provided by the meter can be stored as a reference touchi...

Page 38: ...38 74 BlankPage ...

Page 39: ...ing parameters and in addition the SPAN parameter which gives the user the possibility to increase or decrease graph s span around the measured signal Beyond the classical SPANs from 10 to 500MHz for satellite signals fro 1 to 500 MHz for terrestrial signals shown here under TER Span SAT Span is also possible to make special SPAN selections to visualize SAT extended spectrum Two modes are availabl...

Page 40: ...echanical encoder or touching the screen over the signal envelope It allows the user to make differential measurements on two points of a signal or two adjacent signals i e two transponders in the same bouquet Spectrum type Contours Full Picture This function allows to switch the analyzer view either on full picture as shown in the previous pictures or contours showing only the signal envelope Mar...

Page 41: ...to the Auto discovery function with which the meter will try to identify automatically the tuning parameters for the pointed digital carrier First of all the meter tries to determine the modulation type among those it can manage once the modulation has been identified the meter will determine in a certain range the exact center frequency of the carrier Last the meter will try to demodulate the sig...

Page 42: ...ed the Decoder starts scanning the Transport Stream to find the SI tables Service Information Tables containing all the information related to the Transport Stream s structure number of services list of PIDs Services names etc When all these information are available the meter visualizes the list of all the available services and for each of them displays the service type TV RADIO or DATA the encr...

Page 43: ...43 74 as shown in the following picture ...

Page 44: ...cts all the misc information about the selected service Service ID presence of Teletext and encryption status 7 Transport Information In the bottom status bar the meter displays the basic Transport Stream parameters TS ID Cell ID Network ID and Network name When the selected service is a Radio the video box will be empty while the Audio PID will be decoded and diffused by the two embedded stereo l...

Page 45: ...r can set up the IP parameters and select the services to be broadcasted over IP Pressing START will activate the IP transport to the configured IP address through an UDP unicast connection On a PC or any other IP capable device is possible to receive the stream and decode one of the broadcasted services The actual limit for outgoing streaming is 22Mb s It is also possible to record the Transport ...

Page 46: ...to determine the power distribution along the monitored band taking a certain number of carriers as reference and evaluating the average power level as well as the relative difference between two carriers Moving the PILOT 1 and PILOT 2 markers is possible to set the carriers on which the differential power measurement is performed in the bottom status bar the meter gives the TILT value power level...

Page 47: ... level thus compensate their interference During the test the embedded LTE Filter is always off to let the meter evaluate correctly the interferers magnitude and give the user the correct feedback about the real interference level If the test result is PASS then no LTE filter should be placed in antenna as the LTE level is not harming the TV reception conversly if the test result is MARGIN or FAIL...

Page 48: ...n external USB 2 0 device connected to the USB A port to be saved for future reference This function requires a specific hardware option and APP 11 2 Transport Stream Template monitoring To start the analysis function the user should touch the screen over the ASI ANALYZER icon or move the selector over the icon by rotating the encoder The following screen appears The page has three main sections 1...

Page 49: ...are intended for application dependent monitoring The alarm status led respects the following rules 1 Green LED no alarms detected so far 2 Red LED active alarm 3 Orange LED past alarm 4 Black LED alarm not available As soon as an alarm is detected the status led switches to Red and the corresponding counter is incremented the counter keeps trace along with the status LED of all the occurred alarm...

Page 50: ...ternal reference and the measurement statistics are shown Actual maximum and minimum Network Delay values are shown and updated each 5 10 or 30 seconds depending on the chosen refresh interval via the contextual menu The Graph has an auto scale function which let enlarge or compress the view depending on the MAX MIN values As for all the other meter s screens it is possible to take a snapshot of t...

Page 51: ...e first row the meter displays the channel plan based on which the auto discovery will be made by default the last used in the measurement interface To use a different one the user should enter the PLAN SELECT menu and choose the plan of interest File N parameter lets the user select the AUTO plan in which will be stored the measurement results LEVEL and POWER represent respectively the Analog Vid...

Page 52: ...mines on which channel plan the data logger will be executed This could be a standard SAT canalization a Manual memory plan or an auto memory plan The data logger could be done indirectly also on terrestrial plans via the auto memory function if we consider for instance the EUROPE plan this contains the generic channels distribution according to the EBU frequency planning Conversely this do not gu...

Page 53: ...Margin measurement a negative Noise Margin very low MER will result in a FAIL indication a NM value positive but near to zero will correspond to the MARGIN condition The PASS condition will then correspond to a good MER and positive Noise Margin values Note the PASS MARG FAIL indication isn t in relation with the LOCK UNLOCK status a FAIL quality status still means that the signal is locked and de...

Page 54: ...54 74 ...

Page 55: ...arameters the user can modify Once finished modifying the tuning parameters pressing SAVE will result in storing the new parameters in the selected canalization plan Add a new item via the functions ADD BELOW and ADD ABOVE In this case a pop up similar to the one used for editing will appear and the user will be able to insert manually the tuning parameters of the channel of interest Again selecti...

Page 56: ...or data logger and auto memory files The file manager s view is a list of all the files present on the meter among which the user can select the one to be renamed and or deleted RETURN will toggle the selector from the Action menu back to the files list EXIT brings the user back to the main MEMORY menu ...

Page 57: ...Satellite special functions let the user perform tests and measurements on particular dish configuration such as Dual LNB SCR or motorized dishes SAT SCR The Satellite Channel Router SCR is a special LNB with typically 4 or 8 RF outputs normally used in buildings centralized installations enabling the connection of up to 8 different receivers decoders to the same LNB Each User RF output is assigne...

Page 58: ...will tune on the first TP of each one of the selected plans and give the signal strength and Noise Margin values Di S Eq C MOTOR this function allows the user to control motorized dish moving the motor via Di S Eq C commands The control could be done using either the spectrum analyzer or the SAT measurement interface the meter provides the information about the current azimuth and the correspondin...

Page 59: ... measurement is also associated with a buzzer synthesizing a tone the intensity of which is proportional to the signal strength The better the noise margin is the higher is the tone This graph keeps also trace of the maximum Noise Margin value detected SAT POINT this function is a special view of the meter s spectrum analyzer in which the Max Hold is active by default and the RF Full Scale range i...

Page 60: ...ing known level The meter s attenuation test activated at another end of the distribution starts doing a frequency sweep to detect those carriers and record their frequencies and signal levels as reference calibration mode Once the calibration has finished the user could store those carriers in a special PLAN MANUxx that can be later recalled in the measurement interface to perform comparative mea...

Page 61: ...uzzer the intensity of which varies according to the magnitude of the difference between signal strength and that threshold INGRESS CATV Ingress test is typical of the cable TV distribution systems Its aim is to verify the quality of the CATV uplink path having a frequency band ranging from 4 to 66MHz In the configuration menu the user could define the test band s lower and upper frequency limits ...

Page 62: ... dielectric or coax with AIRSPACE dielectric To each cable type corresponds the V o P index Velocity of Propagation expressed in percentage from 1 to 99 that can be set in the MENU contextual menu once the cable type has been selected set this value using a known test cable varying the value until the displayed Distance equals the length of the test cable VERT POS which represents the RF level ref...

Page 63: ... a screenshot of the Meter actual screen and store it on the USB device If no USB device is connected this function is disabled Pressing the VOLUME button for 5 seconds will result in locking the Meter s keyboard and the following message will appear on the screen In this situation neither the keyboard nor the touch screen are enabled Press HOME to go back to normal operation ...

Page 64: ...round robin mode is available using the meter with the ROVER Test Drive desktop Application Test Drive function is accessible through the Special Functions menu after having selected the TV measurement interface The user should specify type Analog TV DVB T or DVB T2 and frequency of the signal as well as BW and in case of DVB T2 signal the desired PLP Measurement mode can be ALL meaning that the c...

Page 65: ...n looking at the number of samplings done and indicated by Tracking points Pressing again ENTER will stop the measurements and automatically toggle the meter to the HOME screen Now the file containing the tracked points has been saved on the USB dongle Unplug it from the meter and plug into your PC to retrieve the file and browse the recordings Using the ROVER Test Drive application it will be the...

Page 66: ...upgrade allows also to upload Canalization Plans file mem to manage the meter s internal memory MANU FILE AUTOMEMORY LOGGER etc and to export the data loggers in XLS format Once installed the S M A R T software will work in PRO version for a trial period of 30 days after which it will continue to work in STANDARD version To purchase the PRO license for your S M A R T copy please contact RO VE R Af...

Page 67: ...67 74 available files those files normally include firmware upgrade and or channel plans ...

Page 68: ...ect the Upgrade command icon and browse your PC to the download location where you stored the firmware upgrade package Once confirmed the selection by clicking on Open button the upgrade procedure will start automatically During this procedure you ll see the meter displaying the text BOOT MODE at the end the meter will be switched off automatically and the S M A R T User interface will display a p...

Page 69: ...p information box you ll find the available channel plans just under the firmware upgrade package To download it on your Personal Computer click on the MEM icon Once the download has finished connect the meter to your Personal Computer via the USB A micro USB cable and launch the S M A R T software In the toolbar select the Connection command icon and once the meter is connected you ll see meter s...

Page 70: ...ill confirm with a pop up message saying Plan Upload Successful Note the upload of a new channels plan starts with a memory clean up thus it will erase all existing standard and manual plans eventually present in the meter before uploading the new ones Please proceed to a backup of all your personal manual plans via the S M A R T File Manager before proceeding to the plans upgrade see S M A R T Us...

Page 71: ...71 74 Blank Page ...

Page 72: ...ion HW Serial number S NO NOTE model serial number firmware hardware versions are available in the start up screen and in the meter s information display in the configuration menu If the meter does not switch on you may find the meter s serial number on the label placed on the rear of the meter FAULT DESCRIPTION Using few but precise words please describe here below the fault found and forward to ...

Page 73: ...t return the meter without our authorization number RMA and RO VE R shipment instructions otherwise the meter will be rejected upon arrival at our premises To receive your authorization number dial 39 030 9198 299 ...

Page 74: ...74 74 ...

Reviews: