background image

Display Cabinet vertiCal

10

P/N 1011068 Rev. D 08/10

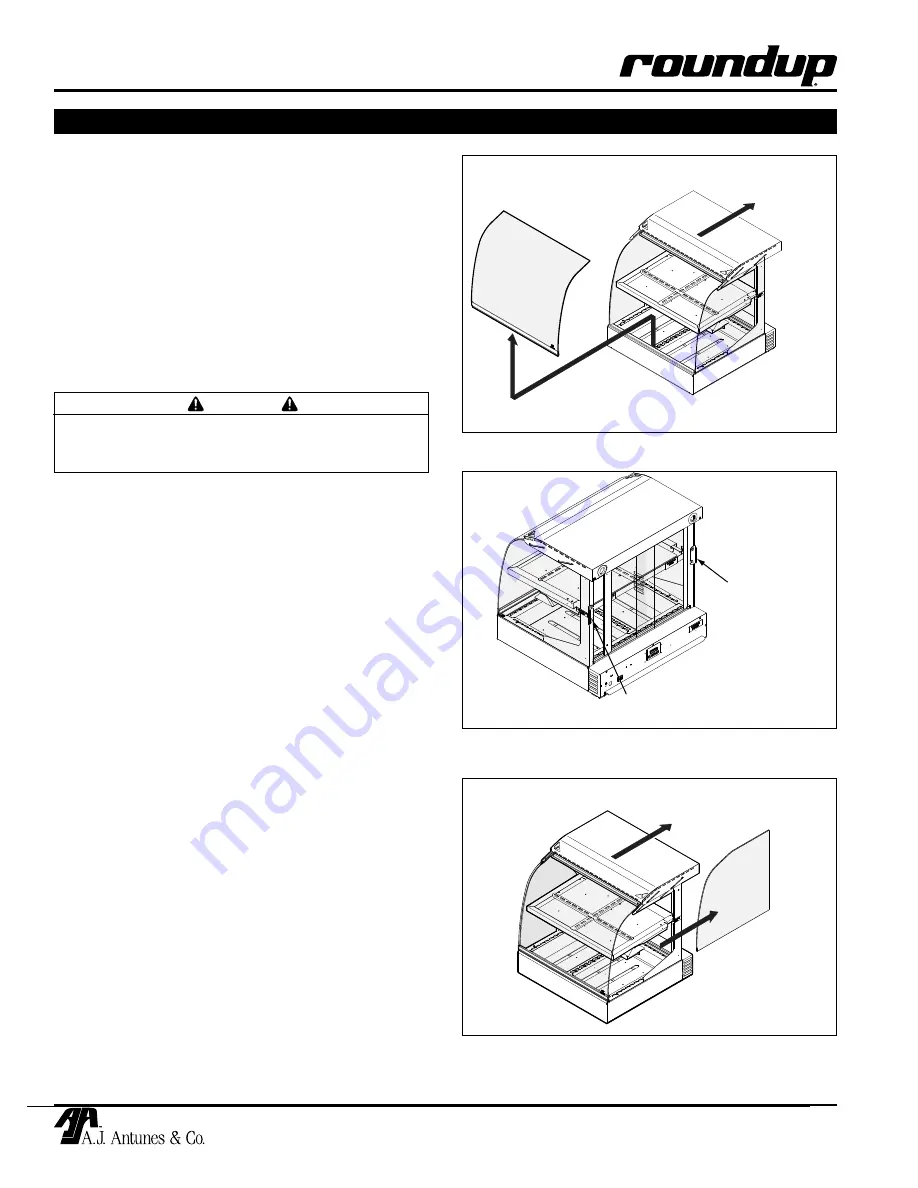
sIDe Glass replacement

  1.  turn the power off, unplug the power cord, and 

allow the unit to cool to room temperature.

  2.  slide the top cover back and up to lock it in the 

raised position.

  3.  flip the side glass Lockouts located on the rear 

of unit into the unlocked position (figure 6).

  4.  slide the side glass out by carefully pulling it to 

the rear of the unit. there are slots in the rear 

of the top cover that allow the side glass to be 

easily removed (figure 7).

  5.  Position the new side glass into the glass rail on 

the top cover and gently push fully forward.

  6.  flip the side glass Lockouts into the locked  

position.

  7.  Lift up the top cover and carefully slide it down 

onto the top of the unit.

caUtIOn

front Glass panel replacement should be per-

formed by two people to prevent damage to the 

glass.

Slide 

Top Cover

Up and Back

Lift and 

Remove 

Front Glass

Side Glass

Lockout

Side Glass

Lockout

Slide 

Top Cover

Up and Back

Slide Back 

Side Glass

figure 5. remove front Glass

figure 6. side Glass lockouts

figure 7. remove side Glass

maIntenance (continued)

frOnt Glass panel replacement

  1.  turn the unit off, unplug the power cord, and allow 

the unit to cool to room temperature.

  2.  slide the top cover back and up to lock it in the 

raised position (figure 5)

  3.  tilt the front glass Panel assembly forward on the 

Hinge base and remove it from the unit (figure 5).

  4.  insert the new front glass Panel assembly and 

ensure its fully seated in the Hinge base.

  5.  Lift up the top cover and carefully slide it down 

onto the top of the unit.

Summary of Contents for DCV-200

Page 1: ...P N 1011068 Rev D 08 10 Display Cabinet Vertical Model DCV 200 Owner s Manual Manufacturing Numbers 9500560 A S D L I S T E CM O I N NIT A T C T I S L US E D D L I S T E C US INTERTEK...

Page 2: ...this manual If the unit arrives damaged contact the carrier immediately and file a damage claim with them Save all packing materials when filing a claim Freight damage claims are the responsibility o...

Page 3: ...u have trouble locating your local Authorized Service Agency Service Technical Assistance If you experience any problems with the installation or operation of your unit contact your local Authorized S...

Page 4: ...eparate electrical lines pro tected by fuses or a circuit breaker of the proper rating Electrical ground is required on this unit Do NOT modify the power supply cord plug If it does not fit the outlet...

Page 5: ...for glass cleaning only If removed the glass should be placed on a flat surface cov ered with a soft cloth Use a clean soft cloth when cleaning the glass Do NOT use paper towels Use light pressure whe...

Page 6: ...olt Non locking Model Mfg No Width A Depth B Height C Operating Weight DCV 200CT 9500560 30 11 16 779 mm 29 3 4 756 mm 30 1 4 768 mm 141 lbs 64 kg Capacities DCV 200 Two 4 102 mm deep full size steam...

Page 7: ...rvice pay attention to the following guidelines Make sure power to the unit is off and the unit is at room temperature Do NOT block or cover any openings on the unit Do NOT immerse cord or plug in wat...

Page 8: ...66 C When the Temp Up button is pressed and held and provided that the unit is up to tempera ture the actual cabinet temperature is displayed When the button is released the Setpoint temperature is di...

Page 9: ...cord and allow the unit to cool to room temperature 2 Lift the outer door and pull the bottom edge out Repeat with inner door 3 Carefully place new inner door in guide followed by the outer door Cauti...

Page 10: ...over and carefully slide it down onto the top of the unit Caution Front Glass Panel replacement should be per formed by two people to prevent damage to the glass Slide Top Cover Up and Back Lift and R...

Page 11: ...ll display it on the console In this example the Setpoint temperature is 150 F 66 C HI flashes if the actual cabinet temperature exceeds the Setpoint temperature or if the thermistor has shorted NOTE...

Page 12: ...r s Loose burnt broken wiring in circuit Display flashes HI and the cabinet does not heat up Inoperable Thermistor Contact your maintenance person or Authorized Service Agency for service Inoperable C...

Page 13: ...13 Display Cabinet Vertical P N 1011068 Rev D 08 10 Wiring Diagrams...

Page 14: ...6 9 55 58 66 4 56 10 28 30 32 77 65 33 34 35 36 39 40 55 63 58 64 81 37 44 25 31 43 24 63 42 80 47 38 7 8 59 48 49 11 13 12 16 61 61 22 23 21 17 19 19 18 17 26 27 27 28 46 29 50 62 52 53 54 78 63 51 4...

Page 15: ...00320 Lower Track Back Door 1 40 0024636 Flange Back Door Bottom Weldment 1 41 7000136 Terminal Block 3 Pole Kit 1 42 0505904 Channel Wire 1 43 0021624 Support Right Side Weldment 1 44 0021623 Support...

Page 16: ...Light Bulbs Air Bulb Actuators Rubber Seals Rubber Feet Teflon Egg Rings Teflon Dampers Teflon Curtains Damper Support Springs This warranty does not cover damage to the Load Cell or Load Cell Assemb...

Reviews: