background image

24

Setup

Reader

V

iewer

Online

Preparation

Before using the LOG PC programs 

Setup

Reader

 and 

Online

, the following 

preparations must be completed:

• Use the USB connecting cable to connect the logger with the PC .
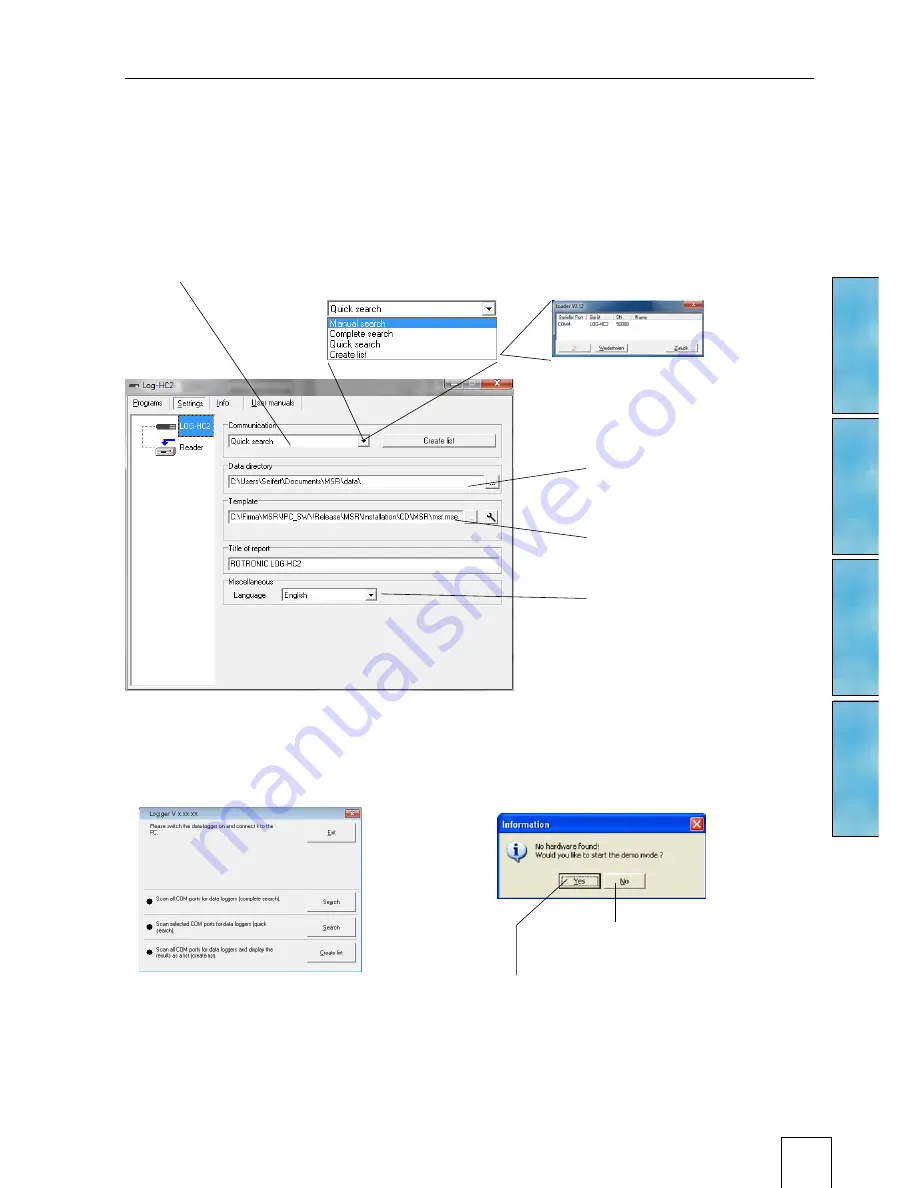
• Before first use: Using logger symbol open the logger program window, select 

Settings

 > 

Logger

 . 

• Select the rule by which the 

Setup

,

 Reader

 and 

Online

 programs are to search 

for the required logger* .


• Enter the path to the  

directory .

• See following page for 

template

• Select the required 

language . 

Logger program window

* One of the following windows will appear if a connection to a logger cannot be 

established using the current rule . 

During Setup:

Loader Dialog

Starts the  

Setup demo mode

Starts the

Loader dialog

(see screenshot left)

Summary of Contents for LOG-HC2

Page 1: ...Bassersdorf Switzerland Document code Unit LOG HC2 Universal datalogger User manual User manual Document Type Document title Page 1 of 60 2011 Rotronic AG EN M LOG HC2 V1_00 LOG HC2 Universal datalogg...

Page 2: ...ger operation 13 Indicator LED s 14 Maintenance 15 User checks 15 Cleaning 15 Charging the battery 15 Specifications 16 Defining the axes 16 Terminal assignment only LOG HC2 RO1 17 Operating transport...

Page 3: ...C2 Universal datalogger User manual User manual Document Type Document title Page 3 of 60 2011 Rotronic AG EN M LOG HC2 V1_00 Formatting the memory 40 Reader 41 Viewer 42 Online 48 Utility programs 50...

Page 4: ...orf Switzerland Document code Unit LOG HC2 Universal datalogger User manual User manual Document Type Document title Page 4 of 60 2011 Rotronic AG EN M LOG HC2 V1_00 Document releases Doc Release Date...

Page 5: ...User manual...

Page 6: ...Operating instructions Utility programs Additional software for PCs PC software Setup Reader Viewer Online Setup Reader Viewer Online Instructions...

Page 7: ...icates that equipment may suffer dam age or that there is a risk of injury to the op erator or user should the instructions not be followed correctly Conventions Term Symbol Description Example Logger...

Page 8: ...hat no fluids enter the logger s casing Fluids cause corrosion damage and short circuits inside the logger The logger must never be opened or modified The manufacturer cannot be held liable for damage...

Page 9: ...Instructions Operating Instructions LOG HC2 RO1 LOG HC2 P1...

Page 10: ...ements The integrated clock RTC allows data from as many loggers as required to be synchronised and merged into a single data record USB connection cable CD with LOG software Controls Indicator LED s...

Page 11: ...properties of the logger are determined using the Setup program Control of measurement parameter storage can be either time activated value activated or by pushing the push button See also chapter Lo...

Page 12: ...atically It can be switched on by means of T1 or T2 Record mode Data is recording or the device is waiting for start up immediate start pro grammed start time start on key press external start signal...

Page 13: ...ord stop Recording is stopped Timeout Timeout Timeout Timeout Menu 1 Select predefined groups Group indication 1 Group indication 2 Group indication 3 Group indication 4 T1 T1 T1 T1 T1 Last group indi...

Page 14: ...settings See the section Setup LED behaviour Meaning of the yellow lamp during charging LED Meaning yellow continuously Charging in progress yellow off Fully charged No connection to PC PC turned off...

Page 15: ...tives such as alcohol will cause the case to become matt and or brittle Clean the logger when necessary Always disconnect the logger from the PC or the power supply before clean ing Use a cleaning age...

Page 16: ...Instructions 16 Specifications See data sheets Defining the axes Y Z Z Y X X...

Page 17: ...rt Stop GND Ground Record Start Stop Alarm Output 1M Alarm Output 3 V VCEO 5 V I CMAX 100 mA GND BCR 142 GND GND REC 3 V 1M R2 GND P 0 2 5V AIN I MAX 40 mA R1 Pin Assignment 0 120 510k 470k 10 pol REC...

Page 18: ...on for the battery Humidity 10 95 relative humidity non condensing Avoid contact with water and humidity Battery charge level Never store the logger with a discharged battery The ideal charge level is...

Page 19: ...nnection cable Mains adapter Options Additional sensors Adapter for connecting further sensors Disposal Take the logger and the mains adapter to a municipal waste disposal centre or return it to Rotro...

Page 20: ...Setup Online Viewer Reader PC software 20 Setup Reader Viewer Online...

Page 21: ...tion you will require Windows administrator rights Insert the CD containing the LOG PC software into the computer s CD ROM drive The installation procedure starts automatically Completing installation...

Page 22: ...Version numbers of LOG PC programs Logger program window Starting the logger Software The logger software may be started by clicking on the logger symbol or via Start Programs LOG_HC2 X XX XX folder...

Page 23: ...23 Setup Reader Viewer Online Uninstalling The software is uninstalled via the computer s operating system Programs LOG_HC2 Uninstall LOG_HC2 System Requirements Windows 2000 XP Vista 7 USB port...

Page 24: ...gram window select Settings Logger Select the rule by which the Setup Reader and Online programs are to search for the required logger Enter the path to the directory See following page for template S...

Page 25: ...is in all display modes 1 Assign right hand axis and blue colour shades to temperature in Viewer 2 Save as template Bluetemp mse 3 Generate new templates for Reader and Online Select logger program wi...

Page 26: ...are transferred to the PC their filenames and their location Transfer only the most recent data record logged with the logger to the PC User defines which records are transferred to the PC Pre adjustm...

Page 27: ...Upon exiting Settings the PC saves the settings that were last entered Once entry of the settings is complete select Programs and start the required program Note The following instructions assume tha...

Page 28: ...e following subjects are dealt with in the Setup chapter Basic settings 29 Prediction 30 Reducing the volume of data 31 Conditional recording of measurement parameters limits 31 Setting the alarm limi...

Page 29: ...Acceleration values are measured at 3 200 Hz and saved at a frequency of approx 50 Hz following digital filtration Energy consumption increases for 50Hz 3200 Hz measurements Exit setup Read the inform...

Page 30: ...d is influenced by The number of sensors The measurement rate The battery capacity With each click on Prediction Basic settings the program generates an ap proximate prediction using the selected basi...

Page 31: ...if a certain measurement parameter drops below or exceeds a certain value When the alarm condition occurs the red LED flashes once per second until the data recording is stopped Inputting the alarm co...

Page 32: ...values in the Basic settings tab Set the cut in and alarm conditions in the Limits tab Use Write basic settings to transfer the basic settings to the logger Disconnect the logger just configured and c...

Page 33: ...gs tab and its sub menus will only be transferred to the logger after clicking Write user settings 2 Enter the name of the logger Enter date of last calibration and comment Check the checkbox in order...

Page 34: ...ematic Changing the basic unit see page 36 Changing the factory settings name unit display format This information is used for calibration purposes among others Calibration see page 37 Correction of t...

Page 35: ...b Gs User information Name Unit Display format Ya Ga Ys Oa Ya X Measurement value Gb Base amplification Ob Zero reference point Yb Reference value Yb Reference value Px Calibration points P1 and P2 Gs...

Page 36: ...nt Using the calculation assistant 6 enter the values for points P1 and P2 7 The program will then calculate the amplification and the zero point Activate Apply user information by checking the checkb...

Page 37: ...sub sequently entering the target value a Manual calibration First enter the actual value and then the associated target value for points P1 and P2 Activate the completed calibration by checking the...

Page 38: ...Select the desired channel e g analogue input A2 and then click Change dis play parameter Enter your adjustments 5 e g psi instead of Mbar To enter the conversion factor e g Mbar to psi the following...

Page 39: ...desired settings to the device by clicking Write user settings Defining the group indication Define which channels should be displayed together in one group indication un der Display Group indication...

Page 40: ...ger Formatting the memory CAUTION Formtting will erase all measurement param eters saved in the logger Formatting is used to delete all the measurement parameters saved in the log ger Formatting the l...

Page 41: ...Begin data transfer with Start The options selected under Settings Reader 26 influence the next steps Under the option Read selected records the following data entry dialog box appears Select the dat...

Page 42: ...File Open Traces on off Cross hair on off Lock axis Autoscaling Undo last change Switch between graphs tables and configuration X and Y values Cross hair 1 cross hair 2 The displayed Y value always r...

Page 43: ...tton held down Enlarge section Mark the required section with the left mouse button held down See also Graphics Fixed axis Cross hair Move axis Grab the axis move with left mouse button Move centre Gr...

Page 44: ...ecord File Use template then select the required tem plate mse Export Time window as text exports the meas urement parameters of the displayed time window in csv format The measurement parameters of t...

Page 45: ...me segment or range of values of the locked axes A further click releases the lock Auto scal clears all locked axes Calculation functions Using the two Crosshairs values can be measured on the X and Y...

Page 46: ...can insert texts at any place By clicking on you can activate and deactivate the text mode Insert text Click on The viewer displays Text 1 in the upper left corner Drag the text field to the desired p...

Page 47: ...to the displayed con figuration screen with Quit Configuration via Graph or Table Upon quitting the Viewer saves the configuration Undo the last changes Quit Configuration Configuration allows the di...

Page 48: ...lete the preparations 24 Start Online Online symbol Online Turn trace on and off Exits Online Stop A display Continue Continue The logger is current ly recording meas urement parameters Online display...

Page 49: ...ed template mse Once recording has finished by clicking on Stop the recorded measurement parameters can be saved via File Save as In the menu View the measurement parameters can be dis played as curve...

Page 50: ...50 CSV Concat Calc Cutter Utility programs...

Page 51: ...on creating csv files If a template mse exists for the data record in ques tion CSV takes this into account when creating the text file csv Example Opening a CSV text file with Excel Start the word pr...

Page 52: ...rogram window Tool Cutter Click on Start and select the data record from which the extract is to be created Select the time window Beginning End Select the sensors for which the measurement parameters...

Page 53: ...lations on the curve It is possible to open multiple data records 2 Create new curves From imported curves select the curve that you want to use for your calcu lations and drag it with the left mouse...

Page 54: ...ave Note The curves are saved as data records mrs The saved measurement parameters can be displayed and processed as a curve or as a table by the Viewer Intermediate values are interpolated Only curve...

Page 55: ...no Cosine of the number sin no Sine of the number tan no Tangent of the number ctg no Cotangent of the number arcsin no Arc sine of the number arccos no Arc cosine of the number arctan no Arc tangent...

Page 56: ...list must be in chronological order such that the oldest data record is at the top Therefore either open the oldest data record first or sort the list afterwards see below Sort the list alphabeticall...

Page 57: ...module and sensor names with the same units the calculation will be aborted and a corresponding message will appear in the status window If the module names sen sor names or units of the curves to be...

Page 58: ...58 FreeMat Additional software for PCs...

Page 59: ...to the PC From these data records msr CSV creates FreeMat files fmc Using the scripts included these can be opened and edited in FreeMat More information on FreeMat can be found at http freemat source...

Page 60: ...11 2011 LOG HC2 Firmware V1 12 LOG HC2 PC Software V2 00 60...

Reviews: