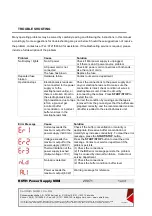
background image


TROUBLE SHOOTING


Many operating problems may be solved by carefully reading and following the instructions in this manual 

accordingly. Some suggestions for troubleshooting are given below. Should these suggestions not resolve 

the problem, contact us at Tel.: 0721/5606-0 for assistance. If troubleshooting service is required, please 

include a full description of the problem. 


Problem 

Cause 

Solution 

No Display / lights 

No AC power 

Check if Mini power supply is unplugged,  
or if there is an AC power source problem 

AC power cord is not 
connected


Check AC power cord connections at both ends. 
Use the correct cords.


The fuse has blown 

Replace the fuse 

Repeated fuse 
broken 

Hardware failure 

Contact our service department 

Operation stops  
 

Electrophoresis leads are 
not connected to the power 
supply or to the 
electrophoresis unit(s), or 
there is a broken circuit in 
the electrophoresis tank 

Check the connections to the power supply and 
on your electrophoresis cell to make sure the 
connection is intact; check condition of wires in 
electrophoresis unit. Close the circuit by 
reconnecting the cables. Press 

START/STOP 

to 

restart the run. 

High resistance due to tape 
left on a pre-cast gel, 
incorrect buffer 
concentration, or incorrect 
buffer volumes in the 
electrophoresis tank 

Correct the condition by making sure the tape is 
removed from the pre-cast gel, that the buffers are 
prepared correctly, and the recommended volume 
of buffer is added to the electrophoresis unit. 


Error Message 

Cause 

Solution 


Current exceeds the 
maximum output for the 
power supply (>400 mA) 

Check if the buffer concentration or molarity is 
appropriate. Excessive buffer concentration or 
molarity may increase conductivity. To clear the error 
message, press the 

START/STOP

 button. 


Voltage exceeds the 
maximum output for the 
power supply (>300 V) 

Press


the 

START/STOP 

button


to clear the error 

message. Contact our service department if the 
problem persists. 


Thermal limitation of the 
power supply reached 
(Output voltage <10 V) 

(1) Check the connections 
(2) If the 

Er3

 error message persists, the problem 

may be caused by internal fan failure.  Contact our 
service department 


No load is detected 

(1) Check the connections 
(2) Check the buffer condition / buffer level  


Power exceeds the 
maximum output (60 W)  

Warning message for reference  


ROTH Power Supply MINI 

2907.1 


1 unit 


Carl Roth GmbH + Co. KG 

Schoemperlenstraße 3-5 • 76185 Karlsruhe • P.O. Box 100121 • 76231 Karlsruhe 
Phone: +49 (0) 721/ 5606-

0 • Fax: +49 (0) 721/ 5606-149 • [email protected] • www.carlroth.com 

The company is a limited partnership with headquarters in Karlsruhe, reg. court Mannheim HRA 100055. Roth Chemie GmbH, with h eadquarters in Karlsruhe,  
reg. court Mannheim HRB 100428, is the personally liable partner. M

anaging Director: André Houdelet. Sales tax identification number: DE 143621073.    


ed 09/2021


Summary of Contents for MINI

Page 1: ...ully before operating this equipment 1 Read and follow the manual instructions carefully 2 Do not alter the equipment Failure to follow these directions could result in personal and or laboratory hazards as well as invalidate the equipment warranty 3 Use a properly grounded electrical outlet of correct voltage and current handling capacity 4 Disconnect from the power source before maintenance and ...

Page 2: ...ight of the power switch is on 3 WAIT at least 5 seconds after stopping a run before handling output leads or connected apparatus 4 ALWAYS make sure that your hands work area and instruments are clean and dry before making any connections or operating the power supply 5 ONLY connect the power cord to a properly grounded AC outlet Avoiding Damage to the Instrument 1 Do not attempt to operate the de...

Page 3: ...t into a municipal trash bin when this unit has reached the end of its lifetime To ensure utmost protection of the global environment and minimize pollution please recycle this unit Caution Warning Indicates a hazardous situation which if not avoided could result in death or serious injury Max voltage 500 V Max current 400 mA Max watt 120 W Encountering Problems Check the troubleshooting section C...

Page 4: ...multaneously saving both time and valuable bench space With a universal voltage rating the Roth MINI is also designed and constructed to the most rigorous safety standards This makes it an excellent choice for education or personal use FEATURES Compact size Power capacity Constant Voltage or Constant Current operation 1 V step voltage selection 1 mA step current selection Timer No load detection S...

Page 5: ...t Constant V or mA with automatic crossover During constant mode not adjusted parameters are automatically set to maximum Programs Manuell adjustable mode Constant Mode 2 step program editable 30 programs each with up to 6 steps editable Program Mode 2 step program pre assigned Pre assigned programs for different applications Typical running condition Mode Outlets parallel socket pairs 2 4 mm 5 4 ...

Page 6: ... 1 Before operation press MODE to set the parameters of Voltage Current and Time of Step 1 and 2 LED light indicates your current parameter For example if you are setting a value for Voltage the Voltage LED will be lit 2 Two step buttons are available for you to select the step and to check the parameters of voltage current and time of each step User will press STEP 1 and STEP 2 buttons mainly to ...

Page 7: ...example to operate under constant voltage adjust current to max before running constant voltage and vice versa 1 Adjust the output value by pressing the or button 2 After adjusting your constant mode output value switch to the other parameter and set it to maximum 3 Timer Setting After setting the current or voltage output value press MODE to switch to time setting mode then press key or key to ad...

Page 8: ...making sure the tape is removed from the pre cast gel that the buffers are prepared correctly and the recommended volume of buffer is added to the electrophoresis unit Error Message Cause Solution Current exceeds the maximum output for the power supply 400 mA Check if the buffer concentration or molarity is appropriate Excessive buffer concentration or molarity may increase conductivity To clear t...

Reviews: