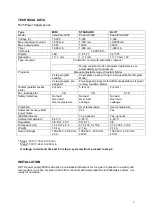
background image


TECHNICAL DATA 

Roth Power Supply series 


Step 1: 300 V / 16 mA / 30 min 

   Step 2: 300 V / 24 mA / 240 min 

   If voltage, current and time set 0 in step 2, system will not proceed to step 2. 
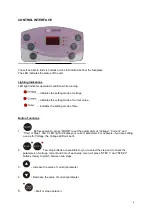


INSTALLATION 

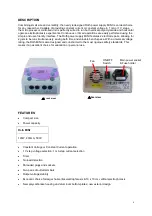
ROTH power supply MINI is actually a pre-installed instrument. As long as it is placed on a sturdy and 
level surface in a safe, dry place, and further connects with well-prepared electrophoresis system, it is 
ready for operation. 

Type 

MINI 

STANDARD 

BLOT 

Model 

nanoPAC-300P 

PowerPro300 

PowerPro3AMP 

Voltage (V) 

10-300 

5-300  

5-300  

Max. intensity of current 

1-400 mA 

1-700 mA 

10-3000 mA 

Max. output power 

60 W 

150 W 

300 W 

Timer 

1-999 min. 

1-999 min. 

1-999 min. 

Volt-hours 

49,995 kVh 

Display 

LED 

2,4“ TFT 

2,4“ TFT 

Resolution 

1 V, 1 mA 

1 V, 1 mA 

1 V, 10 mA, 1 W 

Type of output  

Constant V or mA with automatic crossover 


During constant mode not adjusted parameters are 
automatically set to maximum 

Programs 

Manuell adjustable mode (Constant Mode) 

2-step program 
editable 

30 programs, each with up to 6 steps editable (Program 
Mode) 

2-step program, pre- 
assigned* 

Pre-assigned programs for different applications (Typical 
running condition Mode) 

Outlets (parallel socket 
pairs) 

2 (4 mm) 

5 (4 mm) 

5 (4 mm) 

Min. load resistor 


0,1 


Safety detections 

No load 
Over load 
Over temperature 

No load 
Over load 
Leakage 

No load 
Over load 
Leakage 

Protection 

Over temperature 

Over temperature 

Automatic recovery after 
power failure 

Yes 

Yes 

IQ/OQ Protocols 

Yes, optional 

Yes, optional 

Ambient temperature 

4-40 °C 

4-40 °C 

4-40 °C 

Regulatory 

CE, ETL, FCC 

CE, ETL 

CE 

Dimensions (cm) 

14 x 19,1 x 8,4 

21,5 x 33,5 x 10,4 

21,5 x 33,5 x 10,4 

Weight 

1,0 kg 

2,1 kg 

2,1 kg 

Rated Voltages 

100-240 V, 50-60 Hz, 
2,5 A 

100-240 V, 47-60 Hz, 
200 W 

100-240 V, 47-60 Hz,  
410 W 

Summary of Contents for MINI

Page 1: ...ully before operating this equipment 1 Read and follow the manual instructions carefully 2 Do not alter the equipment Failure to follow these directions could result in personal and or laboratory hazards as well as invalidate the equipment warranty 3 Use a properly grounded electrical outlet of correct voltage and current handling capacity 4 Disconnect from the power source before maintenance and ...

Page 2: ...ight of the power switch is on 3 WAIT at least 5 seconds after stopping a run before handling output leads or connected apparatus 4 ALWAYS make sure that your hands work area and instruments are clean and dry before making any connections or operating the power supply 5 ONLY connect the power cord to a properly grounded AC outlet Avoiding Damage to the Instrument 1 Do not attempt to operate the de...

Page 3: ...t into a municipal trash bin when this unit has reached the end of its lifetime To ensure utmost protection of the global environment and minimize pollution please recycle this unit Caution Warning Indicates a hazardous situation which if not avoided could result in death or serious injury Max voltage 500 V Max current 400 mA Max watt 120 W Encountering Problems Check the troubleshooting section C...

Page 4: ...multaneously saving both time and valuable bench space With a universal voltage rating the Roth MINI is also designed and constructed to the most rigorous safety standards This makes it an excellent choice for education or personal use FEATURES Compact size Power capacity Constant Voltage or Constant Current operation 1 V step voltage selection 1 mA step current selection Timer No load detection S...

Page 5: ...t Constant V or mA with automatic crossover During constant mode not adjusted parameters are automatically set to maximum Programs Manuell adjustable mode Constant Mode 2 step program editable 30 programs each with up to 6 steps editable Program Mode 2 step program pre assigned Pre assigned programs for different applications Typical running condition Mode Outlets parallel socket pairs 2 4 mm 5 4 ...

Page 6: ... 1 Before operation press MODE to set the parameters of Voltage Current and Time of Step 1 and 2 LED light indicates your current parameter For example if you are setting a value for Voltage the Voltage LED will be lit 2 Two step buttons are available for you to select the step and to check the parameters of voltage current and time of each step User will press STEP 1 and STEP 2 buttons mainly to ...

Page 7: ...example to operate under constant voltage adjust current to max before running constant voltage and vice versa 1 Adjust the output value by pressing the or button 2 After adjusting your constant mode output value switch to the other parameter and set it to maximum 3 Timer Setting After setting the current or voltage output value press MODE to switch to time setting mode then press key or key to ad...

Page 8: ...making sure the tape is removed from the pre cast gel that the buffers are prepared correctly and the recommended volume of buffer is added to the electrophoresis unit Error Message Cause Solution Current exceeds the maximum output for the power supply 400 mA Check if the buffer concentration or molarity is appropriate Excessive buffer concentration or molarity may increase conductivity To clear t...

Reviews: