background image

Dual 2.5" to 3.5" SATA JBOD Coverter

Dual 2.5" to 3.5" SATA JBOD Coverter

User Manual

User Manual

RX310

RX310

4

5

Specifications

Product Introduction

Applications

Dimensions

5.7 (L) x 4 (W) x 1 (H) inches

HDD support

2.5" SATA I/II/III HDD / SSD *2 ( up to 9.5mm ) 

Material

Al Plastic

Interface

SATA

Transfer speed

SATAI(1.5Gbps) / SATAII(3.0Gbps) / SATAIII (6.0Gbps)

LED Indicator

HDD access 

OS support

Windows XP / Vista / 7 / 8 / 8.1 / 10, Mac OS 10.0+, 
Linux Kemel 2.4+

1. Compatible with most system case 3.5" hard drive bay 
2. Compatible with most 3.5" SATA internal/external enclosure

Package Contents

Item

Quantity(pcs)

Enclosure

1

User Manual

1

SATA Power Cable

1

SATA Data Cable

1

Screw

4

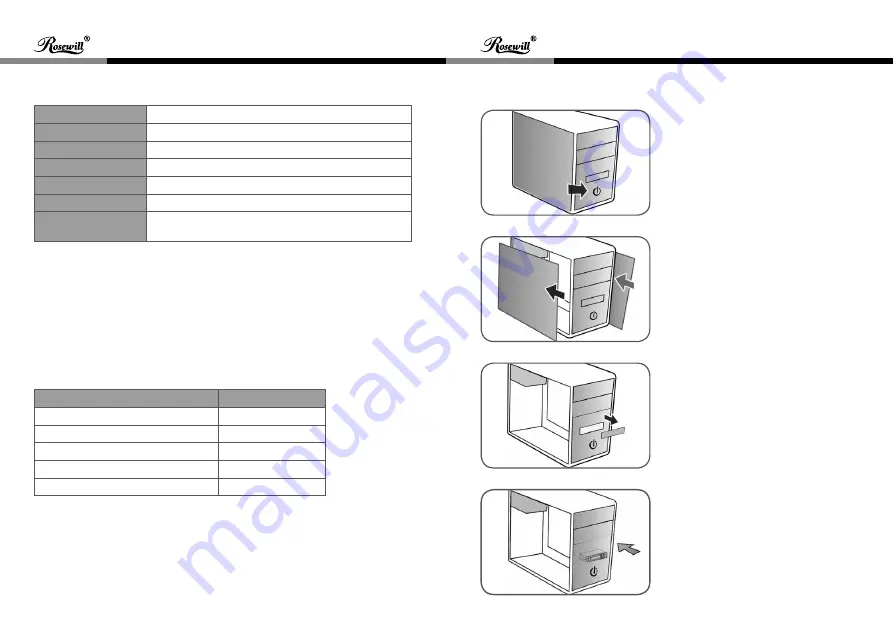
For 3.5" hard drive bay

1. Turn off the PC, and unplug PC 

power cable.

2. Open PC case.

3. Take-out the front PC 3.5" bay panel.

4. Put the converter into the 3.5" bay.

Summary of Contents for RX310

Page 1: ...User Manual RX310 Dual 2 5 to 3 5 SATA JBOD Coverter ...

Page 2: ...on manual before using and retain it for your future reference Table of Contents Preface 02 Product 02 Features 03 Mode Description 03 Specifications 04 Applications 04 Package Contents 04 Product Introduction 05 HDD Installation 07 Used as a 3 5 SATA HDD 08 Attention 08 1 ...

Page 3: ... SATA HDD for 3 5 SATA Drive Bay and Backplane use 3 Built in RAID featuring JBOD 4 Compatible with most 3 5 HDD backplanes and hot swap devices 5 Automatic HDD ejection design 6 Screw free design for quick and easy installation 7 Aluminum construction for durability and drive protection 8 Ventilation holes for excellent heat dissipation 9 Dual LED indicators HDD access LED for each HDD JBOD Mode ...

Page 4: ...I 1 5Gbps SATAII 3 0Gbps SATAIII 6 0Gbps LED Indicator HDD access OS support Windows XP Vista 7 8 8 1 10 Mac OS 10 0 Linux Kemel 2 4 1 Compatible with most system case 3 5 hard drive bay 2 Compatible with most 3 5 SATA internal external enclosure Package Contents Item Quantity pcs Enclosure 1 User Manual 1 SATA Power Cable 1 SATA Data Cable 1 Screw 4 For 3 5 hard drive bay 1 Turn off the PC and un...

Page 5: ...verter 6 Connect the SATA cable to the converter and the SATA slot on the motherboard 7 Plug in the SATA power cable 8 Close the PC case and then turn on the PC SATA 15 PIN SATA 7 PIN HDD Installation A Press down to the left and open the door as shown in the figure B Insert 2 5 SATA HDD or SSD into the open bay C Close the door ...

Page 6: ...D into all external hard disk devices shown in the photos above 1 Please ensure that your computer host supports hot swappable while you replace the hard disk with the computer powered on 2 To prevent data loss please do not change or remove any HDD while it s working 3 After changing the mode the HDD or SSD needs to re initialize partition and format Please note the data security Once the data ha...

Page 7: ...cause cancer birth defects or other reproductive harm Rosewill Technical Support Information techsupport rosewill com 1 800 575 9885 Thank you for purchasing a quality Rosewill product Please register your product at www rosewill com for complete warranty information and support for your product ...

Reviews: