background image

Safe-T-Scope

®


Backup Camera System                                                                                  

                                                                 STSK7360

2.  

CAMERA SELECTION


     From the FULL SCREEN in the full screen, press the           button to see 
     CAM1 > CAM2 > CAM3 > CAM4 > CAM1 . . . .

   Press the “Mode“ buttton to display the screen information (Input Mode/Volume)


3.  

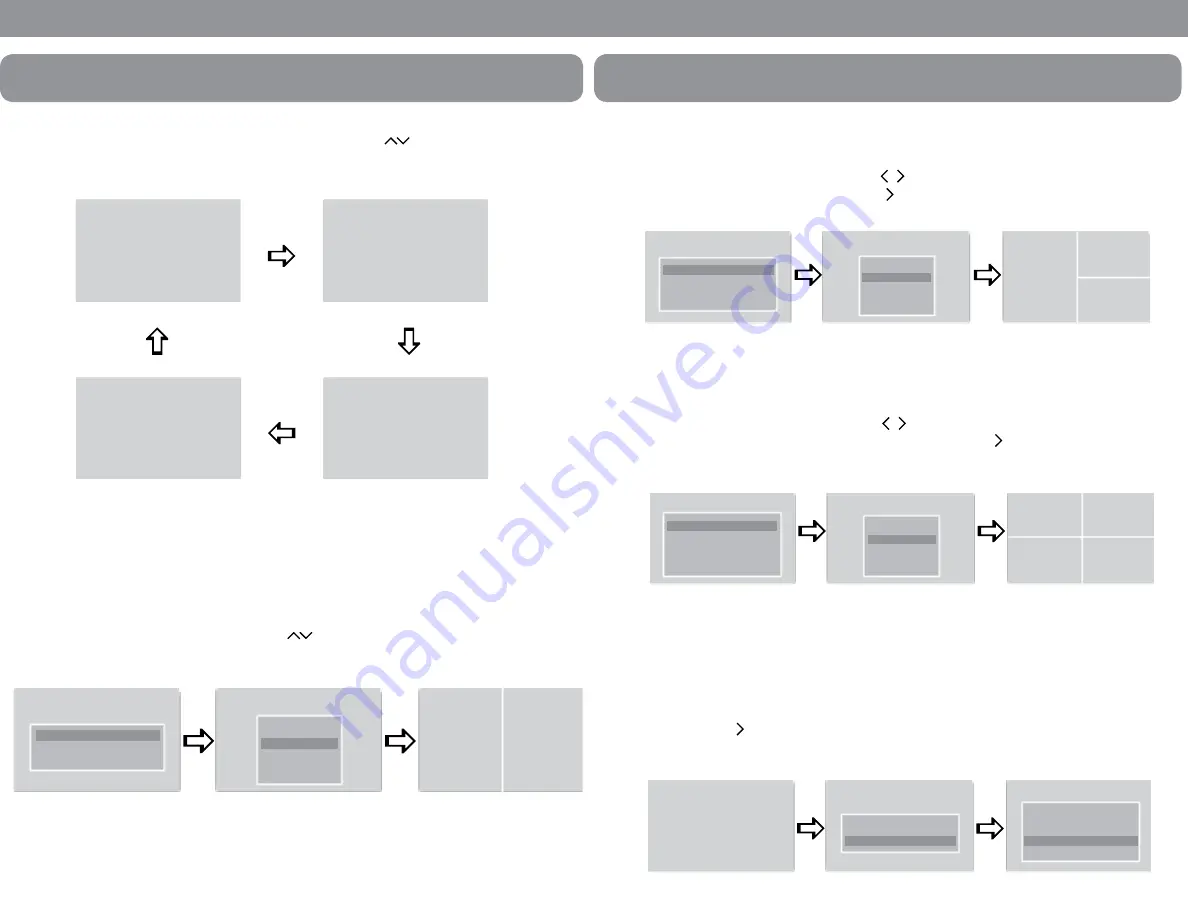
CAMERA SELECTION FOR SPLIT SCREENS

     In the 2 split screen press the “Mode“ button to see the OSD(On Screen Display).
     While the OSD is on select with the            button the camera position 
     (Left or Right). Then press the arrow to select the camera of choice.

FUNCTIONS AND OPERATIONS   

CAM1

CAM4

CAM4

CAM2

SPLIT SCREEN SETUP

SET LEFT

SET RIGHT

SPLIT SCREEN SETUP

CAM 1 
CAM 2 
CAM 3 
CAM 4

CAM2

 9

FUNCTIONS AND OPERATIONS   

          4.  

CAMERA SELECTION FOR 3 SPLIT SCREENS

               In the 3 split screen press the “Mode“ button to see the OSD (On Screen Display).
               While the OSD is on, select with the            button the camera position  
               (Left, Top or Bottom). Then press the      button to select the camera of choice.

          5.  

CAMERA SELECTION FOR 4 SPLIT SCREENS

               In the 4 split screen press the “Mode“ button to see the OSD (On Screen Display).
               While the OSD is on, select with the            button the camera position (Top Left, 
               Top Right. Bottom Left or Bottom Right). Then press the      arrow to select the 
               camera of choice.


NORMAL/MIRROR VIEW

          1.   

CAM1 FULL SCREEN


From the CAM1 full screen press the “Mode” button. From the “MARKER SETUP” 

                screen press the “Mode” button again. Select the desired camera with the             
 

then press       button to change Normal/Mirror view. 

SPLIT SCREEN SETUP

SET LEFT 

SET TOP 

SET BOTTOM 

SPLIT SCREEN SETUP

CAM 1 
CAM 2 
CAM 3 
CAM 4

CAM2

SPLIT SCREEN SETUP

SET LEFT 

SET TOP 

SET BOTTOM 

SPLIT SCREEN SETUP

CAM 1 
CAM 2 
CAM 3 
CAM 4

CAM2

MARKER SETUP

ON 

OFF

MIRROR SET

CAM1 MIRROR 
CAM2 MIRROR 


CAM3 NORMAL 


CAM4 MIRROR

CAM1

10

Summary of Contents for SAFE -T-SCOPE

Page 1: ...STSK7360 SAFE T SCOPE R E A R V I E W B A C K U P C A M E R A S Y S T E M S INSTALLATION USER S MANUAL STSK7360 ...

Page 2: ...d the Safety Rules carefully before using this product Following the safety rules prevents users from damage related with the misuse of the product It is very important to follow these safety rules We state Caution and Warning to clarify any potential risk for a damage associated with the misuse of the product This information is for the user s reference for better usability This information is fo...

Page 3: ... installation please check that the brake lamp head lamp and wipers operate properly SAFEGUARD INSTRUCTIONS 4 FEATURES CONTENTS FEATURES 7 WATERPROOF MONITOR Dimmer sensor built in 7 WVGA 800 x 480 Wide LCD Panel CONTENTS 7 WATERPROOF MONITOR Before using this product please check contents below If there are any missing parts please contact a Rosco sales agent or dealer Monitor Monitor Power Harne...

Page 4: ... and increases the chance of physical damage to the camera 3 Attach camera to bracket using screws provided Adjust angle as indicated in Fig 2 Use rear bumper and back of vehicle as a reference point 4 Wind deflector may be installed This deflector is designed to reduce the buildup of dust dirt and moisture on the camera lens See Fig 3 STSM207 MONITOR 1 Attach monitor inside vehicle in a location ...

Page 5: ...ANKERS OTHER SPECIALTY VEHICLES All electrical equipment fitted to petroleum vehicles must be connected via battery master switch and must be isolated from the battery while the vehicle are loading and unloading For other specialty vehicles please check applicable code and regulations prior to installation 11 Always consult your dealer when fitting any electrical or electronic equipment to a vehic...

Page 6: ...Screen Display While the OSD is on select with the button the camera position Left Top or Bottom Then press the button to select the camera of choice 5 CAMERA SELECTION FOR 4 SPLIT SCREENS In the 4 split screen press the Mode button to see the OSD On Screen Display While the OSD is on select with the button the camera position Top Left Top Right Bottom Left or Bottom Right Then press the arrow to ...

Page 7: ...EFT SET RIGHT MIRROR SET CAM1 MIRROR CAM2 MIRROR CAM3 NORMAL CAM4 MIRROR CAM1 CAM2 11 FUNCTIONS AND OPERATIONS Vehicle width From bumper toward rear 7M MARKER SELECT 5M P1 3M 1M Bumper position CCD camera installation conditions distance marker input conditions Unit mm Marker No Pattern Camera Install Height Vehicle Width P1 2 000 2 500 P2 2 250 2 300 P3 2 500 2 300 P4 2 750 2 300 P5 3 000 2 300 P...

Page 8: ... input screen is displayed as full screen and the screen goes former one when the signal disappear 3 In case of TRG2 and TRG3 input by the OSD the full or split screen could be selected If there is the TRG2 3 signal input then CAM2 CAM3 and CAM1 split screen are shown on the screen With this function Left Right and Rear side could be checked In CAM2 full screen press the Mode button to see OSD Sel...

Page 9: ...ne when the signal is disappears the rest will be display as the priority order TRIGGER PRIORITY ORDER TRG1 Rear light TRG2 3 Emergency light TRG2 Left side light TRG3 Right side light TRG4 If the screen turns by trigger signal the POWER MENU MODE buttons are disabled In the standby position if the trigger wire is activated the monitor will turn on The screen will turn off once the power is de act...

Page 10: ... the Mode button until OSD menu PICTURE SETUP appears Press button to select changes and use to adjust value Language selection ENGLISH FRENCH GERMAN ITALIAN SPANISH 17 SETTINGS FACTORY SETTINGS 5 Reset Press the MODE button until OSD menu PICTURE SETUP appears Press button to select RESET and use to enter selection All settings are initialized at the factory mode except for the video input NTSC P...

Page 11: ...e monitor is installed with enough room for heat emission Install the monitor stand with enclosed screws and double side adhesive tape as shown in the above image 2 Fix the monitor to the monitor stand firmly 3 Sun Visor should be installed with 3 screws 19 CONNECTION MINI DIN A TYPE 20 ...

Page 12: ...60 FIG 1 Camera mount in suggested location Mount Camera assembly high centered Camera Mounting Hole Pattern 21 Typical monitor image of view from properly installed camera Street Vehicles behind truck Rear Bumper FIG 2 Position of camera 22 ...

Page 13: ...Safe T Scope Backup Camera System STSK7360 Optional Wind Deflector FIG 3 23 Mounting on ceiling Mounting on the dash console etc FIG 4 24 ...

Page 14: ... and the rear view camera should be attached to the connector marked REVERSE 25 Cam 1 Trigger Cam 2 Trigger Cam 3 Trigger Cam 4 Trigger Positive 12VDC Black wire is the reverse trigger wire connect to vehicle backup light circuit Monitor will turn on when the vehicle shifts into reverse 15 PIN DIN CONN F M STSH307 65FT M F M F STSH347 32 inches STSM207 STSC107 26 NOTES ...

Page 15: ...A CENTURY OF AUTOMOTIVE VISION SAFETY 90 21 144th Place Jamaica New York 11435 TEL 800 227 2095 FAX 718 297 0323 info roscomirrors com www roscomirrors com www roscovision com M080116B ...

Reviews: