Rongpeng R805 Instruction Manual Download Page 8

- 8 - 

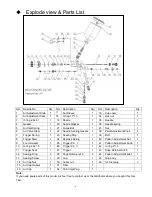
  Explode view & Parts List   


NO.  Description 

Qty.  NO.  Description 

Qty.  NO.  Description 

Qty. 

Air Adjustment Knob 

17 

Nut Sleeve


33 

Cup cover 

Air Adjustment Seat 

18


O-ring 17*1.5 

34 

Hex nut 

O-ring 2.5x2.1 

19 

Nozzle 

35 

Needle 

Gasket 

20 

Nozzle Gasket 

36 

Needle spring 

Air Inlet Spring   

21 

Guide Bolt 

37 

Nut 

Air Valve Stem 

22 

Needle Sealing Gasket 

38 

Paint Adjustment Knob 

Trigger Spring   

23 

Sealing Ring 

39 

Bolt 

Trigger Stem 

24 

Depress Spring 

40 

Pattern Adjustment Nut 

Foam Gasket 

25 

Trigger Pin

 Ⅰ


41 

Pattern Adjustment Knob 

10 

O-ring 4.9x1.5 

26 

Trigger Pin

 Ⅱ


42 

O-ring 2*1.5 

11 

Trigger Seat 

27 

Trigger     

43 

Snap Retainer d=2.5 

12 

Sealing Ring 

28 

Snap Retainer d=3 

44 

Pattern Adjustment seat 

13 

Sealing Screw 

29 

Cup 

45 

Gun body 

14 

Air Cap Nut 

30 

Collar nut 

46 

Air inlet plug 

15 

Air Cap Gasket 

31 

Filter 


16 

Air Cap   

32 

Paint Inlet Plug 


Note: 

If you need spare parts of this model, pls feel free to contact us or the distributor where you bought this tool. 

Tks! 


Summary of Contents for R805

Page 1: ...uctions carefully before starting the product Keep this Manual for future reference Residual Risks Even when the tool is used as prescribed it is not possible to eliminate all residual risk factors Th...

Page 2: ...r skin see fig 1 2 Never use oxygen combustible or any other bottle gas as a power source or would cause explosion and serious personal injury see fig 2 3 Fluid and solvent can be highly flammable or...

Page 3: ...up onto the top of the body 3 Install the barbed hose fitting into the base of the gun handle and tighten in place with the lock nut 4 Secure the air hose to the barbed fitting with a hose clamp 5 Att...

Page 4: ...e painting This will cause a build up of paint in the center of the stroke and an insufficient coating at each end 3 Trigger the gun properly Start the gun moving at the beginning of the stroke BEFORE...

Page 5: ...air 3 Unscrew the cup 4 Disassemble the gun by unscrewing the fluid control knob removing the spring and needle 5 Unscrew the atomizing cap with your fingers and the fluid tip with the service wrench...

Page 6: ...If the air hole is clogged clean it using a wooden toothpick 2 WARNING NEVER USE METAL OR OTHER OBJECTS THAT COULD DAMAGE THE HOLES IN THE NOZZLE AND CAP NEVER IMMERSE THE SPRAY GUN COMPLETELY IN SOLV...

Page 7: ...sure 3 Thin material Narrow center pattern 1 Volume control turned in too far 2 Inlet air pressure too high 3 Fluid pressure is too low 4 Material is too thin 1 Increase volume 2 Reduce inlet air pres...

Page 8: ...1 23 Sealing Ring 1 39 Bolt 1 8 Trigger Stem 1 24 Depress Spring 1 40 Pattern Adjustment Nut 1 9 Foam Gasket 1 25 Trigger Pin 1 41 Pattern Adjustment Knob 1 10 O ring 4 9x1 5 1 26 Trigger Pin 1 42 O...

Reviews: