
- 7 -
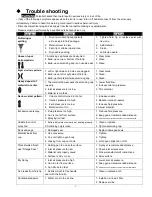
Trouble shooting
WARNING
Potential hazard that could result in serious injury or loss of life.
• If any of the following symptoms appear while the tool is in use, turn it off and disconnect it from the air supply
immediately. Failure to heed this warning could result in serious personal injury.
• Disconnect electrical plug and air supply from the tool before making any adjustments.
• Repairs must be performed by a qualified service technician only.
Symptom
Problems
Solution
Fluttering or
spitting
1. Dry or worn fluid tip seat permits
air to seep into fluid passage.
2. Material level too low.
3. Fluid tip or strainer obstructed.
4. Dry needle packing.
1. Tighten fluid tip or replace seat with
new one.
2. Add material.
3. Clean
4. Lubricate needle.
Uneven top or
bottompattern.
1. Atomizing cap holes are obstructed.
2. Build-up on top or bottom of fluid tip.
3. Build-up on atomizing cap is on needle seat.
1. Clear holes.
2. Clean.
3. Clean.
Right or left arc pattern.
1. Left or right side horn holes are plugged.
2. Build-up on left or right side of fluid tip.
3. Build-up of material inside atomizing cap.
1. Clear holes.
2. Clean.
3. Clean.
Heavy deposit of
material in center.
1. The material flow exceeds the atomizing cap
capacity.
2. Inlet air pressure is too low.
3. Material is too thick.
1. Lower fluid flow.
2. Increase inlet air pressure.
3. Thin material.
Narrow center pattern.
1. Volume control turned in too far.
2. Inlet air pressure too high.
3. Fluid pressure is too low.
4. Material is too thin.
1. Increase volume.
2. Reduce inlet air pressure.
3. Increase fluid pressure.
4. Adjust material.
Excessive overspray.
1. Fluid pressure too high.
2. Gun is too far from surface.
3. Spraying too fast.
1. R educe fluid pressure.
2. Keep gun at recommended distance.
3.
Slow down and maintain consistent, even parallel stroke.
Unable to control
spray fan.
1.
Pattern adjustment screw is not seating properly.
2. Atomizing cap is loose.
1. Clean or replace.
2. Tighten atomizing cap.
Runs and sags.
1. Damaged seal.
1. Replace damaged seals.
Material leaks from
cup.
1. Cap not secure.
2. Cup not tight on gun body.
3. Leaking from cap vent hole.
1. Tighten.
2. Tighten.
3. H old gun upright do not tilt.
Thick dimpled finish
aka "Orange Peel."
1. Holding gun too close to surface.
2. Inlet air pressure too low.
3. Material not properly mixed.
4. Surface is dirty or oily.
1. S pray at recommended distance.
2. Check inlet air pressure.
3. Follow manufacturer's instructions.
4. More surface
Dry Spray.
1. Inlet air pressure too high.
2. Gun too far from surface.
3. Gun stroke too fast.
1. Lower inlet air pressure.
2. Keep gun at recommended distance.
3.
Slow down and maintain consistent even parallel stroke.
Gun leaks from fluid tip.
1. Debris will not let the needle
seat with the fluid tip.
1. Clean or replace both.
Contaminated paint.
1. Water or oil in the air line.
1. Install an in-line air filter.
2. Replace air line.