


12
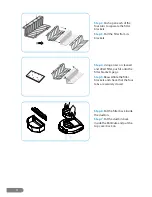
4.4 - Cleaning & Replacing the Brushes
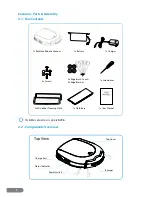
The RolliCute comes with four edge brushes, two for initial installation and two extra to use as
replacements. See the following image and instructions for information on how to clean and
replace the edge brushes.
Step 1.
Turn over the
RolliCute and use the
included screwdriver to
unfasten the screws and
remove the edge brushes
from their designated
shafts.
Step 2.
Tap the brushes
to shake off any debris. If
there are any items twisted
or caught in the bristles,
carefully pull these out by
hand.
Step 3.
Rinse the brushes
with water and allow them
time to dry completely.
Step 4.
Ensure the brushes
are dry and reinstall them
on the bottom of the
RolliCute.
To replace the brushes, discard the old brushes and install new ones.
Step 1.
Thread the bristles of two edge brushes through two edge brush caps then push the
caps down until they attach to the brushes.
Step 2.
Turn over the RolliCute and press the edge brushes onto their designated shafts.
Step 3.
Using the included screwdriver and two of the screws, secure the edge brushes to the
underside of the RolliCute.
Summary of Contents for RolliCute
Page 1: ...ROBOTIC VACUUM USER MANUAL TM...
Page 2: ...www rollibot com Customer Service 1 844 585 6295...
Page 19: ......