rollibot RolliCute User Manual Download Page 11

8

•  Before storing, fully charge the RolliCute to prevent battery over-discharge due to non-

use.

•  Store the RolliCute indoors at a dry and stable temperature. Do not store in an unheated 

garage, shed, or other location with extreme temperature fl uctuations.

•  Always disconnect the RolliCute from the charger before cleaning.
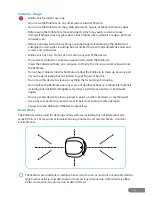
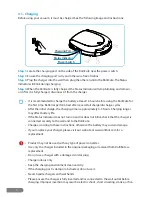
3.2 – Using

Before using your vacuum for the fi rst time, ensure it is fully charged, all parts are installed, and 
your cleaning environment is free of obstacles such as small power cords, pet food containers, 
and loose fabrics. After this, see the following steps:

Step 1.

 Click the power switch on the side of RolliCute to turn it on. Once on, the Status 

Indicator will turn on and the brushes will start to rotate as the RolliCute begins a quick self-test.

Step 2.

 Once the self-test is complete and all components are ready, the Status Indicator 

will turn off  and the RolliCute will move randomly as it begins to clean. The average cleaning 
duration will last approximately 80 minutes. 

Step 3.

 After cleaning, the RolliCute will stop. Locate your vacuum, turn it off , and store it in a 

suitable location.

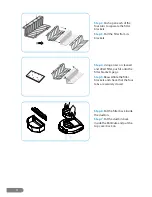
•  Empty the dustbin and clean the brushes and fi lter after every 3-4 uses. 

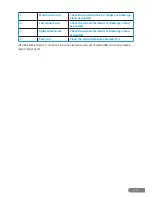
•  When the battery is low, the Status Indicator will blink twice continually or the RolliCute 

will stop working.

•  If there is an issue detected during the self-test, the Status Indicator will blink according 

to the type of error detected. Refer to Section 5.2 for more details.

•  If the RolliCute blinks for any other issue besides a low battery, place it on level ground 

and restart it. If restarting it does not resolve the issue, contact customer service.

3.3 – Storing

Before storing your vacuum, ensure the storing environment is suitable. Properly storing your 
RolliCute will help improve performance and battery life expectancy.

Step 1.

 Ensure the RolliCute is fully charged. Charge it if needed.

Step 2.

 Turn the RolliCute off .

Step 3.

 Store the RolliCute indoors at a dry and stable temperature.

•  Always turn the RolliCute off  before transporting.

•  Before storing, fully charge the RolliCute to prevent battery over-discharge due to non-

use.

•  If storing for more than one month, discharge and recharge the battery every three 

months.

•  Store the RolliCute indoors at a dry and stable temperature. Do not store in an unheated 

garage, shed, or other location with extreme temperature fl uctuations.

•  Cover the RolliCute to protect it from dust. Do not store in a dusty environment as, with 

all electronic devices, dust may cause damage over time.

Summary of Contents for RolliCute

Page 1: ...ROBOTIC VACUUM USER MANUAL TM...

Page 2: ...www rollibot com Customer Service 1 844 585 6295...

Page 3: ...ttery Information Installation 4 2 4 Assembly 5 Section 3 Usage 6 3 1 Charging 6 3 2 Using 8 3 3 Storing 8 Section 4 Maintenance 9 4 1 Removing the Dustbin 9 4 2 Cleaning the Dustbin 9 4 3 Replacing t...

Page 4: ...lliCute remove all objects which may easily sustain or cause damage if bumped such as glass decor loose fabrics like rug tassels or edges pet food containers etc Remove all objects which may easily ca...

Page 5: ...ecommended to charge the battery at least 16 hours before using the RolliCute for the first time Batteries perform best after several full charge discharge cycles Always disconnect the RolliCute from...

Page 6: ...nstalledfilter 2 2 Components Overview 1x RolliCute Robotic Vacuum 1x Battery 1x Cloth Base 1x User Manual 1x Screwdriver 2x Microfiber Cleaning Cloth 4x Edge Brush Caps 4x Edge Brushes 1x Charger 4x...

Page 7: ...included in the original packaging or received from RolliBot as a replacement Step 1 Using the arrows as a guide gently press on the top cover and pull it to remove it Step 2 Locate the battery cords...

Page 8: ...ushes through two edge brush caps then push the caps down until they attach to the brushes Step 2 Turn over the RolliCute and press the edge brushes onto their designated shafts Step 3 Using the inclu...

Page 9: ...the RolliCute or allow the RolliCute to clean up near any part of your body including but not limited to your fingers or hair etc Do not use this device to clean up anything that is burning or smokin...

Page 10: ...oximately 4 5 hours Charging longer may affect battery life If the Status Indicator does not turn on and or does not blink check that the charger is connected securely to the wall and to the RolliCute...

Page 11: ...nd filter after every 3 4 uses When the battery is low the Status Indicator will blink twice continually or the RolliCute will stop working If there is an issue detected during the self test the Statu...

Page 12: ...ater or liquids onto the RolliCute Do not insert objects into the RolliCute or allow the RolliCute to clean up near any part of your body including but not limited to your fingers or hair etc Do not p...

Page 13: ...nd replace the top cover The dust box and filter can be cleaned with water if needed After rinsing fully dry both the dustbin and filter before placing them back in the RolliCute If not fully dried th...

Page 14: ...brackets Step 4 Using a new or cleaned and dried filter push it onto the filter bracket s pegs Step 5 Reassemble the filter brackets and check that the four tabs are securely closed Step 6 Put the fil...

Page 15: ...re are any items twisted or caught in the bristles carefully pull these out by hand Step 3 Rinse the brushes with water and allow them time to dry completely Step 4 Ensure the brushes are dry and rein...

Page 16: ...tionally you can check the top of the stairs for excess debris or obstacles Q Why does the RolliCute retreat during cleaning A 1 The lighting may be generating heat Do not have the RolliBot operate un...

Page 17: ...e wheels for debris or blockage Clean as needed 7 Right wheel error Check the wheels for debris or blockage Clean as needed 8 Fan error Clean the entire RolliCute and restart it IftheinformationinSect...

Page 18: ...844 585 6295 FOR SERVICE REQUEST WHEN A PRODUCT OR PART IS EXCHANGED ANY REPLACEMENT ITEM BECOMES YOUR PROPERTY AND THE REPLACED ITEM BECOMES ROLLIBOT S PROPERTY THIS WARRANTY ONLY COVERS TECHNICAL H...

Page 19: ......

Reviews: