


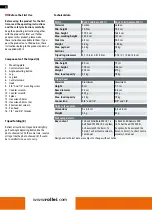

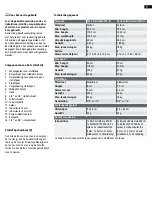


3
Stativ
Rock Solid Beta MK III
Rock Solid Gamma MK III
Material
Carbon
Carbon
Min. Höhe
20,5 cm
18,5 cm
Max. Höhe
178,5 cm
162,5 cm
Max. Arbeitshöhe
147,5 cm
131 cm
Packmaß
63 cm
58,5 cm
Gewicht
2,4 kg
1,83 kg
Max. Traglast
24 kg
18 kg
Sektionen
4
4
Stativbeindurchmesser
2,1 / 2,46 / 2,8 / 3,2 cm
1,76 / 2,1 / 2,46 / 2,8 cm
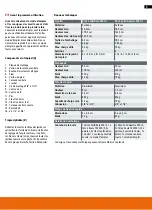
Monopod
Min. Höhe
80 cm
79 cm
Max. Höhe
178 cm
163 cm
Gewicht
590 g
470 g
Max. Traglast
22 kg
18 kg
Stativkopf
Material
Aluminium
Aluminium
Höhe
8 cm
7,7 cm
Basis-Durchmesser
5,3 cm
4,6 cm
Gewicht
407 g
332 g
Max. Traglast
22 kg
18 kg
Anschluss
3/8“ und 1/4“
3/8“ und 1/4“
Schnellwechselplatte
Maße
5 x 4,4 cm
4,4 x 4,4 cm
Gewicht
32 g
32 g
Verpackungsdetails
Lieferumfang
1x Rock Solid Beta MK III, 1x
Kugelkopf T5S MK III,
3x Spikes, 3x Inbusschlüssel
(2x 4mm, 1x 3mm), 1x kurze
Mittelsäule, 1x Handbuch
1x Rock Solid Gamma MK III,
1x Kugelkopf T3S MK III,
3x Spikes, 3x Inbusschlüssel
(2x 4mm, 1x 3mm), 1x kurze
Mittelsäule, 1x Handbuch
Änderungen von Design und technischen Daten bleiben vorbehalten und bedürfen keiner
Ankündigung.
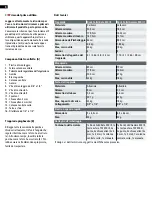
Technische Daten
Vor dem ersten Gebrauch
Lesen Sie vor dem ersten Gebrauch die
Bedienungsanleitung und die Sicher-
heitshinweise aufmerksam durch.
Bewahren Sie die Bedienungsanleitung
zusammen mit dem Produkt für den späte-
ren Gebrauch auf. Sollten andere Personen
dieses Produkt nutzen, so stellen Sie ihnen
diese Anleitung zur Verfügung. Wenn Sie
das Produkt an Dritte weitergeben, gehört
diese Anleitung zum Produkt und muss
mitgeliefert werden.
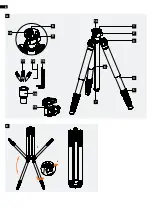
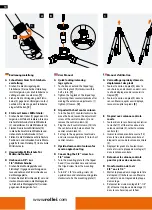
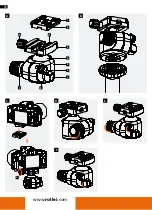
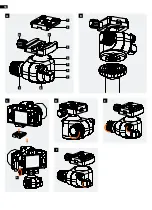
Bestandteile des Statives
[A]
1. Montageplatte für Stativkopf
2. Feststellschraube für Mittelsäule
3. Verriegelung zur Stativbeinverstellung
4. Stativbein
5. Verriegelung Stativbein
6. Mittelsäule
7. Haken
8. 1/4“- und 3/8“-Stativschraube
9. Konterschraube A
10. Konterschraube B
11. Spikes
12. Inbusschlüssel 3 mm
13. Inbusschlüssel 4 mm (2x)
14. Kurze Mittelsäule
15. Kugelkopf
16. 1/4 und 3/8 Zoll Gewinde
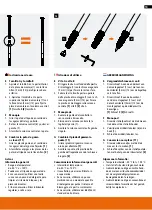
Zusammenklappen des Stativs [B]
Ziehen Sie alle Teile der Beine ein und ver-
riegeln Sie sie fest, ziehen Sie den Knopf für
die Winkeleinstellung heraus, wie auf dem
Foto gezeigt (a). Gleichzeitig klappen Sie alle
Beine um, wie auf dem Foto gezeigt (b). In
der kleinsten Größe ist es leicht zu tragen.
Summary of Contents for Rock Solid Beta MK III
Page 2: ...2 8 9 10 1 2 4 6 7 5 3 www rollei com 16 11 13 12 14 15 A B a b ...
Page 6: ...6 8 9 10 1 2 4 6 7 5 3 16 11 13 12 14 15 A B a b ...
Page 14: ...14 www rollei com B C D a b F E A 1 2 3 4 5 6 7 8 9 10 11 ...
Page 16: ...16 www rollei com B C D a b F E A 1 2 3 4 5 6 7 8 9 10 11 ...


