background image

6

DEUTSCH

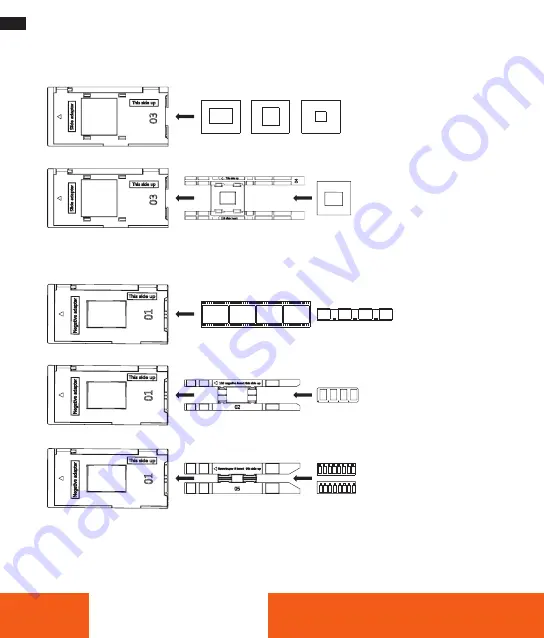
4. Einlegen von Dias / Negativen 

Dia-Halterung und Einleger 

–  135 mm / 126 mm / 110 mm (2”x 2”) 

–  110 mm (1”x 1”)

Negativ-Halterung und Einleger

–  135-mm- / 126-mm-Negative

– 110-mm-Negative

–  Super8- / 8-mm-Negative

–  Schließen Sie die Dia- / Negativ-Halterung und drücken Sie die Kanten zusammen, bis diese einrasten .
–  Vergewissern Sie sich, dass das Dia / Negativ in die richtige Richtung zeigt und nicht verbogen ist . Sie 

können das Dia / Negativ zentrieren, indem Sie es manuell nach links oder rechts ausrichten .

1x1

2x2

Summary of Contents for DF-S 1300 SE

Page 1: ...www rollei de DF S 1300 SE Dia Film Scanner Slide Film Scanner ANLEITUNG AUF DEUTSCH MANUAL IN ENGLISH ...

Page 2: ...ngs Modus 11 8 Wiedergabe Modus 14 9 Technische Daten 17 10 Sicherheitshinweise 18 Entsorgung 20 Konformität 21 Content Before the first Use 22 Explanation of Symbols 22 1 Introduction 22 2 Box Content 23 3 Product Overview 24 4 Inserting Slides Negatives 25 5 Using the Device 27 6 Recording Mode 28 7 Setting Mode 30 8 Playback Mode 33 9 Technical Data 35 10 Safety Instructions 34 Disposal 38 Conf...

Page 3: ...ben eine zusätzliche oder verstärkte Isolierung und entsprechen der Schutzklasse II Nur für innen Geräte mit diesem Zeichen dürfen nur im Haus betrieben werden trockene Umgebung 1 Einführung Vielen Dank dass Sie sich für den Rollei Dia Film Scanner DF S 1300 SE entschieden haben Wandeln Sie Ihre Negative und Dias ganz einfach in digitale Bilder um die Sie speichern und aufbewahren können Speichern...

Page 4: ... 2 Lieferumfang Dia Film Scanner Negativ Halterung Dia Halterung 110 mm Film Halterung 110 mm Film Einleger 8 mm super8 Halterung Dia Slider USB C Kabel HDMI Kabel Netzgerät Reinigungsbürste Bedienungsanleitung ...

Page 5: ...sächlichen Produkt abweichen 4 Einlegen von Dias Negativen Wichtig Vergewissern Sie sich dass Ihre Filme Dias sauber und frei von Schmutz und Ablagerungen sind Öffnen Sie die entsprechende Dia Negativ Halterung und legen Sie die Negative das Dia ein Jede Halterung ist mit einem Etikett versehen um diese zu identifizieren Wenn Sie sich nicht sicher sind um welchen Negativ Dia Typ es sich handelt se...

Page 6: ...126 mm Negative 110 mm Negative Super8 8 mm Negative Schließen Sie die Dia Negativ Halterung und drücken Sie die Kanten zusammen bis diese einrasten Vergewissern Sie sich dass das Dia Negativ in die richtige Richtung zeigt und nicht verbogen ist Sie können das Dia Negativ zentrieren indem Sie es manuell nach links oder rechts ausrichten 1x1 2x2 ...

Page 7: ...tellen Sie den Schalter auf die Position 1 9 3 0 2 Hinweis Wenn Sie die Dicke Ihrer Dias nicht ken nen lassen Sie diesen Schalter in Ruhe Wenn Ihre Dias jedoch im Diaschnelleinzug stecken bleiben entfernen Sie den Diaschnelleinzug stellen Sie den Schalter auf die entgegengesetzte Position und versuchen Sie es erneut 2 Setzen Sie den Dia Slider von rechts in das Gerät ein 3 Drücken Sie den Schieber...

Page 8: ...den SETTING Modus zu gelangen 2 Einschalttaste Drücken Sie sie um das Gerät ein auszuschalten 3 Links Taste Bewegen Sie sich nach links oder folgen Sie den Infor mationen auf dem Display 4 Rechts Taste Bewegen Sie sich nach rechts oder folgen Sie den Informationen auf dem Display 5 OK Taste Drücken Sie diese Taste um die ausgewählten An weisungen einzugeben zu speichern beenden oder zu speichern z...

Page 9: ...t ist erscheint FEHLER KEINE SD KARTE 2 Drücken Sie die Links 3 oder Rechts Taste 4 um die Statusleiste am oberen und unteren Rand des Bildschirms aufzurufen Hinweis Die Statusleiste wird nach 15 Sekunden ausgeblendet oder drü cken Sie die Taste CAPTURE um zum Vorschaumodus zurückzukehren Drücken Sie die Links Rechts Taste 3 4 um die obersten Einstellungen zu wählen Drücken Sie dann die OK Taste 5...

Page 10: ...ken Sie die Rechts Taste 4 um die gewünschte Einstellung auszuwäh len verwenden Sie EV als Beispiel und drücken Sie dann die OK Taste 5 unter ANPASSUNG um das Einstellungsmenü aufzurufen 3 Drücken Sie die Links Rechts Taste 3 4 um die Einstellung vorzunehmen drücken Sie dann die OK Taste 5 um die eingestellten Daten zu speichern und zum Untermenü zurückzukehren und drücken Sie die Rechts Taste 4 u...

Page 11: ... Rechts Taste 3 4 um die gewünschte Einstellung auszuwählen und drücken Sie dann die OK Taste 5 um das Untermenü aufzurufen FILM TYP Der Filmtyp umfasst die folgenden Film Dia Formate NEGATIV 135 110 126KPK DIA 135 110 126KPK SUPER8 8MM SCHWARZ WEISS 135 110 126KPK 1 Drücken Sie die Links Rechts Taste 3 4 um die Option FILM TYP im Einstellungsmenü auszuwählen und drücken Sie dann die OK Taste 5 um...

Page 12: ...formationen einzufügen Die Anzeige verschwindet nach 5 Sekunden speichert die Auswahl und bringt Sie zum Startmenü AUFLÖSUNG 1 Wählen Sie AUFLÖSUNG aus dem Einstellungsmenü und drücken Sie dann die OK Taste 5 um das Menü AUFLÖSUNG aufzurufen 2 Drücken Sie die rechte Rechts Taste 4 um 16M oder 25M M Megapixel auszuwählen und drücken Sie dann die OK Taste 5 um das Menü zu verlassen TV STANDARD 1 Wäh...

Page 13: ...dung hergestellt ist erkennt der Computer den Dia Film Scanner als externes Gerät 3 Wenn Sie fertig sind drücken Sie die Taste zum Trennen der Verbindung und ziehen Sie dann das USB C Kabel ab FORMATIEREN Wichtig Wenn Sie die eingelegte SD Karte formatieren werden alle Dateien auf dieser Karte gelöscht Speichern Sie die benötigten Dateien vor dem Formatieren auf Ihrem Computer Wenn die SD Karte ni...

Page 14: ... Taste 4 um die Sprache auszuwählen die Sie wünschen 3 Drücken Sie die OK Taste 5 um die gewählte Sprache zu speichern und zum Startmenü zurückzukehren 8 Wiedergabe Modus 1 Drücken Sie die Wiedergabe Taste 6 um in den Wiedergabemodus zu gelangen 2 Drücken Sie die Links Rechts Taste 3 4 um durch die Bilder zu blättern 3 Wenn Sie ein Bild bearbeiten möchten drücken Sie die OK Taste 5 wenn das Bild a...

Page 15: ... um den Löschmodus aufzurufen Wählen Sie und drücken dann die OK Taste 5 um den Diashow Modus aufzurufen DREHEN 1 Geben Sie die Einstellung Drehen wie oben beschrieben ein 2 Verwenden Sie die Links Rechts Taste 3 4 um das Bild zu drehen SPIEGELN 1 Geben Sie die Einstellung für horizontal spiegeln vertikal spiegeln wie oben beschrieben ein 2 Drücken Sie die Links Taste 3 um das Bild vertikal B zu s...

Page 16: ...d zu löschen und in den Bildvorschau Modus zu gelangen 3 Drücken Sie die Links Taste 3 um zum Startbildschirm zu gelangen DIASHOW 1 Rufen Sie den Diashow Modus wie oben beschrieben auf 2 Drücken Sie die OK Taste 5 um das nächste gespeicherte Bild anzu halten bzw wiederzugeben 3 Drücken Sie die Links Taste 3 um zum Startbildschirm zu gelangen ...

Page 17: ... Externer Speicher SD MMC kompatibel bis zu 64 GB SDHC Stromversorgung DC 5 V 1 A Adapter Netzgerät Hersteller Cullpower Modell SAW06B 050 1000G Eingang 100 240 V 50 60 Hz 0 3 A Ausgang 5 V 1 A 5 W Anschlüsse SD Karten Slot HDMI USB C Anschluss Sprachen Deutsch Englisch Spanisch Italienisch Französisch Portugiesisch Niederländisch Tschechisch Polnisch Ungarisch Griechisch Schwedisch Dänisch Finnis...

Page 18: ...Computer und ziehen Sie den Netzadapter aus der Steckdose Entsorgen Sie alle Verpackungsmaterialien sofort nach dem Auspacken des Produkts da die für die Ver packung verwendeten Beutel eine Erstickungsgefahr darstellen könnten Bestimmungsgemäßer Gebrauch Der Scanner darf ausschließlich dazu verwendet werden um Dias und Negative zu schannen Er eignet sich nur für den privaten und nicht für den gewe...

Page 19: ...icht über scharfe Kanten Den Scanner nie so aufbewahren dass es in eine Wanne oder ein Waschbecken fallen könnte Niemals ein elektrisches Gerät berühren welches in Wasser gefallen ist Den eingebauten Akku nicht starker Wärme aussetzen etwa durch Sonneneinstrahlung oder Feuer usw Brand und Explosionsgefahr Wenn Sie den Scanner länger nicht benutzen oder wenn eine Gerätestörung auftritt das Gerät un...

Page 20: ... Original Ersatzteile ersetzen Eine Beschädigung der Elektronik oder von Zubehörteilen durch externe Einflüsse wie Schlag Herabfallen oder sonstige Einwir kungen fallen nicht unter die Garantie und eine Reparatur ist kostenpflichtig Entsorgung Entsorgen Sie die Verpackung sortenrein Nutzen Sie dafür die örtlichen Möglichkeiten zum Sammeln von Papier Pappe und leichten Verpackungen anwendbar in der...

Page 21: ...4 30 EU EMV Richtlinie 2014 35 EU Niederspannungsrichtlinie 2009 125 EG ERP Richtlinie 2011 65 EU RoHs Richtlinie Der vollständige Text der EU Konformitätserklärung ist unter der folgenden Internetadresse verfügbar http www rollei de egk dfs1300se Rollei GmbH Co KG In der Tarpen 42 22848 Norderstedt Deutschland ...

Page 22: ...t current Products with this symbol have additional or reinforced insulation and comply with protection class II For indoor use only Devices with this symbol may only be operated indoors dry environment 1 Introduction Thank you for purchasing the Rollei Slide Film Scanner DF S 1300 SE Easily convert your negatives and slides into digital images that you can save and store Store your precious memor...

Page 23: ... 2 Box Content Slide film scanner Negative holder Slide holder 110 mm film holder 110 mm film inserter 8 mm super8 holder Slider USB C cable HDMI cable Power supply unit Cleaning brush Instruction manual ...

Page 24: ...trative purposes only and may differ from the actual product 4 Inserting Slides Negatives Important Make sure your films slides are clean and free of dirt and debris Open the appropriate slide negative holder and insert the negatives slide Each holder is labelled to identify it If you are not sure which type of negative slide it is refer to the following illustrations ENGLISH 1 2 3 4 5 6 7 10 11 1...

Page 25: ...nserter 135 mm 126 mm negatives 110 mm negatives Super8 8 mm negatives Close the slide negative holder and press the edges together until they click into place Make sure that the slide negative is facing the right way and is not bent You can centre the slide negative by manually aligning it to the left or right 1x1 2x2 ...

Page 26: ...s are thicker than 1 9 mm set the switch to the 1 9 3 0 position 2 Note If you do not know the thickness of your slides leave this switch alone However if your slides get stuck in the slide feeder remove the slide feeder set the switch to the opposite position and try again 2 Insert the slide slider 3 into the device from the right 3 Press the slider from right to left to insert the slides one by ...

Page 27: ...tion 1 Setting button Press this button to enter the SETTING mode 2 Power button Press it to turn the device on off 3 Left button Move to the left or follow the information on the display 4 Right button Move to the right or follow the information on the display 5 OK button Press this button to enter save exit or save reset the selected instructions 6 Playback button Press it to enter the PLAYBACK ...

Page 28: ...d 2 If no memory card is inserted ERROR NO SD CARD appears 2 Press the left right button 3 4 to display the status bar at the top and bottom of the screen Note The status bar will disappear after 15 seconds or press the CAPTURE button to return to preview mode Press the left right button 3 4 to select the top settings Then press the OK button 5 to apply the selected setting By selecting gives you ...

Page 29: ...ng for Brightness Colour and Sharpness 2 Press the right button 4 to select the desired setting use EV as an exam ple then press the OK button 5 to enter the adjustment menu 3 Press the left right button 3 4 to make the adjustment then press the OK button 5 to save the adjusted data and return to the submenu and press the left button 3 to select another setting Note The settings will be reset to t...

Page 30: ... the left right button 3 4 to select the desired setting and then press the OK button 5 to enter the submenu FILM TYPE The film type includes the following film slide formats NEGATIVE 135 110 126KPK SLIDE 135 110 126KPK SUPER8 8MM BLACK WHITE 135 110 126KPK 1 Press the left right button 3 4 to select FILM TYPE in the settings menu and then press the OK button 5 to display the FILM TYPE menu ...

Page 31: ...ert information The display disappears after 5 seconds saves the selection and takes you to the start menu RESOLUTION 1 Select RESOLUTION from the Settings menu then press the OK button 5 to access the RESOLUTION menu 2 Press the right button 4 to select 16M or 25M M megapixels then press the OK button 5 to exit the menu TV STANDARD 1 Select TV STANDARD from the Settings menu then press the OK but...

Page 32: ...conds When the connection is established the computer recognises the slide film scanner as an external device 3 When you are finished press the disconnect button and then disconnect the USB C cable FORMAT Note If you format the inserted SD card all files on that card will be deleted Save the files you need on your computer before formatting If the SD card is not compatible format it on your comput...

Page 33: ...nu 8 Playback Mode 1 Press the playback button 6 to enter playback mode 2 Press the left right button 3 4 to scroll through the pictures 3 If you want to edit an image press the OK button 5 when the image appears on the screen 4 Press the right button 4 to select ROTATE MIRROR DELETE and SLIDE SHOW Press the OK button 5 to call up the selected output Select then press the OK button 5 to set the ro...

Page 34: ...p the image vertically B 3 Press the right button 4 to flip the image horizontally A DELETE 1 Enter delete mode as described above 2 Press the right button 4 to delete the current picture and enter the picture preview mode 3 Press the left button 3 to go to the start screen SLIDESHOW 1 Enter the slideshow mode as described above 2 Press the OK button 5 to pause play the next saved picture 3 Press ...

Page 35: ...te LEDs External memory SD MMC compatible up to 64 GB SDHC Power supply DC 5 V 1 A adapter Power supply unit Manufacturer Cullpower Model SAW06B 050 1000G Input 100 240 V 50 60 Hz 0 3 A Output 5 V 1 A 5 W Connections SD card slot HDMI USB C connector Languages German English Spanish Italian French Portuguese Dutch Czech Polish Hungarian Greek Swedish Danish Finnish Japanese Dimensions 13 6 x 13 2 ...

Page 36: ...onnect the USB C cable from your compu ter and unplug the power adapter from the wall socket Dispose of all packaging materials immediately after unpacking the product as the bags used for packa ging could pose a choking hazard Intended use The scanner may only be used to take photos and videos It is only suitable for private and not for commer cial use You may use the Gimbal only as described in ...

Page 37: ...tub or sink Never touch an electrical appliance that has fallen into water Do not expose the built in battery to strong heat such as sunlight fire etc Risk of fire and explosion If you do not use the Gimbal for a longer period of time or if a device malfunction occurs be sure to switch off the device CAUTION Danger to children and persons with limited physical sensory or mental abilities e g parti...

Page 38: ...ct dropping or other influences are not covered by the warranty and repairs are subject to a charge Disposal Dispose of the packaging according to its type Use the local possibilities for collecting paper cardboard and other materials applicable in the European Union and other European countries with systems for the separate collection of recyclable materials Devices that are marked with this symb...

Page 39: ...0 EU EMC Directive 2014 35 EU Low Voltage Directive 2009 125 EC ERP Directive 2011 65 EU RoHs Directive The full text of the EU Declaration of Conformity is available at the following internet address http www rollei com egk dfs1300se Rollei GmbH Co KG In der Tarpen 42 22848 Norderstedt Germany ...

Page 40: ...www rollei de Item No 20700 Rollei GmbH Co KG In de Tarpen 42 22848 Norderstedt Service Hotline 49 40 270750270 rollei_de rollei foto de ...

Reviews: