background image

rolleaseacmeda.com


© 2017 Rollease Acmeda Group

ABOUT THE “AUTOMATE SHADES” SKILL

The Automate Pulse app allows for control of your motorized window treatments through your smartphone/tablet

THE APP ALLOWS FOR:


„

Individual and group control


„

Scene control


„

Timer functionality


„

Compatible with Amazon Alexa devices

GETTING STARTED:

In order to control your motorized window treatments through The Automate Pulse app, you will need to have:


„

Downloaded the free app via the Apple App Store (available under iPhone apps) or the Google Play Store.


„

Purchased one or more Wi-Fi Bridges depending on size of the space. 


WI-FI BRIDGE TECHNICAL SPECIFICATIONS:


„

Radio Frequency range: ~60 feet (no obstructions)


„

Radio Frequency: 433 MHz


„

Wi-Fi: 2.4 GHz


„

Power: 120V AC


„

For Indoor Use Only 


SETUP BEST PRACTICES:


„

Bridge must be within signal range of both the motorized window treatments and the Wi-Fi router.


„

Wi-Fi network must be visible.


„

Environments with multiple WAPs (wireless access points) may need to temporarily disable all but one.


„

Security settings may need to be temporarily disabled. 


CAPABILITIES:


„

Motors per Bridge: 30


„

Locations per account: 5


„

Wi-Fi Bridges per location: 5


„

Rooms per Location: 20


„

Scenes per Location: 20


„

Timers per Location: 20 
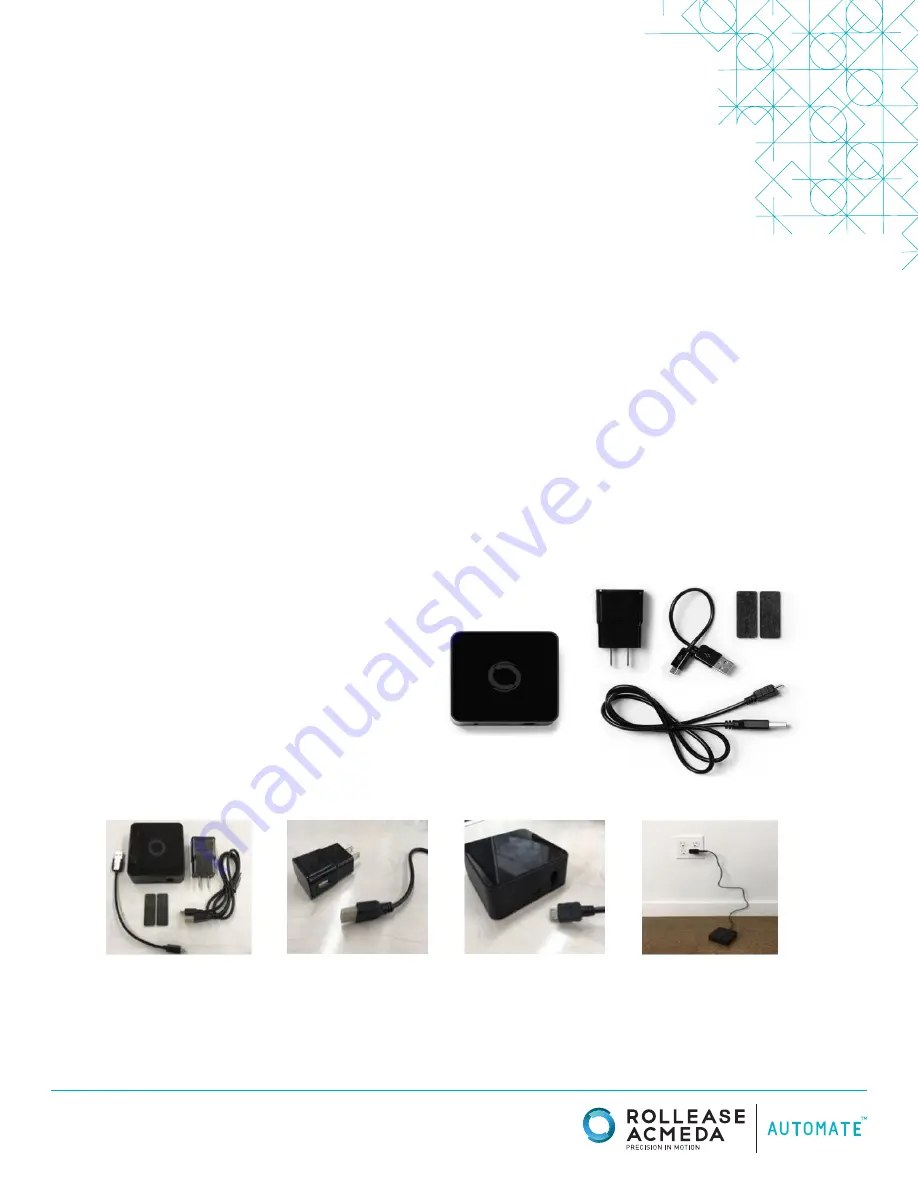
  

WHAT’S IN THE BOX?


„

1x Automate Pulse Bridge (a)


„

1x 6” Short Power Cord (b)


„

1x 12” Long Power Cord (c)


„

1x Outlet Power Plug (d)


„

2x Antiskid Pads (e) 

UNPACKING THE WI-FI BRIDGE 

Automate Pulse

Set-Up Instructions

A

B

C

D

E

1. Unpack the Wi-Fi Bridge.

2. Insert USB end of the 

power cord (long or short) 

into the outlet power plug.

3. Insert the micro USB 

end of the power cord (long 

or short) into the Wi-Fi 

Bridge.

4. Place the bridge in a 

centrally located position 

in your home and plug in 

to outlet. (You may need to 

experiment with different 

locations to be able to 

reach the desired shades).

Summary of Contents for Automate Pulse

Page 1: ...e within signal range of both the motorized window treatments and the Wi Fi router Wi Fi network must be visible Environments with multiple WAPs wireless access points may need to temporarily disable all but one Security settings may need to be temporarily disabled CAPABILITIES Motors per Bridge 30 Locations per account 5 Wi Fi Bridges per location 5 Rooms per Location 20 Scenes per Location 20 Ti...

Page 2: ... menu button in the upper left corner of the home screen 3 lines If required create a new account Select Sign Up on the bottom left corner of the screen Select the default Home option under LOCATION to open Location Settings Creating an account will require an email address and a password Select ADD NEW HUB to enter the pairing process SIGN IN with your account information SIGN IN with your accoun...

Page 3: ...Wi Fi Bridge will attempt to pair to your Wi Fi network for 60 seconds Select Set Hub after success Name your Wi Fi Bridge to complete the Wi Fi connection process All of the shades and scenes configured in your Automate Pulse app will now appear in the Devices section of the Alexa app Hold the Wi Fi Bridge set button for 2 seconds The bridge will start blinking blue to signify it is ready to pair...

Page 4: ...anual Configuration See Manual Configuration steps below STEP 15 STEP 16 STEP 17 STEP 18 Using a paper clip press and hold the recessed button on the Wi Fi Bridge until the Bridge blinks blue 3 times Press next when the Bridge begins blinking red Your Bridge should connect to your Wi Fi network and direct you to the Connected screen Press OK Name your Bridge and click finish to complete the Wi Fi ...

Page 5: ...The Automate Pulse app rights to use your smartphone tablet camera when prompted On the bottom of your Wi Fi Bridge there will either be a Number Letter code or a small QR code Use the camera to scan the QR code or manually type in the Number Letter code and press OK MANUAL CONFIGURATION STEP 23 STEP 24 STEP 25 STEP 26 On the home screen select Device then select the Plus icon to add a new shade d...

Page 6: ... individual channel not Ch 0 Remove the remote battery cover and press the upper left P2 button next to the battery The motor will jog up and HOW TO LINK EACH SHADE TO THE APP PAIRING COMPLETE Once the motors have paired the application will take you directly to the shade properties screen to edit the settings for your treatment STEP 28 STEP 29 STEP 30 STEP 31 Select the device Modify Device Type ...

Page 7: ...bleshooting pairing failures Once you have completed the pairing process for the Wi Fi bridge and linked all of your shades to the application you can create scenes to set a treatment or group of treatments to specific heights 1 On the lower menu bar select the Scene icon This will take you to the scene homepage 2 Select Add New Scene to begin programming your desired scene 3 Input your scene name...

Page 8: ...o the scene menu and pressing GO next to the desired scene name If you wish to set a programmed timer to activate your scene or individual shades please see the next section Programming Timers PROGRAMMING TIMERS You can program timers to trigger the specific operation of your shades and scenes at your desired times throughout the day 1 On the lower menu bar select the Timer icon This will take you...

Page 9: ...ommend that you turn off all but one to complete the network pairing process Once this is complete you can turn on all of the wireless access points and the Wi Fi Bridge will work without issue I CANNOT CONNECT TO MY 5GHZ WI FI NETWORK Rollease Acmeda Wi Fi Bridge does not currently support operation over a 5GHz network It operates on a 2 4GHz network Most routers are dual band and can support bot...

Reviews: