background image

14

Adding Effects to the Sound

Applying Effects (EFX)

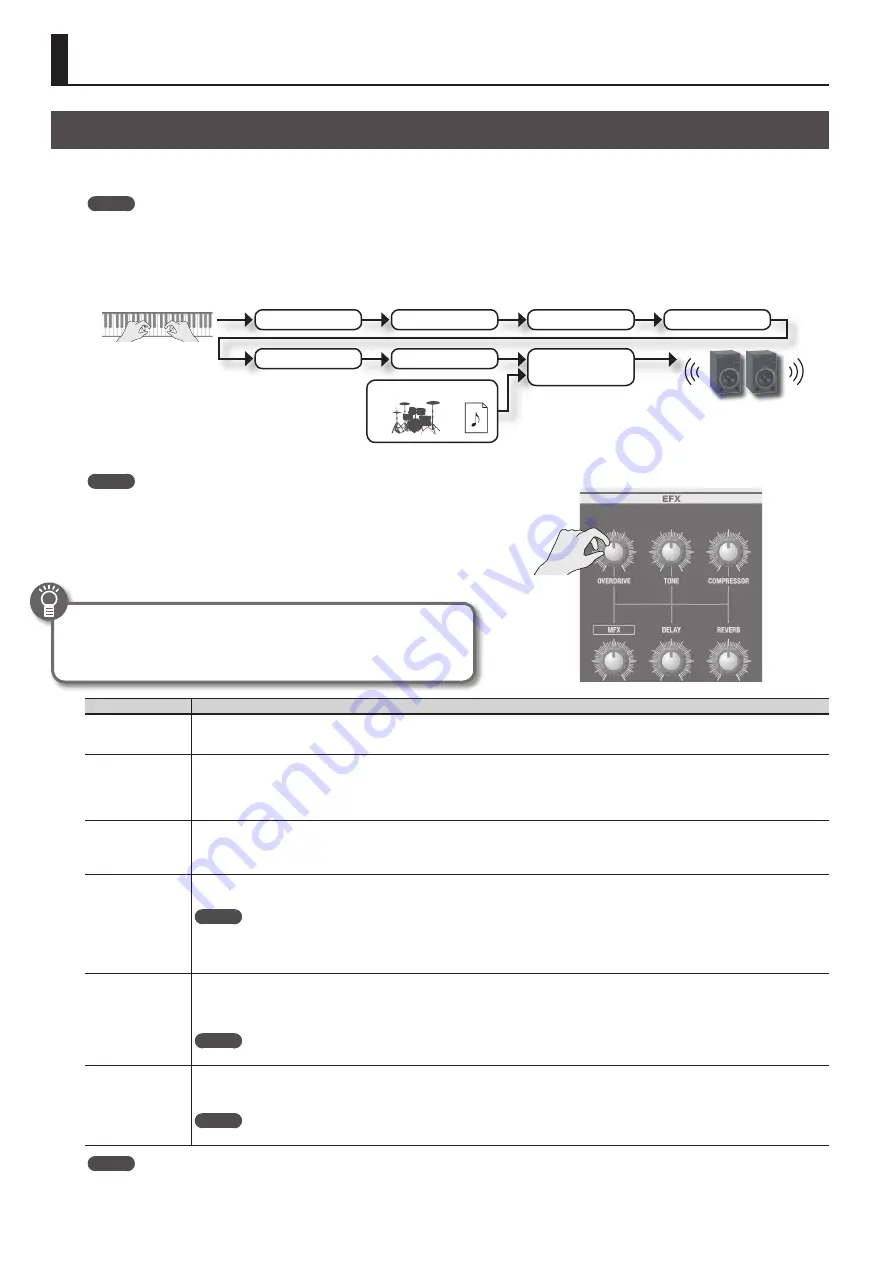
You can apply effects to the sounds you play. This unit contains 7 effect processors; each can be set independently.
For the six effects other than rotary, you can use “global control” to conveniently apply each effect in an appropriate way.

MEMO

•  If you’re playing two sounds (split or dual) (p. 15), the settings will determine which sound is affected.

When using Dual: 

The same effects will apply to both sounds.

When using Split: 

 The effects will be applied only to the upper part (except for reverb). However if you’ve assigned organ sound to the lower 

part, the same effects will apply to all parts.

•  The effects are connected in the order shown below.

MFX (Multi-effect)

Compressor

Overdrive

Rotary (p . 12)

Tone

Delay

Reverb

Play

Song

Rhythm pattern

1. 

Select a sound (p . 9) .

MEMO

Some sounds already have effects applied. 

The way in which effects are applied will differ depending on the sound.

2. 

Turn the knobs to adjust the depth of each effect .

*  The effects may cause noise or loud sounds. To prevent malfunction and/or 

damage to speakers, adjust the volume of external mixers and amplifiers.

What’s the global control?

This is technology that optimizes multiple parameters of an effect so that 

they can be controlled by a single knob.

Knob

Explanation

[OVERDRIVE] 

 knob

Produces a natural-sounding distortion as heard from a tube amp. 

If the knob is turned all the way to the left, no effect will be applied. 

Turning the knob toward the right will increase the depth of distortion.

[TONE] knob

Adjusts the tonal character of the low and high frequency ranges. 

If the knob is set to the center position, the response will be flat. 

Turning the knob toward the left will boost the mid-range, making the sound punchier. This is appropriate when playing in a band.  

Turning the knob toward the right will boost the low and high-frequency ranges, producing a more colorful sound. This is appropriate for solo 

performances.

[COMPRESSOR] knob

Compresses loud sounds and boosts the level of soft sounds. 

This narrows the dynamic range, helping to keep your playing audible within the performance of your band. 

If you turn the knob all the way to the left, no compressor effect will be applied. 

Turning the knob toward the right will smooth out the overall volume, making your sound more consistent.

[MFX] knob

This is a general-purpose multi-effect that can change the fundamental character of the sound, transforming it into something quite different. 

If you turn the knob all the way to the left, no effect will be applied.

MEMO

•  The selected type of multi-effect is shown in the bottom line of the display.
•  To change the multi-effect type, move the cursor to the lower line of the display and turn the [VALUE] dial.
•  The multi-effect gives you a choice of 20 types. You can use the menu to change the multi-effect type (MFX Type:

&

PDF).

[DELAY] knob

Produces an echo-like effect by delaying the sound. 

By layering the delayed sound with the original sound, you can add depth and spaciousness to the sound. 

If you turn the knob all the way to the left, no delay effect will be applied. 

Turning the knob toward the right will lengthen the delay time (the time from the original sound until the left and right delay sounds are heard).

MEMO

You can choose from six types of delay. Use the menu to change the delay type (Delay Type:

&

PDF).

[REVERB] knob

Adds reverberation to the original sound, simulating a spacious room. 

If you turn the knob all the way to the left, no reverb effect will be applied. 

Turning the knob toward the right will make the reverb deeper.

MEMO

You can use the menu to change the reverb type and the wall type (surface material) (Reverb Type:

&

PDF, Wall Type:

&

PDF).

MEMO

When you turn the [DELAY] knob or [REVERB] knob, the type will be displayed. You can turn the [VALUE] dial to change the type. 

If you press the [TRANSPOSE] button while the adjustment screen is shown, the adjustment screen will be held. Press the [EXIT] button to return 

to the previous screen.

Summary of Contents for V-combo VR-730

Page 1: ...d effects built into the unit MIDI Implementation This is detailed information about MIDI messages To obtain the PDF manual 1 Enter the following URL in your computer http roland cm om 2 Choose V Comb...

Page 2: ...u can select synthesizer sounds REFERENCE Adding Effects to the Sound p 14 Using the Rotary Effect p 12 Registration Sound and effect settings as well as combinations of sounds can be stored as a regi...

Page 3: ...ds 18 Layering Two Sounds Dual 18 Layering a Piano Sound and Synthesizer Sound 18 Combining an Organ Sound with a Piano Sound or Synthesizer Sound 18 Cancelling Dual 18 Playing Different Sounds in the...

Page 4: ...usts the tonal character COMPRESSOR knob Makes the sound more consistent MFX knob Applies a multi effect multiple effects DELAY knob Delays the sound to create an echo like effect REVERB knob Applies...

Page 5: ...ass sounds PAD button Selects synth pad sounds CHOIR button Selects choir sounds SFX button Selects sound effects OTHERS button Selects synthesizer sounds that are not shown on the panel SYNTH LEVEL b...

Page 6: ...the OUTPUT jacks Use the controls of the connected device to adjust its volume This sound cannot be recorded PHONES jack Connect you headphones sold separately to this jack USB COMPUTER port You can...

Page 7: ...rom damage Also handle the unit carefully do not drop it 2 Insert the batteries into the battery compartment taking care to observe the correct polarity orientation NOTE Carefully follow the installat...

Page 8: ...n the power on again Listening to the Demo Songs Here s how to listen to the demo songs 1 Turn the power on 2 Press the START STOP button 3 Press the START STOP button Demo playback starts When the se...

Page 9: ...Press the EXIT button to return to the previous screen The organ sounds of this unit reproduce the distinctive way in which notes played on a vintage organ are triggered even by a shallow key press Th...

Page 10: ...can be recalled instantly by pressing a single button This is a convenient way to switch sounds for each song or to instantly switch between settings during a live performance Registrations are organ...

Page 11: ...ODE PIANO Space button Inserts a space 5 Press the ENTER button or the MODE SYNTH Write button Your settings will be stored in the selected registration REFERENCE About the settings stored in a regist...

Page 12: ...eds at the fast and slow settings as well as the time it will take for the tweeter and woofer to change their speed when you switch the rotary effect ROTARY PDF If you re playing only organ sounds you...

Page 13: ...ng the bar will lengthen the time When you operate a bar the current value is shown in the screen MEMO While the value of a parameter is displayed you can turn the VALUE dial to adjust the value The v...

Page 14: ...a more colorful sound This is appropriate for solo performances COMPRESSOR knob Compresses loud sounds and boosts the level of soft sounds This narrows the dynamic range helping to keep your playing...

Page 15: ...ange of the D BEAM controller The illustration at right shows the effective range of the D BEAM controller Moving your hand outside this range will not produce any effect The effective range of the D...

Page 16: ...n Lever PDF For the following acoustic sounds you can use the modulation lever to produce dynamics effects N Trumpet N Alto Sax N Flute Making the Pitch Change Smoothly Portamento Portamento is an eff...

Page 17: ...ranspose You can transpose the pitch of the keyboard This setting specifies the pitch sounded by the middle C C4 key 1 Hold down the TRANSPOSE button and press the or button The display will indicate...

Page 18: ...DOWN UP buttons to specify the octave Combining an Organ Sound with a Piano Sound or Synthesizer Sound Organ sound Piano sound Synthesizer sound 1 Simultaneously press the MODE ORGAN button and a sou...

Page 19: ...N SPLIT button to make it light The SPLIT screen appears Lower part setting Volume LEVEL bar Type name of the organ sound Multi effect type PDF Upper part setting 3 Press the UPPER LOWER button to sel...

Page 20: ...art Use the CURSOR buttons to select a part and use the OCTAVE DOWN UP buttons to specify the octave Combining an Organ Sound with a Piano Sound or Synthesizer Sound Piano sound Synthesizer sound Orga...

Page 21: ...in left hand zone E1 B1 C2 C5 B4 C4 B2 C3 E7 1 Press the ORGAN SPLIT button or SYNTH SPLIT button to make it light 2 While holding down the SPLIT button you pressed in step 1 press the key that you w...

Page 22: ...of the rhythm pattern This setting specifies the tempo of the following functions Song SMF format recording and playback Tempo synchronized effects 1 Press the TAP TEMPO button The TEMPO screen appea...

Page 23: ...4 2 As desired select a rhythm pattern that will play while you record p 22 3 Press the REC button The REC button will light the START STOP button will blink and this unit will be in the record ready...

Page 24: ...eginning of the song If you press this at the beginning of a song you ll move to the beginning of the preceding song Hold down the button to rewind the song button Moves to the next song Hold down the...

Page 25: ...to a USB flash drive and play them on this unit You can copy the SMF audio files to the root folder of your USB flash drive or you can create a folder on the USB flash drive and copy the files into t...

Page 26: ...per Assign PDF or Expression Assign PDF to LOOPER Record standby Press the LOOPER button to enter the record standby condition Recording Recording will begin immediately when you press the START STOP...

Page 27: ...e ENTER button The audio file is loaded 4 Play back or record as described in Loop playback or Overdubbing in Recording with the Looper p 26 and subsequent steps Deleting the Phrase Here s how to dele...

Page 28: ...rt p 4 2 Press the MENU button 3 Turn the VALUE dial to select Media Utility 4 Press the ENTER button 5 Use the CURSOR buttons to select Save Registration 6 Press the ENTER button The SAVE REGISTRATIO...

Page 29: ...w be loaded individually into this unit NOTE When you load a registration the loading destination registration will be overwritten and lost If you don t want to lose that registration save it to a USB...

Page 30: ...that you want to initialize 2 Hold down the SYNTH button and press the EXIT button The screen indicates INITIALIZE and the selected synthesizer sound is initialized MEMO Synthesizer sounds can be init...

Page 31: ...s semi weighted waterfall keyboard with velocity Maximum Polyphony 128 voices Parts Organ 3 parts Piano 2 parts Synthesizer 2 parts Drum 1 part GM2 16 parts Sounds 245 sounds 268 sounds Power Supply A...

Page 32: ...Depending on the material and temperature of the surface on which you place the unit its rubber feet may discolor or mar the surface Maintenance To clean the unit use a dry soft cloth or one that is s...

Reviews: