background image


16


Applying Effects to the Sound


You can assign a variety of patch factors (p. 81), tone parameters (p. 82), and other settings to the V-Synth 
XT’s complement of controller sections. This is referred to as the 


Control Setup


. With intuitive editing of 

sound sources with the knobs, you can use the D-50 in ways that go way beyond the original instrument.


1.


Access the 


PATCH TOP


 Screen.


2.


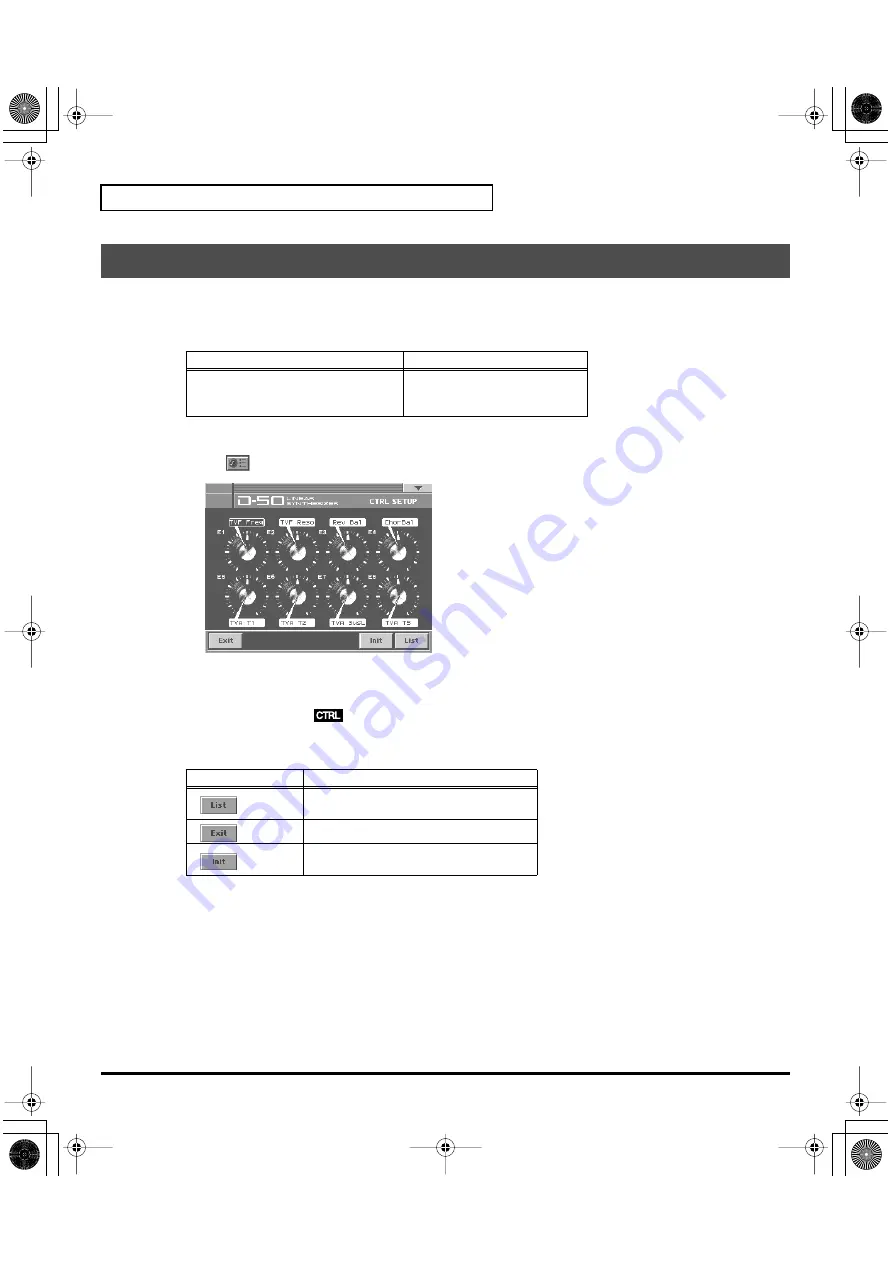
Touch 

 in the lower left of the screen. The 


CTRL SETUP


 window appears.


3.


When editing a parameter that requires you to specify a value, move the cursor to the value box of that 
parameter. Then modify the value by either turning the 


VALUE dial


 or pressing 


[INC/+]


 or 


[DEC/-]


Parameters marked by 

 can be controlled by specific CTRL Setup. For details on each parameter, 

refer to the corresponding reference page.
The on-screen keys have the following functions.


Assigning Parameters to the Controllers


Controllers

Parameters


E1–E8 knobs

Patch Factor (p. 81)
Tone Parameters (p. 82)
Partial Parameters (p. 83)


Keys

Functions


Displays the parameters to be assigned 
as a list.

Returns to the screen.

Restores the assigned parameters to their 
original factory condition.

vc1_for_XT_e2 16 ページ 2005年3月23日 水曜日 午後4時13分

Summary of Contents for V-Card

Page 1: ...ion of ROLAND CORPORATION Owner s Manual V Card Owner s Manual To resize thickness move all items on the front cover and registration marks to left or right fig 00 01 The V Synth XT comes with the VC...

Page 2: ...To resize thickness move all items on the front cover and registration marks to left or right...

Page 3: ...vc1_for_XT_e2 3...

Page 4: ...y Settings 28 Transferring Patches To and From the D 50 550 29 Transferring Patches from the D 50 to the VC 1 29 Transferring Patches from the VC 1 to the D 50 550 33 Copying a Reverb Type 35 Overview...

Page 5: ...le of Contents Key Mode Alteration 76 Sound List 78 Preset Patches 78 Patch Factors 81 Tone Parameters 82 System Parameters 85 Waveform 86 MIDI Implementation 88 Specifications 97 Index 98 vc1_for_XT_...

Page 6: ...apable of containing them All sound generator parameters are assignable to the V Synth XT s full complement of editing controls Parameters can also be edited with the touch panel allowing you to almos...

Page 7: ...nues to be used by creative artists around the world There are numerous sound libraries stocked with many original patches In the course of time however keyboards and buttons age and wear out It looke...

Page 8: ...p 11 V CARD button Starts up VC 1 p 11 Also used to switch among the software in the V CARD series VC 1 VC 2 and V Synth PREVIEW button By pressing the PREVIEW button you can audition preview the cur...

Page 9: ...e power on off p 11 Display Function NUMBER 1 8 These buttons let you select patches BANK BANK You can change the Patch bank Display Function VALUE Dial This is used to modify values If you hold down...

Page 10: ...gital interface format used for consumer digital audio devices MIDI Connectors IN OUT THRU Connect external MIDI devices here Use MIDI cables sold separately to make connections MAIN OUT Jacks L MONO...

Page 11: ...press the V CARD button and touch D 50 VC 1 in the screen that appears The VC 1 Startup screen appears The V CARD button works only in the PATCH PLAY screen V Synth System or the TOP screen VC 1 VC 2...

Page 12: ...Pre1 D 50 No Original D 50 preset patches Pre2 VC 1 No Newly added patches Pre3 PN D50 01 No D 50 D 550 sound library Pre4 PN D50 02 No D 50 D 550 sound library Pre5 PN D50 03 No D 50 D 550 sound libr...

Page 13: ...he PATCH TOP screen appears 2 Touch List in the upper left area of the display The PATCH List window appears fig 03 05 PatchList 3 Select a patch from the list Either turn the VALUE dial or use INC DE...

Page 14: ...specify whether or not a beep tone will be heard when you touch a valid point on the touch screen At the factory setting the beep tone will be sounded fig 03 07 1 In the upper right of the screen tou...

Page 15: ...in this manual in each Patch can be edited by taking the following procedure A patch consists of several Factors as show below fig 05 01e PatchFactorImage Variations of Control Functions Tone Tune To...

Page 16: ...meter that requires you to specify a value move the cursor to the value box of that parameter Then modify the value by either turning the VALUE dial or pressing INC or DEC Parameters marked by can be...

Page 17: ...Tone Select button or the Partial Select button Tone Parameters The Tones UPPER or LOWER to be applied are specified with the Tone Select button Partial Parameters The Partials L1 L2 L3 or L4 to be ap...

Page 18: ...s Balance TONE PARTIAL FORM p 57 Waveform WG Waveform PCM No WG PCM Wave No PW WG Pulse Width PW Velo WG PW Velocity Range PW Aftr WG PW Aftertouch Range PW LFO WG PW LFO Select PW LFOD WG PW LFO Dept...

Page 19: ...g the VALUE dial or pressing INC or DEC 5 Repeat steps 3 4 to set patch factors 6 If you wish to save the changes you ve made perform the Save operation p 27 If you do not wish to save changes press E...

Page 20: ...r Tones are played by each key in 8 voices polyphony SPLIT The Split mode divides the keyboard into upper and lower sections where two different Tones can be played in 8 voices polyphony That is the V...

Page 21: ...is selects the Tone that on the Pedal Hold effect When the Key mode is Whole Pedal Hold always works whichever of the above three modes may be selected Value U L UL Time Portamento Time This sets the...

Page 22: ...cts many times in the environment fig 05 16e LCD_PatchEditControl Output Mode Output Mode Selects one of the following four output modes Value 1 4 OUTPUT Output Mode Display Function Stereo reverb wor...

Page 23: ...Display Description Display Description 1 Small Hall 17 Bright Hall 2 Medium Hall 18 Large Cave 3 Large Hall 19 Steel Pan 4 Chapel 20 Delay 248 ms 5 Box 21 Delay 338 ms 6 Small Metal Room 22 Cross De...

Page 24: ...the number of repeats of the delayed sound differ Value UL ULL ULU When the Key Mode is Dual When the Key Mode is Whole Level Chase Level Sets the volume of the chase sound Value 0 100 Time Chase Time...

Page 25: ...0 50 approx 2 cents You can change the setting of the MIDI Functions included Patch Factor as follows fig 05 19 LCD_PatchEditControl Midi TxCH Transmit Channel The transmit channel of each Patch can b...

Page 26: ...A pulldown menu appears 3 In the pulldown menu touch PATCH NAME or TONE NAME The window for naming appears fig 06 02 LCD_PatchName ToneName 4 Touch the on screen alphabetic or numeric keys to enter th...

Page 27: ...ITE window appears 4 Turn the VALUE dial to specify the save destination patch When you touch ReName the PATCH NAME window will appear allowing you to rename the patch By touching Compare you can chec...

Page 28: ...the V Synth XT owner s manual 1 Press MODE The MODE MENU window appears 2 Touch FACTORY RESET The Factory Reset screen appears fig 08 11 ModeMenu 3 Touch OK 4 Touch Execute to execute the Factory Rese...

Page 29: ...n lost The patches are restored when you turn the power off then on again The transferred patch data 64 patches will be lost if you turn off the power Be sure to save the data Saving Transferred Patch...

Page 30: ...ENTER button When the data transfer is completed the display shows Complete 6 Return the Memory Protect of the D 50 to On 6 1 Press the TUNE FUNCTION button 6 2 Select Protect with the Selector butto...

Page 31: ...SFER button specify B Dump with the Selector button 5 Press the D 50 s ENTER button to begin the bulk dump When the data transfer is completed the D 50 s display shows Complete 6 Press the EXIT button...

Page 32: ...3 Touch Bank Copy in the left of the screen The Bank Copy screen appears 4 When editing a parameter that requires you to specify a value move the cursor to the value box of that parameter Then modify...

Page 33: ...the V Synth XT to On 5 1 Press MODE 5 2 Touch SYSTEM 5 3 Select Exclusive Sw then turn the V Synth XT s VALUE dial to specify On 6 Press MODE on the V Synth XT The MODE MENU window appears 7 Touch DA...

Page 34: ...ns then press the ENTER button while holding the DATA TRANS button 4 3 Press the ENTER button again fig 04 05a 5 Turn the Exclusive Sw of the V Synth XT to On 5 1 Press MODE 5 2 Touch SYSTEM 5 3 Selec...

Page 35: ...Reverb types from a bank other than the internal banks any from 1 through 32 can be copied to a reverb type in the internal banks any from 17 through 32 This is convenient when for example you want to...

Page 36: ...source Patch Bank of Reverb Type Value P1 P6 I1 I8 No Selects the source Reverb Type Value 1 32 Destination Bank Selects the destination Patch Bank of Reverb Type Value I1 I8 No Selects the destinati...

Page 37: ...n the Work Area Bulk dumped data is cleared if the power is simply turned off so be sure to save the data to the VC 1 p 27 Temporary Area Patch data selected for performance is further taken from the...

Page 38: ...og synthesizer or a PCM sampled synthesizer Consequently They are referred to as Partials since they are far more than just a pure synthesizer These Partials are combined in pairs to form a TONE A Ton...

Page 39: ...n be obtained This is effective for making strings or organ type sounds fig 07 06 RingModulatorBlock Partial 1 can be mixed with the ring modulated sound of Partials 1 and 2 Ring Modulator p 40 Tone A...

Page 40: ...e Patch Ring Modulator The Ring Modulator multiplies two sounds creating an unusual and metallic sound that contains complicated harmonics For instance two waveforms and are multiplied and waveform is...

Page 41: ...can be set here The pitch is a Common parameter and is therefore controlled by P ENV and LFO 1 Waveform PCM Wave Number This selects the waveform of the sound source When a synthesizer sound generato...

Page 42: ...lope Generator This generators a control signal envelope curve which controls the pitch timbre and volume of each Partial sound generator P ENV This is the ENV which controls pitch It can be set for t...

Page 43: ...eady been prepared carry out the Initialize operation p 49 2 The parameters are organized into several editing groups Touch one of the buttons at the bottom of the screen to select the edit group cont...

Page 44: ...n SHIFT as you move the VALUE dial to increase value increments to make large value changes more quickly INC and DEC Press INC to increase the selected value and DEC to decrease it Keep the button pre...

Page 45: ...elect PANEL_Strycture1Button The Partial select setting will be written into the VC 1 by taking the saving procedure p 27 While editing a Partial parameter any Partial sound can be muted Partial Mute...

Page 46: ...ppears fig 08 06 LCD_ToneCopyWindow 4 Touch some buttons checkbox in the left side of the screen to select the object you want to copy 5 Touch a button valuebox in the right side of the screen to sele...

Page 47: ...PPER LOWER PARTIAL Source Partial Select the Partial parameter to be copied Value ALL COMMON PART 1 PART 2 BLOCK Source Block If either PART 1 or PART 2 is selected in any of the following Blocks can...

Page 48: ...inal sound before it was edited The Compare function allows you to call the original Patch without erasing the edited sound 1 In the upper right of the screen touch A pulldown menu appears 2 In the pu...

Page 49: ...the patch that you wish to initialize p 12 2 Touch in the upper right of the screen A pulldown menu appears 3 In the pulldown menu touch INITIALIZE The INITIALIZE window appears fig 08 10 LCD_Initiali...

Page 50: ...e of the Upper and Lower Tone Value 0 99 Common Parameters Structure Number Partial 1 Partial 2 Combination of two Partials 1 S S Mixture of Partial 1 and partial 2 2 S S Mixture of Partial 1 and ring...

Page 51: ...ter effect on the envelope Value 0 2 fig 09 10 TimeKeyFollow TKF Keyfollow Time Sets the time of the P ENV depending on the key played Higher values change the time more drastically Value 0 4 P ENV Ti...

Page 52: ...sed to point 4 Value 0 50 P ENV Level Edit fig 09 13 LCD_P ENV Level L0 Level 0 Sets the pitch created the moment a key is pressed Value 50 50 L1 Level 1 Sets the pitch of the point 1 Value 50 50 L2 L...

Page 53: ...en the effect Value 0 100 After Pitch Aftertouch Modulation This sets the sensitivity of the vibrato depth controlled by aftertouch Higher values deepen the vibrato effect Value 0 100 The parameters o...

Page 54: ...arameters fig 09 17e EQ_Lg LowFreq Low Frequency Sets the frequency where the gain is altered in the low to middle range Value 63 75 88 105 125 150 175 210 250 300 350 r420 500 600 700 840 Hz LowGain...

Page 55: ...EQ_Hg HiGain High Gain Sets the gain of the Hf frequency settings raise the gain and settings lower it Value 12 12 dB fig 09 20 LCD_ChorusEdit Chorus Edit Type Chorus Type Selects one of the 8 basic...

Page 56: ...heard Restriction of the available parameters caused by Structure Depending on what Structure p 50 is used the available parameters may be different 1 Some parameters included in a Partial that uses a...

Page 57: ...ves of the PCM sound generator p 86 Value 1 127 WG PW WG Pulse Width fig 09 22 LCD_WgPw fig 09 23 PulseWidth PW Pulse Width A square waveform has exactly the same width up and down but a Pulse wavefor...

Page 58: ...e width With values the pulse width becomes smaller with stronger aftertouch and with values the pulse width becomes wider with stronger aftertouch Value 7 7 LFO LFO Select Pulse Width Modulation PWM...

Page 59: ...itch Usually the keyboard to a synthesizer assigns a semi tone to each key This parameter can change the pitch ratio as show below The value represents how many octaves are changed over 12 keys Value...

Page 60: ...alue OFF KEY NOM Display Description OFF No vibrato is obtained Vibrato is on Vibrato is on but inverted A L Vibrato can be obtained only by Aftertouch and Bender Lever Display Description OFF No alte...

Page 61: ...ill finally fade out Value 0 100 TVF Time Variant Filter Bender Mode Example If the Bender range is set to 12 1 octave and the Keyfollow Pitch of WG is set to 2 the maximum pitch change caused by movi...

Page 62: ...Keyfollow curve and set the range bias direction where the bias level is valid The bias range is where the bias level is valid on the keyboard It can be set with the bias point where the bias range b...

Page 63: ...harder Value 0 100 DKF Keyfollow Depth This can change the TVF ENV depth depending on the key played Higher values change the depth more drastically Value 0 4 TKF Keyfollow Time fig 09 36 TimeKeyFollo...

Page 64: ...0 T2 Time 2 Sets the time needed to reach point 2 from point 1 Value 0 100 T3 Time 3 Sets the time needed to reach point 3 from point 2 Value 0 100 T4 Time 4 Sets the time needed to reach point 4 from...

Page 65: ...Level This sets the level of point 4 Value 0 100 EndL End Level To lower the level after releasing the key set this to 0 and to raise the level set it to 100 Value 0 100 The End Level is retained unti...

Page 66: ...ange the overall volume of the keyboard bias level from the set level and set the range bias direction where the bias level is valid This bias range is where the bias level is valid on the keyboard It...

Page 67: ...played 0 to 4 are valid Higher values change the time more drastically Value 0 4 TVA ENV Time An envelope curve is determined by times and levels fig 09 37e TvaEnv fig 09 43 LCD_TvaEnvTime T1 Time 1...

Page 68: ...Value 0 100 SusL Sustain Level Sets the level of point 4 Value 0 100 EndL End Level To lower the level after releasing the key set this to 0 and to raise the level set it to 100 Value 0 100 The End L...

Page 69: ...FO Depth Sets the depth of a growl effect Higher values deepen the effect Value 0 100 After Aftertouch Range Sets the sensitivity of the aftertouch that controls the cutoff point values lower the cuto...

Page 70: ...ets the depth of the tremolo effect Higher values deepen the effect Value 0 100 After Aftertouch Range Sets the sensitivity of the aftertouch that controls the volume values lower the volume by strong...

Page 71: ...ither turning the VALUE dial or pressing INC or DEC 4 Repeat steps 3 to make the settings for the System function 5 After you have edited the settings of the System function touch Write located in the...

Page 72: ...y shows the frequency of the A4 note center A Value 427 452 Hz Sound Character Sets whether the output characteristics of the sound are the same as those of the D 50 D 50 or the V Synth XT V Synth Val...

Page 73: ...ges set this to On Program Change messages are transmitted only when a Patch is selected by operating the V Synth XT s panel buttons or when the Program Change number to be transmitted is altered also...

Page 74: ...ted to an external device However it cannot be transmitted by Patch Shift with the pedal switch or by patch selection with the Program Change messages sent from an external device Bank S Bank Select S...

Page 75: ...ings or to the factory settings System Initialize fig 10 04a 1 Access the System Edit screen 2 Touch Init located in the lower right of the screen 3 If you want the factory settings to be in effect th...

Page 76: ...Tones are played and how the control messages run as shown in the following pictures Mono Mode Poly Mode Name Functions Poly Mode Allows the control of more than one Key message on one channel at a a...

Page 77: ...ate Separate S Separate Solo Key Mode Poly Mode Mode Message Off Mono Mode Receive Channel Lower Upper Lower Receive Channel Group Upper Lower Upper Receive Channel Rceive Channel Lower Upper Lower Re...

Page 78: ...orale Pianissimo D D S D W D D D 8 Intruder FX Steel Pick Synth Bass Afterthought Bones Bottle Blower Future Pad PCM E Piano D D D D D D D D No 1 2 3 4 5 6 7 8 BANK 1 Brass Tacks A Bright Day Soft EPi...

Page 79: ...D S W D 8 Star Peace Chorus Spacy Voice Thinful Vox Harmonium Android Nuns Pressure Pad Digital Sound D D D D D D D D No 1 2 3 4 5 6 7 8 BANK 1 Synthetic Piano 1 Upright Pianer Loud Piano Tack Piano...

Page 80: ...D D D 8 Whispy Vox Alpha Omega Ensemble Vox n Sawz 4th Synth Vox Husky Voices Stereo Panorama Voyageur Glass Voice 2 D D D D D D D D No 1 2 3 4 5 6 7 8 BANK1 Perc E Piano Ballad Piano Choir New Age P...

Page 81: ...ode U L UL Time Portamento Time 0 100 Mode Portamento Mode U L UL OUTPUT p 22 Mode Output Mode 1 4 RevType Reverb Type 1 32 RevBal Reverb Balance 0 100 Vol Total Volume 0 100 CHASE p 24 Mode Chase Mod...

Page 82: ...0 Level0 50 50 L1 Level1 50 50 L2 Level2 50 50 SusL Sustain Level 50 50 EndL End Level 50 50 Pitch Mod LFOD LFO Depth 0 100 Lever Pitch Lever Modulation 0 100 Aftr Pitch Aftertouch Modulation 0 100 LF...

Page 83: ...Parameter Value Comment FORM p 57 WG Form Wave Waveform SQU SAW PCM PCM Wave No 1 127 WG PW PW Pulse Width 0 100 Velo Velocity Range 7 7 After Aftertouch Range 7 7 LFO LFO Select 1 1 2 2 3 3 LFOD LFO...

Page 84: ...city Range 50 50 BP Bias Point Bias Direction A1 C7 A1 C7 BLevel Bias Level 12 12 TVA ENV Velo Velocity Follow 0 4 TKF Time Keyfollow 0 4 TVA ENV Time T1 Time1 0 100 T2 Time2 0 100 T3 Time3 0 100 T4 T...

Page 85: ...r Sound Character D 50 V Synth Digital Freq Digital Output Frequency 44 1 48 96 kHz MIDI p 73 MIDICH Basic CH 1 16 Control Control B CH G CH MdeOff Separate CH Separate Mode Receive CH 1 16 Prog C Pro...

Page 86: ...Harmo Flute Harmonics 39 Lips1 Lips 1 40 Lips2 Lips 2 41 Trumpt Trumpet 42 Bones Trombones 43 Contra Contrabass 44 Cello Cello 45 VioBow Violin bow 46 Violns Violins 47 Pizz Pizzicart Number Display...

Page 87: ...y Wurly 103 FM EP FM Electric Piano 104 M_Box Music Box 105 Kalmb2 Kalimba 2 106 StlGtr Steel Guitar 107 Sitar Sitar 108 FM Bs FM Bass 109 MtlVox Metal Voice 110 Hit Hit 111 Sync Sync 112 FMMod1 FM Mo...

Page 88: ...when Program Change Switch SYSTEM MIDI is OFF System Realtime Messages Active Sensing Status FEH This message is transmitted at intervals of approximately 250 msec System Exclusive Messages Status F0...

Page 89: ...ller number 6 38 Status 2nd byte 3rd byte BnH 06H mmH BnH 26H llH n MIDI channel number 0H FH ch 1 16 mm ll the value of the parameter specified by RPN NRPN mm MSB ll LSB Volume Controller number 7 St...

Page 90: ...21 Status 2nd byte 3rd byte BnH 79H 00H n MIDI channel number 0H FH ch 1 16 When this message is received all controllers on the corresponding channel will be set to their reset values MONO Controller...

Page 91: ...rea Address Description 00 00 00 Upper Partial 1 temp area 00 00 40 Upper Partial 2 temp area 00 01 00 Upper Common temp area 00 01 40 Lower Partial 1 temp area 00 02 00 Lower Partial 2 temp area 00 0...

Page 92: ...F ENV Time T2 0 100 0 100 18H 0vvv vvvv TVF ENV Time T3 0 100 0 100 19H 0vvv vvvv TVF ENV Time T4 0 100 0 100 1AH 0vvv vvvv TVF ENV Time T5 0 100 0 100 1BH 0vvv vvvv TVF ENV Level L1 0 100 0 100 1CH 0...

Page 93: ...vvvv LFO 2 Sync 0 1 Off On 21H 0vvv vvvv LFO 3 Waveform 0 3 Triangle Sawtooth Square Random 22H 0vvv vvvv LFO 3 Rate 0 100 0 100 23H 0vvv vvvv LFO 3 Delay Time 0 100 0 100 24H 0vvv vvvv LFO 3 Sync 0 1...

Page 94: ...0vvv vvvv Chase Time 0 100 0 100 25H 0vvv vvvv MIDI Transmit CH 0 16 Basic 1 16 26H 0vvv vvvv MIDI Separate Mode Receive CH 0 16 Off 1 16 27H 0vvv vvvv MIDI Transmit Program Change 0 100 Off 1 100 28H...

Page 95: ...ff 11B 3 Upper On Lower On BIN DEC Description 0000B 0 Upper Partial2 Off Upper Partial1 Off Lower Partial2 Off Lower Partial1 Off 0001B 1 Upper Partial2 Off Upper Partial1 Off Lower Partial2 Off Lowe...

Page 96: ...X X X X X X O X 1 16 1 16 Mode 3 Mono Poly Omni Off Mode 1 Mode 3 Mode 2 Mode 4 O X 0 127 12 108 X O O O 0 63 O X X O O X X O X 1 Can be set to O or X manually and memorized 2 RPN Registered paramete...

Page 97: ...c Synthesis Polyphony 16 voices Waveforms Synthesizer 2 PCM 128 Internal User Memory Banks 8 Patches 512 Preset Memory Banks 6 Patches 384 In the interest of product improvement the specifications and...

Page 98: ...e 48 CONTROL 21 Control 73 Control Setup 16 Cursor Buttons 44 cursor buttons 44 Cutoff Frequency 61 D Delay 54 Delay Time 54 Depth 55 63 Destination Bank 32 36 DIGITAL AUDIO INTERFACE 10 Digital Freq...

Page 99: ...IDI Connectors 10 MOD 69 Mode 21 22 24 Mode Message OFF mode 73 Modulation 69 N Naming 26 No 36 Number 12 NUMERIC KEY 9 O OUTPUT 22 Output Mode 22 P parameter 43 Parameter Copy 47 Partial 38 Partial B...

Page 100: ...Time 1 52 64 67 Time 2 52 64 67 Time 3 52 64 67 Time 4 52 64 Time 5 64 68 Time Variant Amplifier 66 Time Variant Filter 61 TKF 51 63 67 Tone 39 Tone Balance 20 Tone Copy 46 Tone Select 19 TONE TUNE 2...

Reviews: