11
TR-REC
(Step Recording)
In this method of recording, you create a pattern by specifying the
steps at which each track will sound. You can even play back the
pattern while you’re creating it.
* If you want to keep the edits that you made to a pattern or kit, you
must save that pattern or kit (
1.
Press the
[TR-REC]
button.
2.
Use the variation buttons to select A–H.
3.
Press the
[START/STOP]
button to start recording.
4.
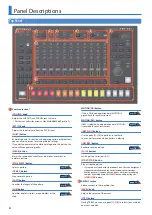
Press one of the INST select buttons to select the
track that you want to record.
5.
Press pads
[1]
–
[16]
to input the steps at which you
want sound to play.
6.
Repeat steps 4–5.
MEMO
You can change the scale. For details, refer to
Pattern Settings (Pattern Setting)”
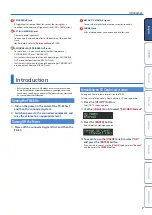
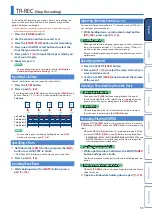
Inputting Sub Steps
You can sub-divide a step and input sub steps within it.
1.
Press the
[SUB]
button.
2.
Press a pad
[1]
–
[16]
.
By holding down the
[SUB]
button and turning the
[VALUE]
knob
you can choose 1/2, 1/3, or 1/4 as the number of step divisions.
Sub Step
Pad
1
Pad
2
Pad
3
Pad
4
Pad
5
Step
1
Step
2
Step
3
Step
4
Step
5
no Sub Step
Sub Step 1/2
Sub Step 1/3
Sub Step 1/4
MEMO
You can also input a sub step by holding down the
[SUB]
button and pressing a pad
[1]
–
[16]
.
Specifying a Flam
1.
Hold down the
[SHIFT]
button and press the
[SUB]
button to set SUB STEP to FLAM.
SUB STEP and FLAM alternate each time you press the button.
2.
Press a pad
[1]
–
[16]
.
Inputting Weak Beats
1.
While holding down the
[SHIFT]
button, press a
pad
[1]
–
[16]
.
Inputting Alternate Sounds
(ALT INST)
For sounds whose name includes a
“/”
character, such as 707Bass1/2,
you can input alternate sounds.
1.
While holding down an instrument select button
[BD]
–
[RC]
, press a pad
[1]
–
[16]
.
Alternate sounds
Although one sound is assigned to each pad, sounds (instrument’s
tones) whose name includes a
“/”
character, such as 707Bass1/2,
are also assigned a second sound (alternate sound).
You can switch between normal sounds and alternate sounds for
performance.
Specifying Accents
1.
Press the ACCENT
[STEP]
button.
2.
Press pads
[1]
–
[16]
to select the steps at which you
want to add an accent.
3.
Use the ACCENT
[LEVEL]
knob to adjust the volume
of the accent.
Deleting a Recorded Step from the Track
Deleting only a portion
If you press the
[CLEAR]
button during playback, the step of
the track selected by the INST select buttons is deleted from the
pattern only while you’re holding down the
[CLEAR]
button.
Deleting all
While holding down the
track
select button of the instrument
that you want to delete, press the
[CLEAR]
button.
Recording/Playing MOTION
While the MOTION
[REC]
button is lit, movements of the instrument
[TUNE]
knobs,
[DECAY]
knobs, and
[CTRL]
knobs are recorded in the
steps.
While the MOTION
[ON]
button is lit, recorded movements of the
instrument
[TUNE]
,
[DECAY]
, and
[CTRL]
knobs are played back.
* REVERB LEVEL, DELAY LEVEL/TIME/FEEDBACK, MASTER FX CTRL, and
MASTER FX ON are also recorded and played back according to the
state of the buttons described above.
Another operating method
1.
While a pattern plays, hold down the MOTION
[REC]
button and operate a knob.
This lets you record a motion only while you’re holding down the
button.
Entering a value at a specified step
While the
[TR-REC]
button is lit, you can specify a step and enter a
value for a knob.
1.
Operate a knob while holding down a pad
[1]
–
[16]
.


