7
Panel Descriptions
Rubix44
Front Panel
MEMO
The following explanation and illustration covers the
INPUT (1L, 2R) jack section. The Rubix44 additionally has
INPUT (3L, 4R) jacks with placement and functionality that
are equivalent to the INPUT (1L, 2R) jacks. This explanation
applies in the same way to the INPUT (3L, 4R) jack section.
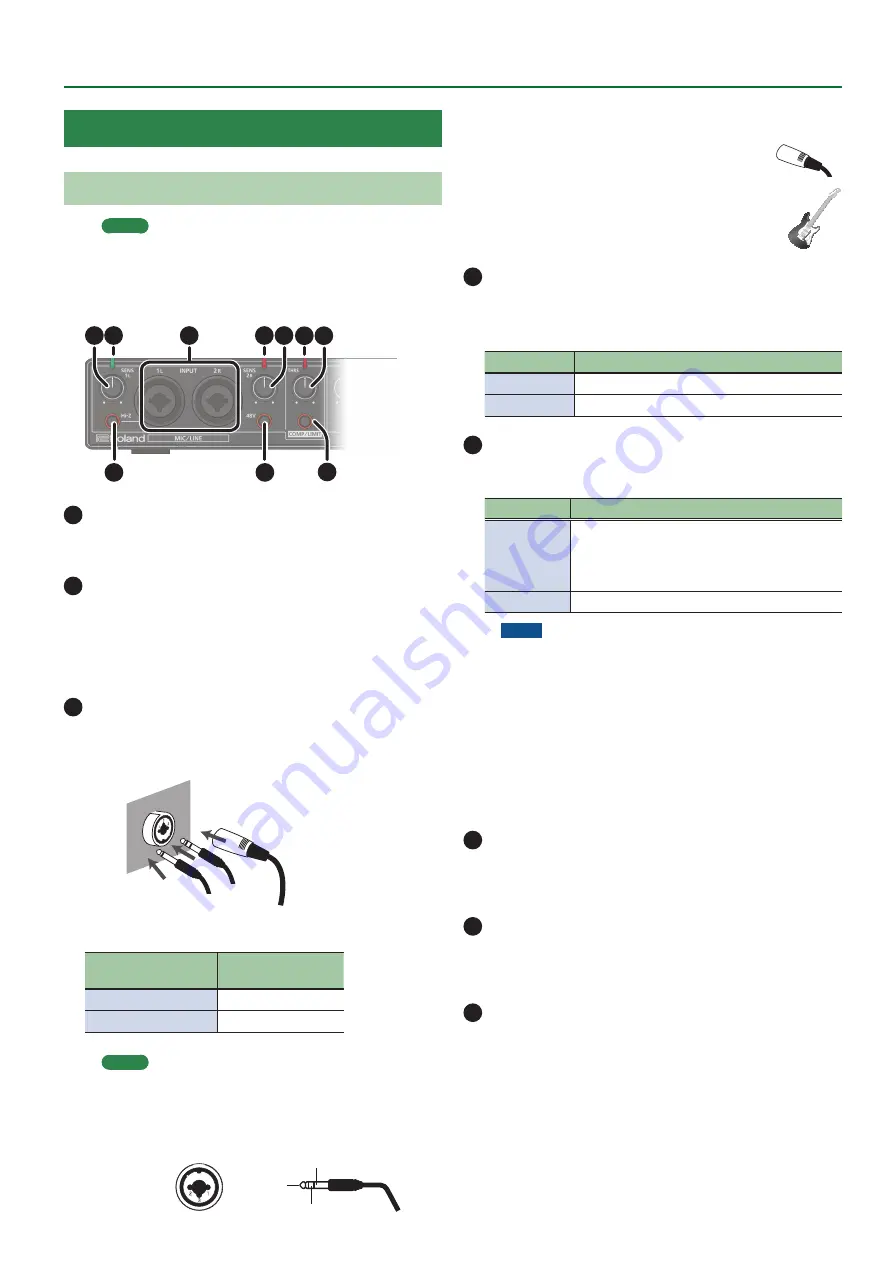
5
1
1
2
2
3
4
8
7
6
1
[SENS 1L] knob, [SENS 2R] knob
Adjust the volume of the audio signal that is input via the
INPUT (1L, 2R) jacks.
2
Level indicator
The indicator is lit green if an audio signal greater than -24 dB (*) is
being input to the INPUT (1L, 2R) jacks. If the input level is -3 dB (*)
or higher, the indicator is lit red. If the indicator is lit red, use the
[SENS 1L] knob and [SENS 2R] knob to adjust the input level.
* The level relative to the maximum allowable input (0 dB)
3
INPUT (1L, 2R) connectors (combo jacks)
These are analog audio input jacks with microphone preamps. They
accommodate both XLR connectors and 1/4-inch phone type jacks,
and support both balanced and unbalanced connections.
XLR
connector
(balanced)
Phone type plug
(unbalanced)
TRS phone
type plug
(balanced)
INPUT (1L, 2R)
connectors
Input sensitivity
XLR connector
-60– -12dBu
Phone type plug
-44–+4dBu
MEMO
5
To prevent malfunction and equipment failure, always turn
down the volume, and turn off all the units before making
any connections.
5
Pin assignment of INPUT connector/jack
1: GND
2: HOT
3: COLD
GND (SLEEVE)
HOT (TIP)
COLD (RING)
5
Set the [Hi-Z] button (p. 7) and [48V] button (p. 7) as
appropriate for the audio device that is connected.
5
Use a microphone with an XLR connector.
The sound level will be very low if you use a
microphone with a phone type plug.
5
When connecting a guitar or bass, use the INPUT 1L
or INPUT 3L jack. The sound level will be very
low if you connect directly to the INPUT 2R or
INPUT 4R jack.
4
[Hi-Z] button
Determines the impedance of the INPUT 1L jack.
You can select high impedance (Hi-Z) or low impedance (Lo-Z) as
appropriate for the connected equipment.
[Hi-Z] button
Equipment connected to the INPUT 1L jack
Lit (Hi-Z)
Guitar or bass
Unlit (Lo-Z)
Other equipment (such as synthesizers)
5
[48V] button
Determines whether the Rubix44 supplies phantom power to the
XLR connectors of the INPUT (1L, 2R) jacks.
[48V] button Connected equipment
Lit
Condenser microphone that requires phantom
power
* Phantom power supplied by this unit: DC 48 V;
maximum 6 mA. (current value per channel)
Unlit
Other equipment
NOTE
5
You must leave the [48V] button set to
“OFF”
unless
condenser microphones requiring phantom power are
connected to the XLR connectors. Supplying phantom
power to a dynamic microphone or to an audio playback
device may damage the equipment. For details on the
requirements of your microphone, refer to its owner’s
manual.
5
Minimize the volume before you turn phantom power on
or off. Even if the volume is minimized, turning phantom
power on/off might make a sound, but this is not a
malfunction.
6
Reduction indicator
If the [COMP/LIMIT] button is turned on, this indicator is lit red
when the audio input signal exceeds the level specified by the
[THRS] knob.
7
[THRS] knob
Specifies the level at which the compressor or limiter will begin
operating. As you turn this knob toward the right, the compressor
or limiter will be applied more deeply, producing a thicker sound.
8
[COMP/LIMIT] button
Turns the compressor/limiter on/off.


