


13
MC-09
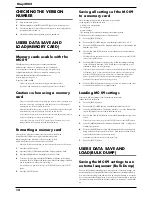
Saving MC-09 data on an
external MIDI sequencer
1.
Use a MIDI cable to connect the MC-09’s MIDI OUT tothe MIDI IN of
your external MIDI sequencer.
2.
Press the [SETUP] button.
3.
Press the [INC] or [DEC] button until the display indicates "DMP”(Bulk
Dump).
4.
Press the [ENTER] button.
5.
Use the [INC] and [DEC] buttons to select the data that you want to
save.Ptn: Settings for the currently selected pattern Ptc: Process
patchesALL: All patterns, process patches, and system settings
6.
Press the [ENTER] button. The display will blink "SUR”(Sure), asking you
to confirm the operation. If you decide to cancel, press the [EXIT] button.
7.
Begin recording on your external MIDI sequencer.
8.
Press the [ENTER] button to initiate the bulk dump. While the data is
being transmitted, the indication in the display will blink. When
transmission is completed, the display will show “END”.
9.
Stop recording on your external MIDI sequencer.
10.
Press the [EXIT] button to complete the bulk dump.
Restoring MC-09 data from an
external MIDI sequencer
The data that was saved by a bulk dump is referred to as bulk data. By loading
this bulk data, you can reproduce the state in which the MC-09 was when it
transmitted the bulk data.
1.
Use a MIDI cable to connect the MC-09’s MIDI IN to the MIDI OUT of the
external MIDI sequencer.
2.
Press the [SETUP] button.
3.
Press the [INC] or [DEC] button until the display indicates "rcv”(Bulk
Receive).
4.
Press the [ENTER] button. The MC-09 will wait to receive bulk data. If
you decide to cancel, press the [EXIT] button.
5.
Play back your external MIDI sequencer to transmit the bulk data to the
MC-09. While the MC-09 is receiving bulk data, the display will
blink.When bulk data reception ends, the display will indicate “BSY”.
This display will continue for approximately 60 seconds.
*
Never turn off the power while "BSY”appears in the display. Doing so will
damage the data in the memory card and internal memory.
*
You must transmit all of the bulk data.
6.
Press the [EXIT] button to complete the operation, after the display
indicates “rcv”.
RESTORING THE FACTORY
SETTINGS
Restoring the factory settings
(Factory Reset)
By carrying out a Factory Reset, the following settings of the MC-09 are
restored to their original factory-set condition.
· System settings
· All patterns you’ve saved (User Patterns)
*
Once you execute a Factory Reset, all the settings you’ve saved will be lost, being
replaced by the settings your unit originally had when it left the factory. If
internal memory contains important data that you want to keep, you must save
it on a memory card, or to an external MIDI sequencer via bulk dump.
1.
Press the [SETUP] button.
2.
Press the [INC] or [DEC] button until the display indicates “Fct”.
3.
Press the [ENTER] button. The display will show “Sur”.
4.
To execute the factory reset, press the [WRITE] button. While the factory
settings are being restored, “BSY” will appear in the display. When the
factory reset is finished, you’re returned to where you were in step 2.
*
If you decide not to restore the factory settings, press the
[SETUP]
button or the
[EXIT]
button.
*
Never turn off the power while “BSY”appears in the display. Doing so will
damage the system.
5.
Press the [SETUP] button to return to the previous display.
SYSTEM SOFTWARE UPDATE
PROCEDURE
General Outline
The MC-09 uses a Flash Memory for the system program.
The Flash Memory updater (control program) is stored within the Flash
Memory.
Generally, data for updating is provided in divided SMF data. The program
version is updated by connecting a playable sequencer (MC-80, etc.) to the MC-
09 with a MIDI cable and then loading SMF data to the MC-09.
The Flash Memory consists of 2 areas and modes: FIX (with updating and test
mode programs) and USER (with main program) areas, and ALL (for both FIX
and USER areas) and USER (for USER area only) updating modes.
Updating is only available via MIDI.
Note:
If updating fails in ALL updating mode, the unit may become permanently
unrebootable. In this case, the current Flash Memory must be replaced with the
one already written in with program.
After updating, factory reset is necessary. Back up the user data in advance
since it will be reset. Details are described in “Saving and loading data”.
Device Used in Updating Mode
MC-09 and AC adapter
Sequencer that can playback SMF (MC-80, etc.)
MIDI cable x 1
SMF data disk for updating (2HD) x 1 (#17041155)
Files on SMF disk are as follows:
File names remain the same even after version updating.
Update Disk
UP_U_TKO.MID
UP_A_TKO.MID
_TKO00.MID
_TKO01.MID
_TKO02.MID
_TKO03.MID
_TKO04.MID
_TKO05.MID
_TKO06.MID
_TKO07.MID
_TKO08.MID
_TKO09.MID
_TKO10.MID
_TKO11.MID
Common Updating Procedure in
ALL and USER Updating Modes
1.
Connect the power code to the respective devices to be used and confirm
that the power can be turned on.
2.
Confirm the MC-09’s version prior to updating if necessary.
Summary of Contents for Phase Lab MC-09
Page 3: ...3 MC 09...
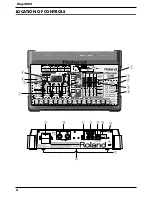
Page 4: ...4 May 2002 LOCATION OF CONTROLS fig top...
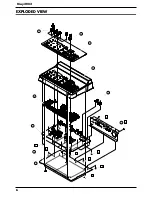
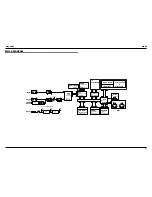
Page 6: ...6 May 2002 EXPLODED VIEW fig explo 1 8 2 9 4 5 6 10 7 a b b c c c c c b 3...
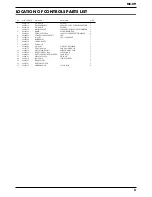
Page 11: ...11 MC 09...
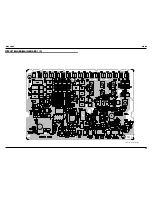
Page 17: ...19 May 2002 MC 09 CIRCUIT BOARD MAIN BOARD 1 2 fig block View from component side...
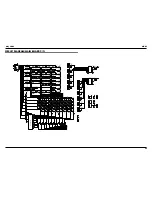
Page 18: ...21 May 2002 MC 09 CIRCUIT BOARD MAIN BOARD 2 2 fig block View from foil side...


