


12
May 2002
CHECKING THE VERSION
NUMBER
1.
Turn off the main power.
2.
While holding down [SHIFT] and STEP [4], turn on the main power.
3.
The version number of the software will appear on the display and the
test mode will be turned on .
4.
The mode will end when the main power is turned off.
USERS DATA SAVE AND
LOAD(MEMORY CARD)
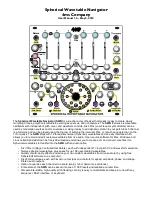
Memory cards usable with the
MC-09
The MC-09 can use commercially available SmartMedia
memory cards. However, a memory card is not included.
You can purchase a memory card at a nearby computer shop
or digital camera dealer. When you purchase a memory card,
make sure that it meets the following conditions.
· Power supply voltage: 3.3 V
· Capacity: 2 MB
-
128 MB
*
The MC-09 cannot use SmartMedia of types other than the above.
*
If you use 2 MB Smart Media, it may not be possible to save all data.
Cautions when using a memory
card
*
The power of the MC-09 must be off when you insert or remove a memory card.
Inserting or removing a memory card when the power is on will damage the
memory card as well as the data in the MC-09.
*
Make sure that the memory card is oriented correctly (The surface without gold
contactsmust face upward), and push it all the way into the slot.
*
Never turn on the power when a memory card is inserted part-way into the slot.
Doing so will damage the data in internal memory.
*
Never turn off the power while ”BSY” appears in the display. Doing so will
damage the data in the memory card and internal memory.
Formatting a memory card
This operation prepares the memory card for use on the MC-09.
You will need to format a newly purchased memory card
before using it for the first time, or before a memory card
used with another device can be used on the MC-09.
*
When you format a memory card, the entire contents of the card will be erased.
1.
Press the [SETUP] button.
2.
Press the [INC] or [DEC] button until the display indicates "FMT”.
3.
Press the [ENTER] button. The display will show "SUR”.
4.
To format the card, press the [WRITE] button. While the card is being
formatted, "BSY” will appear in the display. When formatting is finished,
you’re returned to where you were in step 2.
*
If you decide not to format the card, press the [SETUP] button or the [EXIT]
button.
5.
Press the [SETUP] button.
Saving all settings of the MC-09
to a memory card
The following settings stored in the audio looper will be
saved together on the memory card.
· All loops and user patterns
· Process patch
· System settings
· The settings of the currently selected pattern/effect pattern
For details on system settings, refer to "Parameter list”
1.
Press the [SETUP] button.
2.
Press the [INC] or [DEC] button until the display indicates " AL.L”.
3.
Press the [ENTER] button. The display will show the save-destination file
number (A01
-
A50).
4.
Use the [INC] and [DEC] buttons to select the desired save-destination
file number.
*
Should you decide that you don’t want to carry out the save, press the [SETUP]
button or the [EXIT] button.
5.
Press the [WRITE] button to begin saving. While the settings are being
saved, the display will show "BSY”. Once the save is complete, you’re
returned to where you were in step 2.
*
If the save-destination file number already exists on the memory card, the display
will indicate "SUR”. If you want to save the new data by overwriting the old,
press the [ENTER] button. If you want to save the data with a different file
number, press the [EXIT] button and repeat the procedure from step 2.
*
It may take up to three minutes for saving one loop.
6.
Press the [SETUP] button. When loops are saved to a memory card, they
are saved in the MC-09’s own original format.
Loading MC-09 settings
Here's how MC-09 settings saved on a memory card can be
loaded back into the MC-09.
1.
Press the [SETUP] button.
2.
Press the [INC] or [DEC] button until the display indicates "AL.L".
3.
Press the [ENTER] button. The display will show one of the file numbers
(A01
-
A50) that have been saved in the memory card.
4.
Use the [INC] and [DEC] buttons to select the file number that you want
to load.
*
If you decide not to load a file, press the [SETUP] button or the [EXIT] button.
5.
Press the [WRITE] button. The display will indicate "SUR”, asking you to
confirm the operation.
6.
Press the [ENTER] button to load MC-09 settings. While the settings are
being loaded, the display will show "BSY”. Once the data's been loaded,
you’re returned to where you were in step 2.
*
It may take up to three minutes for loading one loop.
7.
Press the [SETUP] button.
USERS DATA SAVE AND
LOAD(BULK DUMP)
Saving the MC-09 settings to an
external sequencer (Bulk Dump)
Data for the currently selected pattern, process patch or all saved settings, can
be transmitted to an external MIDI
device. This function is called bulk dump.
You can create a backup of the MC-09's data by using bulk dump to record
the
data on an external MIDI sequencer. You can also use this function to replicate
the current settings of one MC-09 (except for the Loop setting) on another MC-
09.
Summary of Contents for Phase Lab MC-09
Page 3: ...3 MC 09...
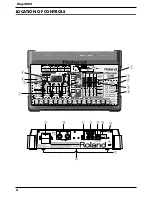
Page 4: ...4 May 2002 LOCATION OF CONTROLS fig top...
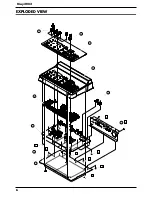
Page 6: ...6 May 2002 EXPLODED VIEW fig explo 1 8 2 9 4 5 6 10 7 a b b c c c c c b 3...
Page 11: ...11 MC 09...
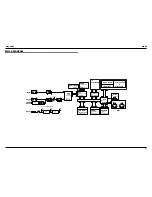
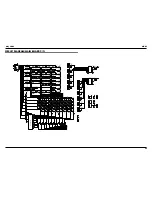
Page 17: ...19 May 2002 MC 09 CIRCUIT BOARD MAIN BOARD 1 2 fig block View from component side...
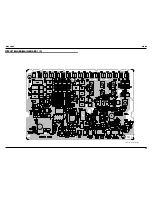
Page 18: ...21 May 2002 MC 09 CIRCUIT BOARD MAIN BOARD 2 2 fig block View from foil side...