background image


124


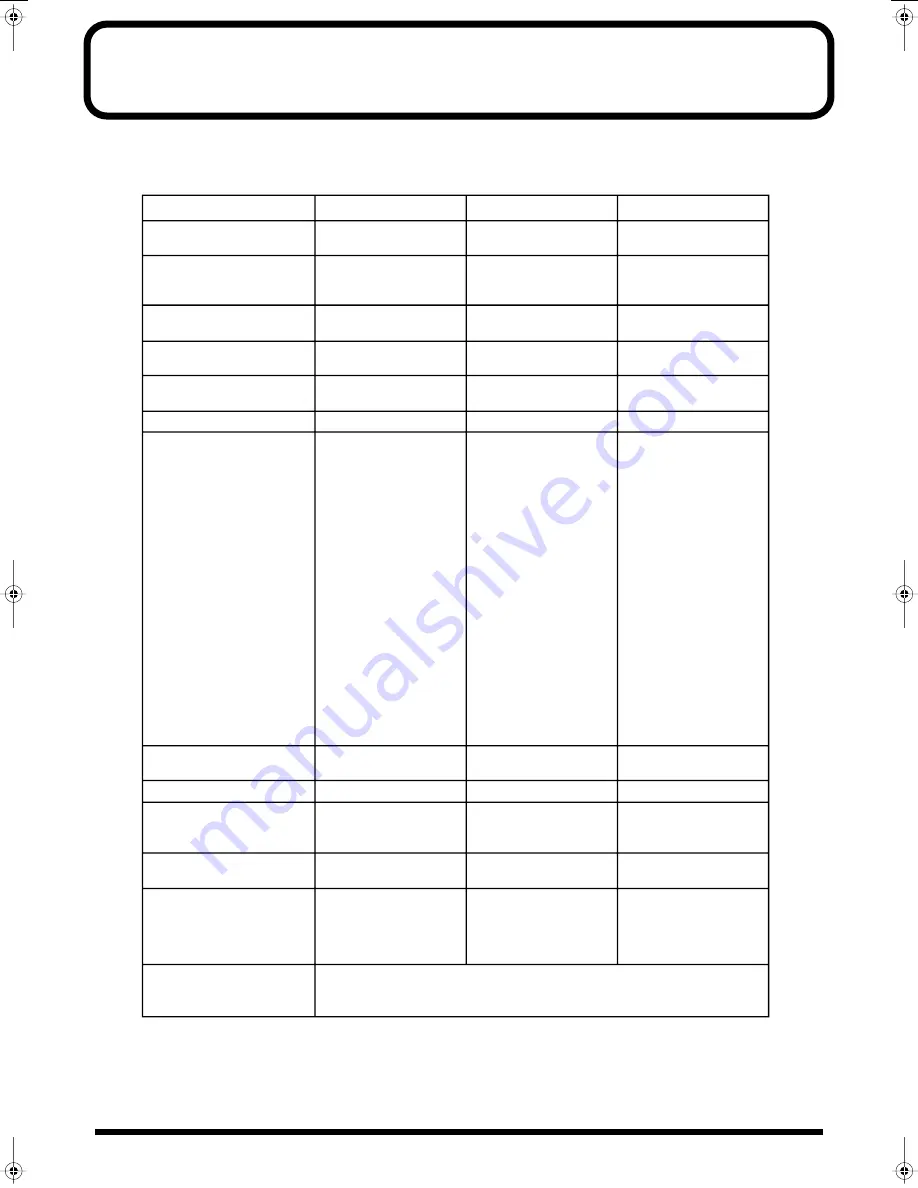
MIDI implementation chart


984


* A separate publication titled “MIDI Implementation” is also available. It provides complete details concerning the way MIDI has been implemented on this 

unit. If you should require this publication (such as when you intend to carry out byte-level programming), please contact the nearest Roland Service Center 
or authorized Roland distributor.

Function...

Basic
Channel

Mode

Note
Number :

Velocity

After
Touch

Pitch Bend

Control
Change

Program
Change

System Exclusive

System
Common

System
Real Time

Aux
Messages

Notes

Transmitted

Recognized

Remarks

Default
Changed

Default
Messages
Altered

True Voice

Note On
Note Off

Key's
Channel's

0, 32

1
5

6, 38

7
8

10
11
12
13
64
65
66
67
71
72
73
74
75
76
77
78
84
91
93

98, 99

100, 101

: True Number

: Song Position
: Song Select
: Tune Request

: Clock
: Commands

: All Sound Off
: Reset All Controllers
: Local On/Off
: All Notes Off
: Active Sensing
: System Reset

1–16
1–16

Mode 3
X

O
O

0–127

X
O

O

O
O
O
O
O
O
O
O
O
O
O
O
O
O
O
O
O
O
O
O
O
O
X
O
O
X
X

O
O
O
O
O
O
O
O
O
O
O
O
O
O
O
O
O
O
O
O
O
O
O
O  (Reverb) 
O  (Chorus) 
O
O

O

**************

O

X
X
X

X
X

X

X

X

X

O                              *1

X

1–16
1–16

Mode 3
Mode 3, 4 (M = 1)

O
O

0–127 
0–127

O                              *1

O                              *1

O                              *1
0–127

O                              *1

X
X
X

O                              *3
X

O  (120, 126, 127)

X

O  (123–127)

O

X

Bank select
Modulation
Portamento time
Data entry
Volume
Balance
Panpot
Expression
Effect control 1
Effect control 2 
Hold 1
Portamento
Sostenuto
Soft
Resonance
Release time
Attack time
Cutoff
Decay time
Vibrato rate
Vibrato depth
Vibrato delay
Portamento control
General purpose effects 1
General purpose effects 3
NRPN  LSB, MSB
RPN  LSB, MSB

* 1  O X  is selectable.
* 2  Recognized as M=1 even if M

1.

* 3  Recognized when the Clock Source parameter (SYSTEM) is set to "MIDI."

SYNTHESIZER

Model JUNO-D

Date : April 1, 2004

Version : 1.00

**************

**************

Mode 1 : OMNI ON, POLY
Mode 3 : OMNI OFF, POLY

Mode 2 : OMNI ON, MONO
Mode 4 : OMNI OFF, MONO

O : Yes
X : No

* 2

Program No. 1–128

*1

*1
*1
*1
*1
*1
*1
*1
*1
*1
*1
*1
*1
*1
*1
*1
*1
*1
*1
*1
*1
*1
*1
*1
*1
*1
*1
*1

JUNO-D_e.book 124 ページ 2004年6月11日 金曜日 午後1時21分

Summary of Contents for JUNO-D

Page 1: ...g this unit carefully read the sections entitled USING THE UNIT SAFELY p 2 3 and IMPORTANT NOTES p 4 5 These sections provide important information concerning the proper operation of the unit Additionally in order to feel assured that you have gained a good grasp of every feature provided by your new unit Owner s manual should be read in its entirety The manual should be saved and kept on hand as ...

Page 2: ...e If you experience any hearing loss or ringing in the ears you should immediately stop using the unit and consult an audiologist IMPORTANT THE WIRES IN THIS MAINS LEAD ARE COLOURED IN ACCORDANCE WITH THE FOLLOWING CODE BLUE BROWN As the colours of the wires in the mains lead of this apparatus may not correspond with the coloured markings identifying the terminals in your plug proceed as follows T...

Page 3: ...mation page 023 DO NOT play a CD ROM disc on a conventional audio CD player The resulting sound may be of a level that could cause permanent hearing loss Damage to speakers or other system components may result 101b The unit and the AC adaptor should be located so their location or position does not interfere with their proper ventilation 102d Always grasp only the output plug or the body of the A...

Page 4: ...58 Do not allow objects to remain on top of the keyboard This can be the cause of malfunction such as keys ceasing to produce sound Maintenance 401a For everyday cleaning wipe the unit with a soft dry cloth or one that has been slightly dampened with water To remove stubborn dirt use a cloth impregnated with a mild non abrasive detergent Afterwards be sure to wipe the unit thoroughly with a soft d...

Page 5: ... in the display may not always match what appears in the manual Handling CD ROMs 563 Unauthorized duplication reproduction hiring and lending of the software included in the applied CD ROM is prohibited 801 Avoid touching or scratching the shiny underside encoded surface of the disc Damaged or dirty CD ROM discs may not be read properly Keep your discs clean using a commercially available CD clean...

Page 6: ...1 About memory 41 Temporary memory 41 Rewritable memory 41 Non rewritable memory 41 Basic operation of the JUNO D 42 Switching the mode 42 Patch mode 42 Performance mode 42 Editing parameters 42 Basic procedure 42 Executing a command 42 Assigning a name 43 When one page contains two or more settings 43 Inputting numbers and numerals 43 Selecting a part 43 Creating a patch Patch mode 44 How to make...

Page 7: ...ettings that apply to the entire performance 55 Editing the effect settings of a performance 56 Editing the part settings of a performance Part Setup 56 Editing the effect settings for each part of the performance Performance Part Effect 58 Saving a performance 59 Convenient functions for performance editing Performance Utility 59 Copying part or effect parameters PERFORM PRM COPY 59 Initializing ...

Page 8: ...ting to an external sequencer 96 Making settings before recording 96 Recording 97 Listening to the recorded performance 97 Playing together with the playback of a recorded performance 98 Transposing playback of performances Master Key Shift 98 Backing up saving all JUNO D settings on your external MIDI sequencer 98 Using the JUNO D as a General MIDI General MIDI 2 system compatible sound module 98...

Page 9: ...g program JUNO D Editor Mac and Windows versions on a hybrid CD ROM is included allowing you to use your computer to create and rearrange sounds quickly and easily D Beam controller The D Beam controller gives you control over a variety of effects simply by moving your hand In conjunction with the visual element this can be a powerfully impressive addition to a live performance Rhythm Guide functi...

Page 10: ... Accesses the demo playback function p 18 EDIT Section PARAM Parameter button This button accesses sound or performance settings parameters The settings that are accessed will depend on the selected mode Patch Performance or state EFFECTS button This button switches effects MFX chorus reverb on off and accesses effect related settings UTILITY button In Patch Performance modes this button accesses ...

Page 11: ...tton Switches Rhythm guide function on off p 36 F NUMERIC button When this button is lit the direct access buttons will function as a numeric keypad This lets you directly input or specify a numerical value for the displayed item patch number or parameter 0 9 DIRECT ACCESS buttons In Patch mode use these buttons to switch between the sound categories printed on the panel p 20 In Performance mode u...

Page 12: ...n Selects either UPPER or LOWER as the tone to be edited Patch Modify select button Selects whether the three knobs located at the right will edit the envelope or the balance and LFO If envelope is selected ENV indicator lit ATTACK knob Adjusts the attack speed of the sound p 28 DECAY knob Adjusts the speed at which the sound decays while you continue holding the key p 28 RELEASE knob Adjusts the ...

Page 13: ...lly and to avoid applying undue stress to the DC IN jack anchor the power cord using the cord hook as shown in the illustration fig CordHook e F DC IN jack Connect the AC adaptor here p 14 Be sure to use only the supplied AC adaptor G POWER switch This switch turns the power on off p 15 H Ground terminal 927 Depending on the circumstances of a particular setup you may experience a discomforting se...

Page 14: ...d To prevent malfunction and or damage to speakers or other devices always turn down the volume and turn off the power on all devices before making any connections To prevent the inadvertent disruption of power to your unit should the plug be pulled out accidentally and to avoid applying undue stress to the AC adaptor jack anchor the power cord using the cord hook as shown in the illustration Use ...

Page 15: ...s 4 Play the JUNO D s keyboard and gradually raise the volume controls of the JUNO D or the connected audio equipment to an appropriate volume level fig q01 03 If you want to know how to make the connections with another external device refer to Using the JUNO D to play an external MIDI sound module p 93 Playing the JUNO D s sound generator from an external MIDI device p 94 Recording to an externa...

Page 16: ...rn off the JUNO D s power switch Adjusting the display contrast LCD CONTRAST The characters in the display may be difficult to view immediately after turning on the power or after extended use this may also be because of where and how the display is situated Follow the steps below to adjust the display s contrast fig q01 04 1 Press SYSTEM so it is lit 2 Use PAGE CURSOR to select LCD Contrast fig q...

Page 17: ...as been completed If there is important data you ve created that s stored in the JUNO D s internal memory you must note that all such data will be discarded when a Factory Reset is performed If you want to keep the existing data save it using an external sequencer p 98 3 1 2 4 5 Be sure not to turn off the power while Factory Reset is being performed If the power is turned off or interrupted while...

Page 18: ...playback To return the keyboard to performance mode press EXIT again or press DEMO again so the indicator goes out Demo songs list The JUNO D comes with 3 demos T Roland Corporation Short sweet Roland Corporation Catch Me Roland Corporation 2 4 1 3 981a 982 Unsaved settings changes may be lost when you start Demo Play Carry out the write procedure as required to save such data before listening to ...

Page 19: ...19 Quick Start ...

Page 20: ...CD ACCORDION Accordion HRM HARMONICA Harmonica Blues Harp 3 GUITAR Gt AGT AC GUITAR Acoustic Guitar EGT EL GUITAR Electric Guitar DGT DIST GUITAR Distortion Guitar 4 ORCH Oc STR STRINGS Strings ORC ORCHESTRA Orchestra Ensemble HIT HIT STAB Orchestra Hit Hit WND WIND Winds Oboe Clarinet etc FLT FLUTE Flute Piccolo 5 WORLD Wr PLK PLUCKED Plucked Harp etc ETH ETHNIC Other Ethnic FRT FRETTED Fretted I...

Page 21: ...0 p 22 You can turn NUMERIC on and use the 0 9 numeric keys to input a patch number directly Press ENTER to finalize the number p 43 Selecting sounds by category In Patch mode the direct access buttons 0 9 act as category select buttons Since the patches you select for 0 9 each category will be remembered even when the power is turned off you can select ten favorite patches from the panel and reca...

Page 22: ...ress EXIT to stop the patch audition Selecting a rhythm set The JUNO D provides rhythm sets that let you play different percussion instrument sounds or special effects from each key fig q04 04 1 Press PATCH so it is lit and you are in Patch mode 2 Press 0 to select RHYTHM SFX 3 Use VALUE to switch rhythm sets There are patches other than rhythm sets in the Rhythm SFX category group Rhythm sets hav...

Page 23: ...5 1 In Patch mode press 1 to select piano sounds 2 Press PHRASE ARPEGGIO so it is lit 3 Play the keyboard The instrument will play an arpeggio according to the notes you have just voiced Changing the way in which the arpeggios are sounded Then try to change the way in which the arpeggios are sounded Settings that specify how arpeggios are sounded are provided as templates By switching templates yo...

Page 24: ... these chord forms as sets multi chord memory and recall them when desired If you save typical chord progressions as user chord sets these are a convenient way to get immediate results such as when inputting music into the external sequencer fig q04 08 1 Press CHORD MEMORY so it is lit fig q04 09_40 The Chord Memory function will be turned on and the chord set name will be displayed 2 Play the key...

Page 25: ...reen If you want to select a chord set once again press CHORD MEMORY so it goes out and then press CHORD MEMORY once again so it is lit The selected chord set remains stored in memory even while the power is off 5 To turn off the Multi chord Memory function press CHORD MEMORY again so the indicator goes out 5 4 3 Multi chord set list p 122 You can create your own chord set by saving chords you hav...

Page 26: ...fied LOWER lit Only the lower tone will be modified Both lit Both the upper and lower tones will be modified Adjusting the volume balance of the two tones You can use a knob to control the volume balance of the upper tone and lower tone fig q05 02 1 Press the patch modify select button to make the BALANCE LFO indicator light 2 Turn the BALANCE knob Turning this to the right increases the volume of...

Page 27: ...ning it to the left counterclockwise makes the undulation shallower and milder 4 Turn the LFO RATE knob Turning this to the right clockwise increases the speed of the undulating sound while turning it to the left counterclockwise slows the undulation down 5 Press FILTER LFO so it is lit When FILTER LFO is on the two LFO knobs will adjust the wah effect 6 Turn the LFO DEPTH knob Turning this to the...

Page 28: ...ases the time it takes for the sound to rise while turning it to the left counterclockwise shortens this time 3 Turn the DECAY knob Turning this to the right increases the time it takes for the sound to reach the Sustain Level while turning it to the left shortens this time 4 Turn the RELEASE knob Turning this to the right increases the time it takes for the sound to disappear while turning it to ...

Page 29: ...ing this to the right makes the sound more distinctive while turning it to the left reduces these characteristics Using a lever to modify the sound Changing the sound s pitch in real time Pitch Bend Lever While playing the keyboard move the lever to the left to lower the pitch or to the right to raise the pitch fig q05 07 j You can set up to a two octave pitch bend range adjustable in semitones Fo...

Page 30: ...the optional BOSS FS 5U to the PEDAL HOLD jack Shifting the keyboard range in one octave steps Octave Shift Octave Shift is a function that shifts the pitch of the keyboard in one octave units This lets you shift the range of the keyboard to the most convenient range for playing This is also convenient in a situation below When playing sounds outside the keyboard s range While the JUNO D features ...

Page 31: ... transposed instrument You can play the patches of a transposed instrument just as it is written in the score fig q05 11 1 While holding down SHIFT press OCT You can transpose your performance over a range of 5 6 semitones Waving your hand over the D Beam D Beam Controller The D Beam controller can be used simply by waving your hand over it Of the three buttons one is assigned to the solo synth an...

Page 32: ...heard at softer volumes the lower tone will be added as the volume increases After you have used the D Beam to control expression the volume will be at 0 so no sound will be heard when you play the keyboard To return to the normal state in which the sound can be heard either press ACTIVE EXPRESS and turn off its illumination or switch patches The usable range of the D Beam controller The following...

Page 33: ...ameters are changed simultaneously When making the LFO RATE LFO DEPTH or LFO DELAY settings the effect achieved differs depending on whether FILTER LFO is on or off When FILTER LFO is off the LFO alters the pitch vibrato effect When FILTER LFO is on the LFO changes the Filter Cutoff frequency wah effect Value Tx CC Function Parameter Changed MODULATION CC01 Vibrato Effect PORTA TIME CC05 Portament...

Page 34: ...t the sensitivity Value 1 10 As you increase this value the D Beam controller will become more sensitive Normally you will leave it at a setting of 5 5 Press EXIT or PARAM to return to the previous screen Changing the polarity of the change D BEAM POLARITY By changing the D Beam Polarity setting you can invert the direction of the effect that is applied 1 Press SOLO SYNTH ACTIVE EXPRESS or ASSIGNA...

Page 35: ... you are using an external effects processor and do not want to use the built in effects When shipped from the factory all three effects are set to ON 1 Press PATCH so it is lit and you are in Patch mode 2 Press EFFECTS so it is lit The on off state of each effect multi effect chorus reverb will be displayed fig q05 19_40 3 Use PAGE CURSOR to select the effect type and use VALUE to turn to switch ...

Page 36: ... begin playing 3 With the display showing the pattern name use VALUE to select a rhythm pattern 4 Once again press RHYTHM GUIDE so it is unlit the rhythm pattern will stop To select a rhythm pattern without playing it 1 Press PERFORM so it is lit and you are in Performance mode 2 Press RHYTHM GUIDE while holding down SHIFT 3 Use VALUE to select a rhythm set 4 Press ENTER to play back the rhythm pa...

Page 37: ...adjust the tempo 3 Press EXIT to return to the previous screen Pressing a button to modify the tempo Tap Tempo You can modify the tempo by the rate at which you press TAP TEMPO 1 At quarter note beats press TAP TEMPO three or more times at the desired tempo The tempo will be calculated automatically and set to the interval at which you pressed the button The button lets you check the tempo and tim...

Page 38: ...38 Memo ...

Page 39: ...39 Advanced Use ...

Page 40: ...aying e g from the keyboard are called patches A patch is analogous to an instrument held by a member of an orchestra Each patch consists of two tones an upper tone and lower tone You can assign the two tones to their own region of the keyboard or play them together to produce a richer sound p 44 Detailed settings can be made independently for each of the two tones p 46 Rhythm sets Rhythm sets are...

Page 41: ...ack into the JUNO D all settings of the entire JUNO D will return to the state by they were in when the data was saved Temporary memory Temporary area This is the area that holds the data for the patch or the like that you ve selected using the panel buttons When you play the keyboard or play back an external sequence sound is produced based on data in the temporary area When you edit a patch you ...

Page 42: ...t they can be displayed efficiently within the display To select a parameter move to the appropriate page The underlined area cursor in the screen will blink to indicate that you may edit that value fig r02 05 Basic procedure The basic procedure for editing a parameter is to use PAGE CURSOR to move between pages and use VALUE to modify the value in the page fig r02 06 In cases where there are nume...

Page 43: ...holding down SHIFT switches the status 3 If you want to finalize the value press ENTER The value will be finalized and NUMERIC will go out If you decide to cancel press EXIT Selecting a part On the JUNO D you can use 0 9 to select parts There are a total of sixteen parts Select parts as follows 1 Press PERFORM so it is lit and you are in Performance mode 2 Press PART SELECT so it is lit 3 Press th...

Page 44: ...n change the point at which the lower and upper tones are divided p 45 DUAL The upper and lower tones are layered Editing the patch parameters 1 Press PATCH so it is lit and you are in Patch mode 2 Select a patch 3 Press PARAM so it is lit Now you can edit the patch parameters Use PAGE CURSOR to select the parameter that you want to edit Selecting patch parameters p 45 fig r03 04_40 4 If there is ...

Page 45: ... played by all keys on the keyboard SPLIT The keyboard will be split the lower range plays the lower tone and the upper range plays the upper tone You can change the point at which the lower and upper tones are divided p 45 DUAL The upper and lower tones are layered Changing the way that the tones are sounded Key Mode p 44 Patch Level Specifies the volume of the patch VALUE 0 127 Tone Balance Adju...

Page 46: ... lower tone ExpressionDst Expression Destination Specifies the tone that will be affected by expression VALUE UPPER Expression will apply only to the upper tone LOWER Expression will apply only to the lower tone BOTH Expression will apply to both the upper and lower tone Active Exp Sw Active Expression Switch Turns the active expression effect p 32 on off VALUE OFF Expression will affect only the ...

Page 47: ... lever The amount of change will be the same whether the lever is moved to left or right VALUE 0 24 Adjusting the modulation of the sound LFO The LFO Low Frequency Oscillator applies cyclic change to the sound It can be applied to the pitch cutoff frequency or volume to produce vibrato wah or tremolo effects The original tones of the JUNO D contain LFO settings appropriate for each sound You can e...

Page 48: ...nel p 28 VALUE 64 63 Saving a patch When you have edited a patch to your liking use the following procedure to save it 1 Press PATCH so it is lit and you are in Patch mode 2 Select the patch that you want to edit 3 Edit the patch Changing the tone with the knobs Patch Modify p 26 How to make the patch settings p 44 4 When the sound is to your liking press WRITE Use VALUE to specify the number in w...

Page 49: ...o specify whether the data is to be copied to the upper tone or the lower tone of the currently selected patch fig r03 10_40 8 Press ENTER The upper tone or lower tone settings will be copied to the currently selected patch When the data has been copied the display will indicate COMPLETED This ends the procedure Category Group Category Contents PIANO Pf PNO AC PIANO Acoustic Piano EP EL PIANO Elec...

Page 50: ...convenient when you want to create a sound from scratch The Initialize operation applies only to the currently selected sound it will not change the content of sounds stored in user memory If you want to restore all settings to the factory set condition execute the Factory Reset operation p 17 1 Press PATCH so it is lit and you are in Patch mode Select the patch you want to initialize 2 Press UTIL...

Page 51: ...USER PATCHES 6 Press PAGE CURSOR Use VALUE to specify the first number of the range of user patch numbers that you want to transmit fig r03 24_40 7 Press PAGE CURSOR Use VALUE to specify the last number of the range of user patch numbers that you want to transmit fig r03 25_40 8 Press ENTER The selected patch settings will be transmitted from the MIDI OUT connector After the data has been transmit...

Page 52: ...edit the following Rhythm Common parameters Name Rhythm Set Name You can change the name of the rhythm set Here you can use PAGE CURSOR to move through the characters and use VALUE to finalize the desired character Value space A Z a z 0 9 _ For further information refer to Assigning a name p 43 Editing the settings of each rhythm tone key Rhythm Tone parameters A rhythm set assigns a different ins...

Page 53: ... to Patch categories p 49 When the rhythm set has been saved the display will indicate COMPLETED This completes the procedure If you decide not to save the rhythm set press EXIT If you do not change Name Rhythm Set Name p 52 the rhythm set will have the same name as the one you selected in step 2 Convenient functions for rhythm set editing Rhythm Set Utility Rhythm Set Utility provides functions t...

Page 54: ...r04 19_40 6 Use VALUE to select the rhythm tone that you want to initialize VALUE A 0 key 21 C 8 key 108 You can also press a key to select the rhythm tone to edit 7 Press ENTER once again to execute When initialization is finished the display will indicate COMPLETED This ends the procedure Erasing a rhythm set you saved RHY REMOVE This operation erases the specified user rhythm set When you erase...

Page 55: ...ttings of a performance The performances of the JUNO D contain settings that are made for the entire performance and settings that are made individually for each part of the performance Settings made for the entire performance are Settings for the entire performance such as the performance name p 55 Effect settings for the performance p 56 Settings made individually for each part of the performanc...

Page 56: ... assigned to the part p 65 fig r06 54_40 VALUE PERFORM The MFX effect will be applied according to the effect parameters of the performance itself PART1 PART16 The MFX effect will be applied according to the parameters of the patch that is selected for the part Editing the effect settings of a performance In Performance mode you can press EFFECTS to edit the effect settings of a performance For de...

Page 57: ...er MIDI Bank Select messages will be received ON or not OFF Value OFF ON Scale Tune fig r06 54d_40 You can specify a different tuning Scale Tune setting for each part Press ENTER to access the Scale Tune setting screen For details refer to Editing the scale tune settings SCALE TUNE p 58 If you want to edit the scale tune for Patch mode refer to Making scale tune settings for a patch PATCH SCALE p ...

Page 58: ...ver this effect is achieved only in one key and chords will become ambiguous if you transpose ARABIC Arabian Scale In this scale E and B are a quarter note lower and C F and G are a quarter note higher compared to equal temperament The intervals between G and B C and E F and G Bb and C and Eb and F have a natural third the interval between a major third and a minor third Tune C B Part Scale Tune C...

Page 59: ...ETED If there are more patches that have been edited the parts that use such patches will be shown in a consecutive manner Repeat steps 3 6 7 Once all the necessary patches have been saved you are returned to the screen you were in at step 1 fig r06 55_40 8 Press ENTER When the user performance has been saved the display will indicate COMPLETED If you decide not to save the user performance press ...

Page 60: ...ently selected performance When the display indicates COMPLETED the copy operation has been completed If you copy multi effect settings those settings will be pasted into the effect parameters of the performance regardless of the MFX Source setting p 56 This means that if the MFX Source is set to PART for either or both the copy source and copy destination you may not be able to tell that the copy...

Page 61: ...ng the settings of a user performance 5 Use VALUE to select USER PERFORM fig r06 77_40 6 Press PAGE CURSOR Specify the range of performances whose settings you want to transmit Use VALUE to specify the first performance of the range of performances you want to transmit fig r06 78_40 7 Press PAGE CURSOR Use VALUE to specify the last performance of the range of performances you want to transmit fig ...

Page 62: ...a number in which a user template has already been saved the previously saved settings will be overwritten and lost 6 Press ENTER When the user template has been saved the display will indicate COMPLETED If you decide not to save the user template press EXIT Now when you use the arpeggiator you can press 0 and select the user template you just saved User template parameter list Style Arpeggio Styl...

Page 63: ...elocity Arpeggio Keyboard Velocity Specifies the loudness of the notes that you play If you want the velocity value of each note to vary depending on how strongly you play the keyboard set this parameter to REAL If you want each note to have a fixed velocity regardless of how strongly you play the keyboard set this parameter to the desired value 1 127 Value REAL 1 127 Octave Range Arpeggio Octave ...

Page 64: ...move the cursor under the key number fig r06 31a_40 4 Either press a key or use VALUE to specify the key C B for which the chord is to be saved 5 Press PAGE CURSOR to move the cursor to the right fig r06 31b_40 6 Press keys to input chords The display will indicate how many keys were pressed You can input 8 notes fig r06 31c_40 7 Release all the keys The previously saved chords will be erased and ...

Page 65: ...v and you want to edit the effect settings press PAGE CURSOR and the effect parameters selected previously will be displayed For further information refer to Making effects settings p 67 Multi effect chorus Reverb parameters can also be saved in a patch rhythm set or performance In Patch mode effects will be applied according to the settings of each patch For details refer to MFX Switch p 46 Choru...

Page 66: ... Level to Rev Tone Cho Send Level Tone Rev Send Level Tone Cho Send Level to Rev Multi FX Chorus Reverb Performance Mode Patch Multi FX Chorus OUTPUT R L MONO MFX Send Level to Cho MFX Send Level to Rev Part MFX SW Part Cho Send Level Tone Cho Send Level Part Rev Send Level Tone Rev Send Level Tone Reverb Cho Send Level to Rev Tone MFX SW Performance Mode Rhythm OUTPUT R L MONO MFX Send Level to C...

Page 67: ... PAGE CURSOR PAGE CURSOR Multi Effects Parameters PAGE CURSOR PAGE CURSOR PAGE CURSOR PAGE CURSOR SHIFT PAGE CURSOR Chorus Parameters Reverb Parameters SHIFT PAGE CURSOR SHIFT PAGE CURSOR SHIFT PAGE CURSOR SHIFT PAGE CURSOR SHIFT PAGE CURSOR PAGE CURSOR PAGE CURSOR Displays the parameters for the selected effect type VALUE VALUE Switches the effect type Displays the effect type selected previously...

Page 68: ...s for each of the parameters Type Multi Effects Type Selections are made from the following 47 different multi effects Additionally parameters for each of the multi effects types can be found on the following pages Value 00 THROUGH p 69 01 STEREO EQ p 69 02 OVERDRIVE p 69 03 DISTORTION p 70 04 PHASER p 70 05 SPECTRUM p 70 06 ENHANCER p 70 07 AUTO WAH p 71 08 ROTARY p 71 09 COMPRESSOR p 71 10 LIMIT...

Page 69: ...of the low fre quency High Freq 2000 4000 8000 Hz Selects the frequency of the high range High Gain 15 15 dB Adjusts the gain of the high fre quency Mid1 Freq 200 8000 Hz Adjusts the frequency of Middle 1 mid range Mid1 Q 0 5 1 0 2 0 4 0 8 0 This parameter adjusts the width of the area around the Middle 1 Frequency that will be affected by the Gain setting Higher values of Q will result in a narro...

Page 70: ...ncy period of modulation Depth 0 127 Adjusts the depth of modula tion Resonance 0 127 Adjusts the amount of feedback for the phaser Mix 0 127 Adjusts the ratio with which the phase shifted sound is com bined with the direct sound Pan L64 63R Adjusts the stereo location of the output sound L64 is far left 0 is center and 63R is far right Level 0 127 Adjusts the output level L in R in L out R out Pa...

Page 71: ...Adjusts the fast speed FAST of the high frequency rotor Low Fast 0 05 10 00 Hz Adjusts the fast speed FAST of the low frequency rotor Auto Wah L out R out L in R in L out R out L in R in Rotary Speed SLOW FAST Simultaneously switch the rota tional speed of the low frequen cy rotor and high frequency rotor SLOW Slows down the rotation to the specified speed the Low Slow Hi Slow values FAST Speeds u...

Page 72: ...rocessed sound is heard Depth Dev 20 20 Adjusts the difference in modu lation depth between each cho rus sound L in R in L out R out Pan R Pan L Limiter 2 Band EQ Balance W Balance W L in R in L out R out Hexa Chorus Balance D Balance D Pan Dev 0 20 Adjusts the difference in stereo location between each chorus sound With a setting of 0 all chorus sounds will be in the center With a setting of 20 e...

Page 73: ...ect sound begins until the processed sound is heard Rate 0 05 10 00 Hz Adjusts the rate of modulation L in R in Space D Space D L out R out 2 Band EQ 2 Band EQ Balance W Balance W Balance D Balance D L in R in Chorus Chorus L out R out 2 Band EQ 2 Band EQ Balance W Balance W Balance D Balance D Depth 0 127 Adjusts the depth of modula tion Phase 0 180 deg Adjusts the spatial spread of the sound Low...

Page 74: ... the pattern is reset ON or not OFF when sounds are played While the rhythm guide is play ing the period for the pattern is not reset even if you set this ON Level 0 127 Adjusts the output level Parameter Value Description R in R out L in L out Feedback Feedback Balance W Balance D Balance W Balance D 2 Band EQ 2 Band EQ Step Flanger Step Flanger Parameter Value Description Feedback Mode NORMAL CR...

Page 75: ...00 0W D0 100W Adjusts the volume balance be tween the direct sound and the delay sound With a setting of D100 0W only the direct sound will be output and with a setting of D0 100W only the delay sound will be output Level 0 127 Adjusts the output level Parameter Value Description Feedback Balance W Balance W L in R in L out R out Delay Balance D Balance D 2 Band EQ 2 Band EQ Parameter Value Descri...

Page 76: ...f the left delay sound Right Level 0 127 Adjusts the volume of the right delay sound Center Level 0 127 Adjusts the volume of the center delay sound Low Gain 15 15 dB Adjusts the gain of the low fre quency High Gain 15 15 dB Adjusts the gain of the high fre quency Parameter Value Description L in R in L out R out Left Tap Right Tap Triple Tap Delay 2 Band EQ 2 Band EQ Balance W Balance D Balance W...

Page 77: ...ound L64 is far left 0 is center and 63R is far right Low Gain 15 15 dB Adjusts the gain of the low fre quency High Gain 15 15 dB Adjusts the gain of the high fre quency Parameter Value Description L in R in L out R out 2 Band EQ Balance W Balance W Balance D Balance D 2 Band EQ Feedback Time Control Delay Balance D100 0W D0 100W Adjusts the volume balance be tween the direct sound and the delay s...

Page 78: ...W D0 100W Adjusts the volume balance be tween the direct sound and the pitch shift sound With a setting of D100 0W only the direct sound will be output and with a setting of D0 100W only the pitch shift sound will be output Level 0 127 Adjusts the output level Parameter Value Description L in R in L out R out 2 Band EQ Balance W Balance W Balance D Balance D 2 Band EQ Feedback Pitch Shifter Parame...

Page 79: ...64 is far left 0 is center and 63R is far right L in R in L out R out Gated Reverb 2 Band EQ Balance W Balance W Balance D Balance D 2 Band EQ L in R in Chorus Overdrive L out R out Balance W Balance W Balance D Balance D Cho Delay 0 0 100 ms Adjusts the time delay from when the direct sound begins until the chorus sound is heard Cho Rate 0 05 10 00 Hz Adjusts the modulation speed of the chorus ef...

Page 80: ...drive sound that is sent through the flanger will be output Level 0 127 Adjusts the output level Parameter Value Description OD Drive 0 127 Adjusts the degree of overdrive distortion The volume will change togeth er with the degree of distortion OD Pan L64 63R Adjusts the stereo location of the overdrive sound L64 is far left 0 is center and 63R is far right Delay Time 0 500 ms Adjusts the time de...

Page 81: ...x Enhancer Enhancer Balance W Balance W Balance D Balance D Feedback Flanger L in R in L out R out Mix Mix Enhancer Enhancer Balance W Balance W Balance D Balance D Flg Feedback 98 98 Adjusts the proportion of the flanger sound that is fed back into the effect Negative settings will invert the phase Flg Balance D100 0W D0 100W Adjusts the volume balance be tween the enhancer sound that is sent thr...

Page 82: ...ck Delay L in R in L out R out Balance W Balance W Balance D Balance D Chorus Balance W Balance W Balance D Balance D Parameter Value Description Flg Delay 0 0 100 ms Adjusts the time delay from when the direct sound begins until the flanger sound is heard Flg Rate 0 05 10 00 Hz Adjusts the modulation speed of the flanger effect Flg Depth 0 127 Adjusts the modulation depth of the flanger effect Fl...

Page 83: ...ound will be output Flg Delay 0 0 100 ms Adjusts the time delay from when the direct sound begins until the flanger sound is heard Flg Rate 0 05 10 00 Hz Adjusts the modulation speed of the flanger effect Flg Depth 0 127 Adjusts the modulation depth of the flanger effect Flg Feedback 98 98 Adjusts the proportion of the flanger sound that is fed back into the effect Negative settings will invert th...

Page 84: ... 2 TRI The sound will be modulat ed like a triangle wave SQR The sound will be modu lated like a square wave SIN The sound will be modulat ed like a sine wave SAW1 2 The sound will be modulated like a sawtooth wave The teeth in SAW1 and SAW2 point at opposite direc tions L in R in L out R out Slicer Slicer L in R in L out R out Tremolo 2 Band EQ 2 Band EQ Tremolo SAW1 SAW2 Rate 0 05 10 00 Hz note ...

Page 85: ...vert the phase Parameter Value Description RESET LEVEL L in R in L out R out 2 Band EQ Balance W Balance W Balance D Balance D 2 Band EQ Feedback Tumbling Delay Level original tone A B B Balance D100 0W D0 100W Adjusts the volume balance be tween the direct sound and the delay sound With a setting of D100 0W only the direct sound will be output and with a setting of D0 100W only the delay sound wi...

Page 86: ...ter can be applied to the sound coming into the chorus to cut the high frequency range Higher values will cut more of the high frequencies resulting in a more mellow chorus sound Value 0 7 Level Chorus Level Sets the amount of the chorus sound Value 0 127 Feedback Chorus Feedback Level Sets the level at which the chorus sound is re input fed back into the chorus By using feedback a denser chorus s...

Page 87: ...d alternates between left and right It is effective when you are listening in stereo Reverb Type provides several preset like example settings of the reverb parameters When you switch types the other reverb parameters will change according to the settings of the type you select If you intend to edit the other parameters select a type first and then edit the other parameters Character Reverb Charac...

Page 88: ...electing system setting parameters p 88 3 Use VALUE to modify the value 4 Repeat steps 2 3 to make the settings for the System function Changes you make to the system function settings are temporary and will be lost when you turn off the power If you want to save the settings you modified perform the following operation 5 To save the settings you modified press WRITE fig r12 01_40 6 Press ENTER to...

Page 89: ...other than vibrato In Patch mode the modulation lever will affect the patch In Performance mode the modulation lever will affect the patch that is assigned to the current part Use DESTINATION TONE to specify the tone that will be affected p 26 TxCC refers to the controller number of the control change message sent from the MIDI OUT connector when the modulation lever is operated When set to AFTERT...

Page 90: ...ALUE 1 16 Patch Tx Ch Patch Transmit Channel Specifies the transmit channel of MIDI messages in Patch mode If you do not want to transmit MIDI messages to external MIDI devices turn this parameter OFF If you want the transmit channel to always match the Patch Receive Channel set this parameter to RxCh VALUE 1 16 RxCh OFF Perform Ctrl Ch Performance Control Channel Performance Ctrl Ch selects the M...

Page 91: ... The Thru function re transmits all messages received at the MIDI IN connector to the MIDI OUT connector without modifying them in any way VALUE OFF ON Making scale tune settings for a patch PATCH SCALE The Patch Scale function lets you use a variety of tunings for patches used in Patch mode If you want to make scale tune settings for each part in Performance mode refer to Editing the scale tune s...

Page 92: ...it fig r10 02 e MIDI uses sixteen channels numbered 1 16 Normally receiving devices should be set so they receive only the channels they need to receive Example Set the JUNO D to send on Channel 1 and Channel 2 then set sound module A to receive only Channel 1 and sound module B to receive only Channel 2 With this setup you can get an ensemble performance with for example a guitar sound from sound...

Page 93: ...nly to those that conform to the universally shared MIDI specifications it would not be possible to transmit messages that are unique to a particular manufacturer or that are designed specifically for a certain device For this reason MIDI allows for an exclusive format for each manufacturer which can be used to exchange a variety of messages On the JUNO D you can use Exclusive messages to store Pa...

Page 94: ...EXIT to cancel the operation and return to the previous page With the above settings when the JUNO D s keyboard is played sounds are simultaneously played by the JUNO D and the external MIDI sound generator For instructions on setting the Receive channel for each of the Parts of the external MIDI sound generator refer to the owner s manual that came with the device If you want sounds to be played ...

Page 95: ... from an external MIDI device Transmitting Bank Select Controller Numbers 0 32 and Program Change messages from the external MIDI device to the JUNO D allows you to switch patches and rhythm sets 1 Transmit a value for the Bank Select MSB controller number 0 BnH 00H mmH message to the JUNO D 2 Transmit a value for the Bank Select LSB controller number 32 BnH 20H llH message to the JUNO D 3 Transmi...

Page 96: ...red to as Local Control When Local Control is on playing the keyboard will produce sound and moving the pitch bend lever will control the pitch When Local Control is off playing the keyboard will not produce sound and moving the pitch bend lever will not control pitch The sound generator of the JUNO D will produce sound only in response to messages received from an external MIDI device fig r10 21 ...

Page 97: ... a song is changed from the tempo selected at the time of recording the JUNO D may not be able to correctly receive the settings for the recorded Performance which may prevent proper playback of the performance data 1 In Performance mode press UTILITY so it is lit 2 Use PAGE CURSOR to select XFER to MIDI 3 Press ENTER Make XFER to MIDI settings as described in Transmitting performance settings fro...

Page 98: ...acking up saving all JUNO D settings on your external MIDI sequencer By executing the Performance or Patch Utility XFER to MIDI command p 51 p 61 with DUMP ALL selected as the content to be transmitted What you can transmit all of the user area data patches performances system etc from the MIDI OUT connector By recording these messages on your external MIDI sequencer and saving them you can back u...

Page 99: ...IDI interface is connected to the computer and two MIDI cables connect the MIDI connectors of the MIDI interface to the JUNO D s MIDI connectors fig Midi 00 e Installing the included editor software To help you get more out of your JUNO D it comes with JUNO D Editor software Use JUNO D Editor to freely create your own original sounds Detailed instructions on installing the software can be found in...

Page 100: ...100 Memo ...

Page 101: ...101 Appendix ...

Page 102: ...erator check to make sure the channels being used for transmission by the keyboard are matched up with the channels used for reception by the relevant Parts on the external MIDI sound generator p 93 If using an external MIDI device to sound the JUNO D each Part s reception channel needs to be set so it matches the channels that will be used for transmission by the external MIDI device p 94 Are vol...

Page 103: ... this setting is OFF no effect will be controlled Notes are delayed or unsteady during playback a song from an external sequencer The JUNO D contains some patches that are intended for live playing in Patch mode these include tones that use four voices for each note or patches that use the Dual function to produce rich sounds If you are using the JUNO D as a multitimbral sound module playback may ...

Page 104: ...ber settings correct Set the Device ID number p 91 used when the Exclusive message was recorded to the sequencer Is the sequencer playback tempo correct Play back the data on the sequencer at the tempo used when the Exclusive message was recorded to the sequencer MIDI messages not transmitted correctly Are the Patch transmission channel settings correct p 95 Is each Transmission switch set correct...

Page 105: ...transmit ted MIDI Communication Error A problem has occurred with the MIDI cable connec tions Check that MIDI cables are not broken or pulled out Receive Data Error A MIDI message was received incorrectly If the same error message is displayed repeatedly the problem lies with the MIDI messages that are being transmitted to the JUNO D User Memory Damaged The data in user memory has been lost Use th...

Page 106: ... Send Lvl Reverb Send Level 0 127 Coarse Tune 48 48 Fine Tune 50 50 Portamento Sw Portamento Switch OFF ON Portamento Time 0 127 Velo Sens Depth Velocity Sensitivity Depth 64 63 Velo Sens Ofs Velocity Sensitivity Offset 64 63 Pitch Bend Range 0 24 Filter LFO Filter LFO Switch OFF PCH ON FLT LFO Rate 64 63 LFO Depth 64 63 LFO Delay 64 63 Cutoff Freq Cutoff Frequency 64 63 Resonance 64 63 Attack Tim...

Page 107: ... Send Level 0 127 Parameters Value Name Performance Name space A Z a z 0 9 _ Voice Rsv 1 16 Voice Reserve 1 16 0 32 Level Performance Level 0 127 MFX Source PERFORM PART1 PART16 Parameters Value Multi effects group Type Multi Effects Type 00 THROUGH 47 FBK RIPPER Multi effects Parameters The number of parameters varies depending on the Multi effects Type Refer to Setting multi effects parameters p...

Page 108: ...roller OFF ON Clock Source INT MIDI CONTROLLER group Mod Modulation Assign MODULATION PORTA TIME VOLUME BALANCE PAN EXPRESSION PORTAMENTO SOSTENUTO SOFT RESO NANCE RELEASE TIME ATTACK TIME CUTOFF DECAY TIME LFO RATE LFO DEPTH LFO DELAY CHO SEND LEV EL REV SEND LEVEL MFX PARAMETER1 MFX PARAMETER2 AFTERTOUCH Pedal Pedal Control Assign Values for Modulation Assign TAP TEMPO C1 C3 C1 C3 Knob Assign Va...

Page 109: ...0172 JUNO D A Bs2 2 0173 Upright Bs 2 0174 Fingered Bs 1 0175 Finger Slap 2 0176 JUNO D F Bs1 2 0177 JUNO D F Bs2 2 0178 JUNO D JzBs 2 0179 Picked Bass1 1 0180 Picked Bass2 1 0181 JUNO DRockBs 2 0182 Fretless Bs 1 0183 JU D Frtless 2 0184 Syn Fretless 2 0185 Mr Smooth 2 0186 Slap Bass 1 1 0187 Unison Slap 2 0188 Slap Bass 2 2 0189 Slap Bass 3 3 0190 Synth Bass 1 1 0191 SynthBass101 1 0192 Acid Bas...

Page 110: ...DanceStack 2 3 0488 TranceSaws 1 3 0489 Trance Keys 3 0490 TranceSaws 2 2 No Name Voice 0491 TranceSaws 3 2 0492 Power Stack 2 0493 Alpha Rave 1 0494 Retro Rave 4 0495 Chrd Maj7 4 0496 RndmFltrChrd 4 0497 Cool Beam 4 0498 Syn Calliope 2 0499 Chiffer Lead 2 0500 Charang 2 0501 Wire Lead 2 0502 Solo Vox 2 0503 5th Saw Wave 2 0504 Bass Lead 2 0505 Delayed Lead 2 0506 Fantasia 2 0507 Warm Pad 1 0508 S...

Page 111: ...NGLE 068 Ky14 Clav 2 KEY 64 50 2 SINGLE 069 Ky15 Clav 3 KEY 64 51 1 SINGLE 070 Ky16 Clav 4 KEY 64 52 1 SINGLE 071 Ky17 Phaser Clav KEY 64 53 1 SINGLE 072 Ky18 JU 2 Clav 1 KEY 64 54 1 SINGLE 073 Ky19 JU 2 Clav 2 KEY 64 55 2 SINGLE 074 Ky20 Harpsichord2 KEY 64 56 2 SINGLE 075 Ky21 JUNO Marimba MLT 64 57 1 SINGLE 076 Ky22 JUNO D Vibe MLT 64 58 2 SINGLE 077 Ky23 SA Vibe MLT 64 59 1 SINGLE 078 Ky24 JUN...

Page 112: ... 198 Oc05 StringsSect1 STR 64 114 4 DUAL 199 Oc06 StringsSect2 STR 64 115 4 DUAL 200 Oc07 StringsSect3 STR 64 116 4 DUAL 201 Oc08 StringsSect4 STR 64 117 3 DUAL 202 Oc09 VeloStrings STR 64 118 5 DUAL 203 Oc10 SlowStrings1 STR 64 119 2 SINGLE 204 Oc11 SlowStrings2 STR 64 120 2 SINGLE 205 Oc12 Oct Strings STR 64 121 2 SINGLE 206 Oc13 Str Spic 1 STR 64 122 1 SINGLE 207 Oc14 Str Spic 2 STR 64 123 2 DU...

Page 113: ...7 MSB 121 LSB PC LSB PC 331 Br28 Oct Syn Brs SBR 65 77 6 DUAL 332 Br29 Soft SynBrs SBR 65 78 4 DUAL 333 Br30 Deep SynBrs SBR 65 79 4 DUAL 334 Br31 VeloBrass SBR 65 80 2 SINGLE 335 Br32 JP Saw Brs SBR 65 81 4 DUAL 336 Br33 OB Brass SBR 65 82 5 DUAL 337 Br34 BPF Brass SBR 65 83 4 DUAL 338 Br35 Dist SqrBrs SBR 65 84 2 SINGLE 339 Br36 Soaring Horn SBR 65 85 4 SINGLE 340 Br37 JUNO D Tp 1 BRS 65 86 1 SI...

Page 114: ...6 32 6 DUAL 458 Sy16 Time Warp TEK 66 33 3 SINGLE 459 Sy17 Riff the 5th TEK 66 34 2 SINGLE 460 Sy18 Seq Pulse TEK 66 35 2 SINGLE 461 Sy19 Chord Maj7 TEK 66 36 4 SINGLE 462 Sy20 JUNO D Slice PLS 66 37 3 DUAL No Name Cate gory Patch Select GM2 Patch Select Voice Key Mode MSB 87 MSB 121 LSB PC LSB PC 463 Sy21 Saw Impulse PLS 66 38 3 SINGLE 464 Sy22 Slicer PLS 66 39 5 DUAL 465 Sy23 Power Slice PLS 66 ...

Page 115: ...Bass 1 SBS 67 85 0 39 1 SINGLE 582 Bs61 SynthBass101 SBS 67 86 1 39 1 SINGLE 583 Bs62 Acid Bass SBS 67 87 2 39 1 SINGLE 584 Bs63 Clavi Bass SBS 67 88 3 39 2 SINGLE 585 Bs64 Hammer SBS 67 89 4 39 2 SINGLE 586 Bs65 Synth Bass 2 SBS 67 90 0 40 2 SINGLE 587 Bs66 Beef FM Bass SBS 67 91 1 40 2 SINGLE 588 Bs67 RubberBass 2 SBS 67 92 2 40 2 SINGLE 589 Bs68 Attack Pulse SBS 67 93 3 40 1 SINGLE No Name Cate...

Page 116: ...HH EXC1 1 Jazz Kick 3 2 JazzDryKick2 2 Dry Stick 1 1 Jazz Rim 1 SnareGhost 1 JU D JazzSnr 1 JazzTom L 1 JU D CHH 1 EXC1 1 JazzTomL Flm 1 JU D CHH 2 EXC1 1 JazzTom M 1 JU D OHH 1 EXC1 1 JazzTomM Flm 1 JazzTom H 1 Jazz Crash 2 JazzTomH Flm 1 Jazz Ride 1 1 ChinaCymbal1 1 Ride Bell 2 1 Tambourine 1 1 Splash Cym 1 Cowbell 1 Crash Cym 2 1 Vibraslap 1 Jazz Ride 2 1 Bongo High 2 1 Bongo Low 2 1 Conga Hi M...

Page 117: ...2 Dry Stick 2 2 TR909 Snr 3 2 TR909 Clap 2 1 House Snr 1 TR909 Tom 1 TR909 CHH 2 EXC1 1 TR909 Tom 1 TR909 CHH 1 EXC1 1 TR909 Tom 1 TR909 OHH EXC1 1 TR909 Tom 1 TR909 Tom 1 TR909 Crash 1 TR909 Tom 1 TR909 Ride 2 1 ChinaCymbal2 2 TR909RideBl1 1 Tambourine 3 1 TR909 Splash 1 Cowbell 1 TR808 Crash 1 Vibraslap 1 TR909 Ride 3 1 Bongo High 2 1 Bongo Low 2 1 Conga Hi Mt2 EXC2 1 CongHiOp Slp EXC2 1 CongLwO...

Page 118: ...1 Woodblock 1 Cuica Mute EXC4 1 Cuica Open EXC4 1 Triangl Mt 1 EXC5 1 Triangl Op 1 EXC5 1 Shaker 1 1 Jingle Bell 1 Bell Tree 1 Castanets 1 Surdo Mute EXC6 1 Surdo Open EXC6 1 High Q 1 Slap 1 Scratch Push EXC7 1 Scratch Pull EXC7 1 Sticks 1 Square Click 1 Mtrnm Click 1 Mtrnm Bell 1 Mix Kick 1 StandardKick 1 Side Stick 1 Standard Snr 1 TR909 Clap 1 1 Elec Snare 3 1 Room Tom 2 1 Close HiHat EXC1 1 Ro...

Page 119: ... Open EXC4 1 Triangl Mt 1 EXC5 1 Triangl Op 1 EXC5 1 Shaker 1 1 Jingle Bell 1 Bell Tree 1 Castanets 1 Surdo Mute EXC6 1 Surdo Open EXC6 1 High Q 1 Slap 1 Scratch Push EXC7 1 Scratch Pull EXC7 1 Sticks 1 Square Click 1 Mtrnm Click 1 Mtrnm Bell 1 Jazz Kick 2 2 Jazz Kick 1 1 Side Stick 1 BrushSwirl 2 2 Brush Slap 1 1 BrushSwirl 1 1 Real Tom 3 1 Brush CHH EXC1 1 Real Tom 3 1 Brush PHH EXC1 1 Real Tom ...

Page 120: ... 1 Organ Phr 1 2 Organ Phr 2 3 Organ Phr 3 4 Organ Phr 4 5 Organ Phr 5 6 Organ Arp 1 7 Organ Arp 2 8 Organ Arp 3 9 Organ Arp 4 Category Button Name Accordion 1 ACD Phr 1 2 ACD Phr 2 3 ACD Phr 3 4 ACD Phr 4 5 ACD Arp 1 6 ACD Arp 2 7 ACD Arp 3 8 ACD Arp 4 9 ACD Arp 5 Category Button Name Harmonica 1 HRM Phr 1 2 HRM Phr 2 3 HRM Phr 3 4 HRM Phr 4 5 HRM Phr 5 6 HRM Arp 1 7 HRM Arp 2 8 HRM Arp 3 9 HRM A...

Page 121: ...hr 1 2 Vox Phr 2 3 Vox Phr 3 4 Vox Phr 4 5 Vox Phr 5 6 Vox Arp 1 7 Vox Arp 2 8 Vox Arp 3 9 Vox Arp 4 Category Button Name Hard Lead 1 Hard Ld Phr1 2 Hard Ld Phr2 3 Hard Ld Phr3 4 Hard Ld Phr4 5 Hard Ld Phr5 6 Hard Ld Arp1 7 Hard Ld Arp2 8 Hard Ld Arp3 9 Hard Ld Arp4 Category Button Name Soft Lead 1 Soft Ld Phr1 2 Soft Ld Phr2 3 Soft Ld Phr3 4 Soft Ld Phr4 5 Soft Ld Phr5 6 Soft Ld Arp1 7 Soft Ld Ar...

Page 122: ...d Name Constituent Notes of Chord Forms C Cadd9 C3 G3 D4 E4 C C maj9 C 3 C4 D 4 F4 D D 7 D3 F4 A3 C4 D D maj7 D 3 A 3 D4 G4 E Cadd9 on E E3 C4 D4 G4 F Fmaj9 F2 A3 E4 G4 F Dadd9 on F F 2 A3 D4 E4 G Cadd9 on G G2 D4 E4 G4 G F 6 on Ab G 2 C4 D4 F4 A F on A A2 A3 C4 F4 A G on Bb A 2 A 3 D4 G4 B G on B B2 B3 D4 G4 Assign Key Chord Name Constituent Notes of Chord Forms C Cmaj9 C3 E3 B3 D4 C C dim7 C 3 G...

Page 123: ...4 B C maj7 B B2 D4 D 4 G4 Assign Key Chord Name Constituent Notes of Chord Forms C C 7 11 C3 A 3 D 4 F4 C Db7 9 C 3 F3 B3 E4 D D 7 b5 D3 C4 F4 G 4 D Ebaug maj7 D 3 B3 D4 G4 E E7 9 E2 G 3 D4 F 4 F F7 9 F2 A3 D 4 G4 F Gbdim7 F 2 A3 C4 D 4 G G7 9 G2 B3 F4 A 4 G Abmaj7 11 G 2 C4 D4 G4 A A 7 b5 A2 C4 D 4 G4 A Bb 7 A 2 G 3 C 4 F4 B Bdim7 B2 G 3 D4 F4 Assign Key Chord Name Constituent Notes of Chord Form...

Page 124: ...lers Local On Off All Notes Off Active Sensing System Reset 1 16 1 16 Mode 3 X O O 0 127 X O O O O O O O O O O O O O O O O O O O O O O O O X O O X X O O O O O O O O O O O O O O O O O O O O O O O O Reverb O Chorus O O O O X X X X X X X X X O 1 X 1 16 1 16 Mode 3 Mode 3 4 M 1 O O 0 127 0 127 O 1 O 1 O 1 O 1 0 127 O 1 X X X O 3 X O 120 126 127 O X O 123 127 O X Bank select Modulation Portamento time ...

Page 125: ...eset Chord Sets 16 12 chord forms are assigned to each set User Chord Sets 8 12 chord forms can be assigned to each set Phrase Arpeggio Templates 342 User Templates 8 Styles Variations 473 Controllers D Beam Controller 1 Pitch Bend Modulation Lever 1 Control Knobs 5 Display 20 characters 2 lines Backlit LCD Connectors Output Jacks L MONO R Headphones Jack MIDI Connectors IN OUT Hold Pedal Jack Con...

Page 126: ...vl Chorus Send Level Patch Tone Parameters 46 Performance Part Effects 58 Rhythm Tone Parameters 53 Chorus Type 86 Clock Source 89 Coarse Tune 46 Control Change 93 CONTROLLER 89 Ctrl 1 2 Multi Effects Control 1 2 69 Current Part 40 cursor 42 CUTOFF 29 Cutoff Freq Cutoff Frequency 47 D D Beam Controller 31 D BEAM POLARITY 34 D BEAM SENS 34 Decay Time 28 Patch Tone Parameters 48 Delay 86 Delay Feedb...

Page 127: ...and numerals 43 O Octave Range Arpeggio Octave Range 63 Octave Shift 30 Original Tone Number 46 P pages 42 Pan Part Pan 56 Rhythm Tone Parameter 52 Parameters 42 Part 40 43 Part Patch Edit 57 Part Scale Tune C B 58 Part Setup 56 Part Setup Parameters 56 Patch 20 Patch Audition 22 Patch categories 49 Patch Common Parameters 45 PATCH INITIALIZE 50 Patch Level 45 Patch Mode 42 44 52 Patch Modify 26 P...

Page 128: ... 69 Send Lvl to Rev Chorus Parameters 87 Multi Effects Parameters 69 Shuf Rate Arpeggio Shuffle Rate 63 Shuf Resolution Arpeggio Shuffle Resolution 63 Soft Thru Soft Through Switch 91 Solo Switch 46 SOLO SYNTH 32 Split Arp 46 Split Point 45 Style Arpeggio Style 62 Sustain level 28 System Function 88 System messages 93 System Parameters 89 T Tap Tempo 37 Time 87 Tone Balance 45 Tone Pan 46 Tones 40...

Page 129: ...129 Memo ...

Page 130: ...130 Memo ...

Page 131: ...ions However there is no guarantee that interference will not occur in a particular installation If this equipment does cause harmful interference to radio or television reception which can be determined by turning the equipment off and on the user is encouraged to try to correct the interference by one or more of the following measures Reorient or relocate the receiving antenna Increase the separ...

Page 132: ...ej 7 Postbox 880 DK 2100 Copenhagen DENMARK TEL 3916 6200 FRANCE Roland France SA 4 Rue Paul Henri SPAAK Parc de l Esplanade F 77 462 St Thibault Lagny Cedex FRANCE TEL 01 600 73 500 FINLAND Roland Scandinavia As Filial Finland Elannontie 5 FIN 01510 Vantaa FINLAND TEL 0 9 68 24 020 GERMANY Roland Elektronische Musikinstrumente HmbH Oststrasse 96 22844 Norderstedt GERMANY TEL 040 52 60090 GREECE S...

Reviews: