background image

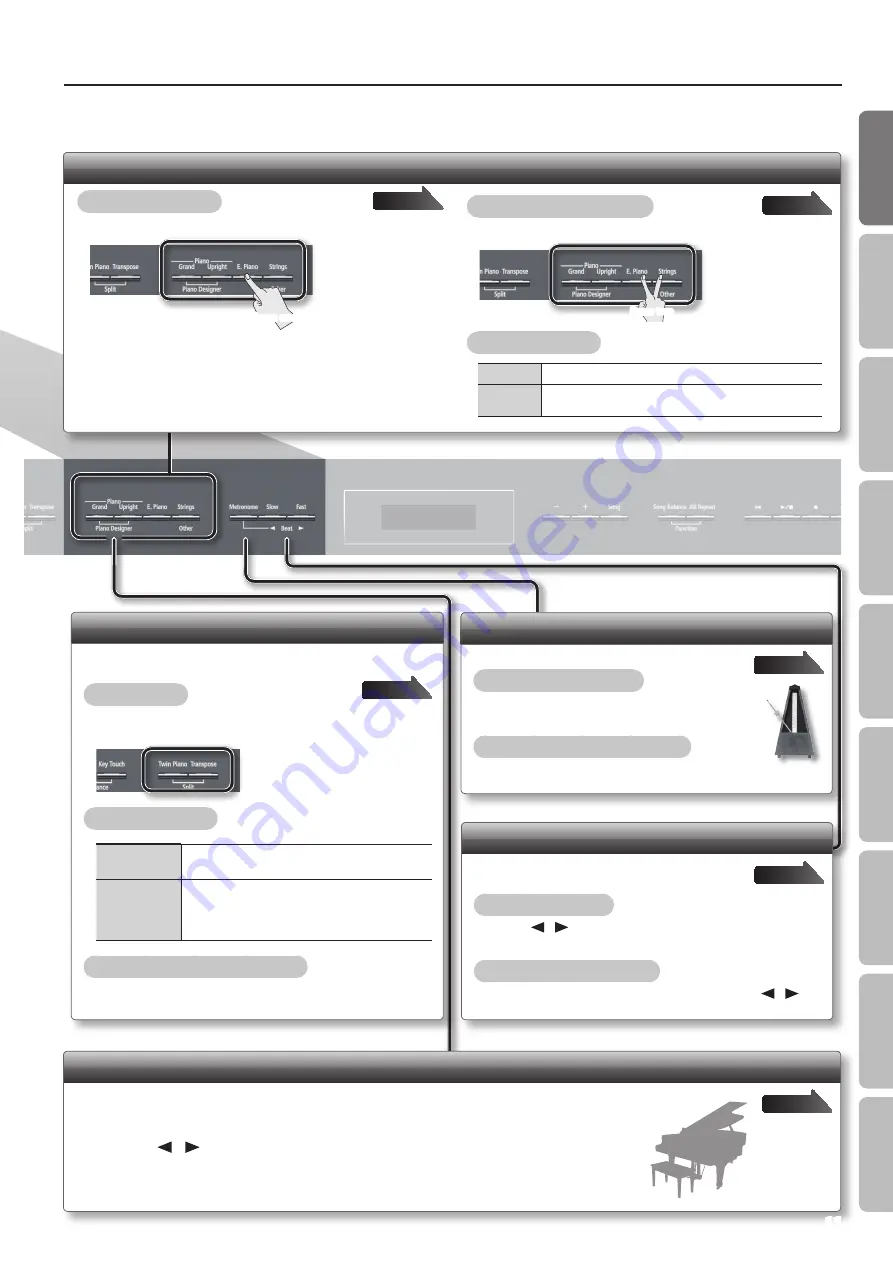
Operation Guide

Tone Buttons

To select a single tone

Press one of the tone buttons, and then use the [–] [+] buttons.

Press one

To layer two tones (dual play)

Press two tone buttons.

Press two

To change the tones

Tone 1

Press the [–] [+] buttons.

Tone 2

Hold down the right-most of the lit tone button, and then use 

the [–] [+] buttons.

page 

18

page 

19

Customizing Your Piano Sound (Piano Designer)

You can adjust various elements of a grand piano’s sound to create your own personalized piano.

1. 

While holding down the Piano [Grand] button, press the Piano [Upright] button .

2. 

Use the [

] [

] (Slow/Fast) buttons to select the item that you want to adjust .

3. 

Use the [–] [+] buttons to adjust the value .

page 

42

Playing Different Tones with the Right and Left Hands (Split Play)

This function divides the keyboard into left and right zones, 

allowing you to play a different tone in each zone.

To turn split on

While holding down the [Transpose] button, press the [Twin Piano] 

button.

To change the tones

Right-hand Tone

1.  Press a tone button.
2.  Press the [–] [+] buttons.

Left-hand Tone

1.  While holding down the [Transpose] button and 

[Twin Piano] button, press a tone button.

2.  While holding down the [Transpose] button and 

[Twin Piano] button, use the [–] [+] buttons.

Changing the keyboard’s split point

While holding down the [Transpose] button and [Twin Piano] 

button, play the key that you want to specify as the split point.

page 

20

Using the Metronome

Here’s how to sound the metronome.

To turn the metronome on

Press the [Metronome] button so it’s lit.

To adjust the metronome’s volume

While holding down the [Metronome] button, use the [–] [+] 

buttons.

page 

26

Changing the Tempo or Time Signature

You can adjust the tempo of the metronome or  

song.

To change the tempo

Use the [

] [

] (Slow/Fast) buttons.

To change the time signature

While holding down the [Metronome] button, use the [

] [

(Slow/Fast) buttons.

page 

26

11

O

per
ation G

uide

Panel Descriptions

Bef

or

You P
la

y

Per

forming

Pr

ac

ticing

Piano Desig

ner

Con

venien

t F

unc
tions

A

ppendix

Func
tion M

ode

Summary of Contents for HP506

Page 1: ......

Page 2: ...t sources such as radiators heat registers stoves or other apparatus including amplifiers that produce heat 9 Do not defeat the safety purpose of the polarized or grounding type plug A polarized plug...

Page 3: ...ts by yourself Refer all servicing to your retailer the nearest Roland Service Center or an authorized Roland distributor as listed on the Information Do not use or store in the following types of loc...

Page 4: ...s on it Otherwise you risk injury as the result of the unit toppling over or dropping down Never connect disconnect a power plug if your hands are wet Otherwise you could receive an electric shock Cau...

Page 5: ...t cloth or a piano use feather duster You must avoid applying any force since even the tiniest particles of sand or grit can produce scratches if you wipe too hard If the finish loses its luster use a...

Page 6: ...ion and Ivory Feel are either registered trademarks or trademarks of Roland Corporation in the United States and or other countries About the Ivory Feel Keyboard Features of an ivory feel keyboard Tra...

Page 7: ...s Panel Lock 47 About the Wireless LAN Function 47 Basic Connection Method Connect by WPS 47 Wireless LAN Function Settings 48 Status Indication 48 Connecting to a Wireless LAN Access Point That You S...

Page 8: ...y of tones sounds You can freely select and perform using these tones e e Play two layered tones You can layer two tones on a single key e e Play different tones with your left and right hands You can...

Page 9: ...create the sensation of performing in a concert hall e e Adjust the brightness of the sound You can adjust the tone quality of the sound ranging from a brilliant timbre to a mellow tone page 23 page...

Page 10: ...Volume buttons Softer Louder page 17 AdjustingtheBrightnessoftheSound Brilliance You can adjust the brightness of the sound you play from the keyboard or the sounds of a song you play back To adjust...

Page 11: ...the Transpose button press the Twin Piano button To change the tones Right hand Tone 1 Press a tone button 2 Press the buttons Left hand Tone 1 While holding down the Transpose button and Twin Piano...

Page 12: ...ons or songs and adjust various settings Holding down the buttons will make the value change continuously To rapidly increase the value hold down the button and press the button To rapidly decrease th...

Page 13: ...s the Play Stop button Enter recording standby mode While stopped press the Rec button Record While in recording standby mode press the Play Stop button Rewind Press the Bwd button Fast forward Press...

Page 14: ...heavier On the HP508 this change in the feeling of resistance is simulated On an acoustic piano when you step on the damper pedal you ll first hear the sound of the dampers releasing the strings Then...

Page 15: ...he Input jack can be adjusted by means of Input Volume p 50 To prevent malfunction and equipment failure always turn down the volume and turn off all the units before making any connections When conne...

Page 16: ...n places where small children are present make sure that an adult provides supervision and guidance Setting Up the Music Rest Opening Closing the Lid To open the lid use both hands to lift it lightly...

Page 17: ...high volume Turning the power off 1 Press the Power switch The power is turned off If you need to turn off the power completely first turn off the unit then unplug the power cord from the power outle...

Page 18: ...of a drum set If you ve selected an organ sound that provides a rotary effect 1 such as a Combo Jz Org or a Ballad Organ pressing the Strings button will switch the speed of the rotary effect For det...

Page 19: ...together Selecting tones for dual play Tone name Corresponding button How to select tones Tone 1 Left tone button Press the buttons Tone 2 Right tone button While holding down the tone button for Ton...

Page 20: ...be as follows C1 D1 E1 F1 G1 A1 B1 A0 B0 C2 C3 C4 C5 C8 B7 Split Point Power up default F 3 Left hand Tone Right hand Tone 2 To exit Split Play hold down the Transpose button and press the Twin Piano...

Page 21: ...plit Point belongs to the left hand section of the keyboard Range in which you can specify the split point B1 B6 1 1 While holding down the Transpose button and Twin Piano button press the key that yo...

Page 22: ...bience effect values Screen Value Explanation 1 10 default 2 Higher values apply deeper ambience If you re using headphones and the Headphones 3D Ambience effect p 50 is set to On this lets you adjust...

Page 23: ...ttons The display will indicate the key touch setting Screen Value Explanation Fix 1 100 default 70 Higher values will make the keyboard feel heavier If you ve specified Fix notes will sound at the sa...

Page 24: ...zone will be heard more loudly from the right speaker than from the left speaker The sound of the left hand keyboard zone will be heard more loudly from the left speaker than from the right speaker Wh...

Page 25: ...If you want to transpose only the keyboard or only the song make the appropriate setting as described in Specifying What the Transpose Will Affect Transpose Mode p 51 2 1 3 1 Press the Transpose butt...

Page 26: ...The Metronome button will go out Changing theTempo 1 Press the Slow Fast buttons Tempo When you play back a song the metronome s tempo will be set to the tempo of that song Changing theTime Signature...

Page 27: ...our Performance A series of sounds rhythmically played to indicate the tempo before a song starts is called a count in If you sound a count in it will be easier for you to synchronize your own perform...

Page 28: ...he buttons to select that folder and then press the Play Stop button To select a song within a folder use the buttons To exit a folder use the button to select Up and then press the Play Stop button I...

Page 29: ...ay will show the song balance Screen Value Explanation 0 9 default 5 The song s volume decreases the more you lower this value and at the same time the keyboard performance will take on more prominenc...

Page 30: ...does not contain an accompaniment the Accomp button will not light even if you press it 1 Press the part button for the part that you don t want to be played The light for the button you pressed will...

Page 31: ...cancel the repeat function press the AB Repeat button once again The AB Repeat button will go out the repeat points you specified will be cleared MEMO The repeat points can be set at the beginning of...

Page 32: ...es containing music file could be widely compatible regardless of the manufacturer of the listening device An enormous variety of music is available whether it be for listening for practicing musical...

Page 33: ...Listening to a performance you ve recorded 1 Press the Play Stop button Playback will start from the beginning of the recorded performance Overdubbing a Recorded Song When recording an SMF you can ov...

Page 34: ...Rec button will light and the HP508 will enter recording standby mode At this time New Song will be selected If you decide not to record press the Rec button once again 2 Reselect the song you saved e...

Page 35: ...play back during recording MEMO If you want to re record only a portion of the song use the Bwd button or Fwd button to move to the measure at which you want to start recording Starting stopping reco...

Page 36: ...nternal memory 2 Select the song that you want to convert to audio p 28 3 While holding down the Rec button press the buttons to select Audio 4 Press the Rec button The Rec button will light and the P...

Page 37: ...be saved in Favorite internal memory 2 Select the tone that you want perform p 18 3 While holding down the Rec button press the buttons to select Audio 4 Press the Rec button The Rec button will light...

Page 38: ...n Specifying What the Transpose Will Affect Transpose Mode p 51 You can also use the Function mode s Audio Transpose setting to change the amount of transposition p 51 If you select a different song t...

Page 39: ...3 From the desktop or other location where you copied it drag and drop the song WAV file to add it to the playlist you created in step 2 Drag drop 4 Insert a blank CD R into your computer 5 Select th...

Page 40: ...en will appear allowing you to select the song number of save destination 5 Use the buttons to select the song number of save destination No song has been saved in song numbers shown as Empty in the s...

Page 41: ...umber in which no song has been saved If you want to save your song by overwriting an existing song you no longer need select the song number of that unwanted song 8 Press the Fast button A screen wil...

Page 42: ...ult 5 This adjusts the damper resonance of the acoustic piano sound the sympathetic vibration produced in strings other than those actually played when you press the damper pedal Higher settings will...

Page 43: ...ched tuning yourself Play the key whose pitch you want to adjust then use the buttons to adjust its pitch Note Volume Off User User 50 0 default Off This lets you adjust the volume of each individual...

Page 44: ...E When turning the unit s power back on after it has been shut down due to the Auto Off function always make sure to allow at least five seconds to pass after the power has been shut off before you tu...

Page 45: ...Favorite Audio files cannot be copied If a USB flash drive sold separately is not connected you won t be able to perform this operation 1 While holding down the Song Balance button press the AB Repeat...

Page 46: ...been saved in Favorite internal memory or the USB flash drive will be erased The erased data cannot be recovered so we recommend that you check the contents of memory before you proceed If you re usi...

Page 47: ...r by changing the wireless connection mode basic WPS ad hoc mode 6 The sound and functionality might be temporarily affected while a connection is being established this is not a malfunction Basic Con...

Page 48: ...USB adapter is inserted but not connected to a wireless LAN access point Not Available The wireless USB adapter is not inserted Ad Hoc SSID Ad Hoc mode p 49 The Ad Hoc SSID is shown Press the Fast bu...

Page 49: ...her wireless device that has cellular capability will be able to connect to the Internet via the cellular connection Please be aware that if you use a cellular connection for Internet connectivity you...

Page 50: ...By playing in the temperament that was in use when a composition was created you can experience the sonorities of chords originally intended for that song For details refer to Temperaments p 43 Equal...

Page 51: ...being input via the Input jack Keyboard Song The sound of the keyboard the song being played back and the sound being input via the Input jack Octave Shift Changing the Pitch of theTone in Octave Ste...

Page 52: ...By connecting MIDI devices USB MIDI and specifying the appropriate MIDI channel for each device you can play or select sounds on those devices The HP508 will receive all sixteen channels 1 16 Off 1 1...

Page 53: ...ntrol device What is MIDIVisual Control MIDI Visual Control is an internationally used recommended practice that was added to the MIDI specification so that visual expression could be linked with musi...

Page 54: ...Off After aTime Auto Off With the factory settings the unit s power will automatically be switched off 30 minutes after you stop playing or operating the unit If you don t want the power to turn off...

Page 55: ...u connect external devices be sure to connect them to the same AC outlet The volume level of the instru ment connected to Input jack is too low Could the Input volume be set to 0 p 50 Raise the volume...

Page 56: ...e speakers 10 15 cm 4 6 inch away from walls or other surfaces Keep the volume down Move away from the objects that are resonating If you hear this in headphones It is likely that there is some other...

Page 57: ...spectrum If communication is unstable the response may be sluggish or if using audio communication there may be dropouts in the audio The following actions may improve the situation Move the wireless...

Page 58: ...rght A brilliant upright piano sound 4 Rock Piano A robust piano sound recommended for boogie woogie playing 5 RagtimePiano A honky tonk piano sound recommended for ragtime playing Tone List E Piano N...

Page 59: ...scher Marsch Ludwig van Beethoven 46 Nocturne No 2 Fryderyk Franciszek Chopin 47 Fr hlingslied Felix Mendelssohn 48 Pr ludium Johann Sebastian Bach 49 J gerlied Felix Mendelssohn 50 Passepied Claude A...

Page 60: ...nternal Memory Save Song Standard MIDI Files Format 0 Songs Max 99 songs External Memory External Storage USB Flash Memory Playable Software Standard MIDI Files Format 0 1 Roland Original Format i For...

Page 61: ...the song After waiting several seconds you may be able to play back the song by pressing the Play Stop button again Error 18 This audio format is not supported Please use 44 1 kHz 16 bit linear WAV fo...

Page 62: ...n the bottom of the piano Copyright 2011 ROLAND CORPORATION All rights reserved No part of this publication may be reproduced in any form without the written permission of ROLAND CORPORATION 1 Assembl...

Page 63: ...et your fingers pinched 2 Fasten the piano to the stand with the screw B M5 20 mm Pull the piano toward yourself while keeping the front slightly raised 1 2 Please don t get your fingers pinched Screw...

Page 64: ...Transmit Channel 52 MIDI Visual Control 53 Mute Volume 30 Muting 30 N Note Character 43 Note Volume 43 O Octave Shift 51 Other button 18 Output jacks 15 Overdubbing 33 P Panel Lock 13 47 Part 30 Part...

Page 65: ...For EU Countries For China 65 Operation Guide Panel Descriptions Before You Play Performing Practicing Piano Designer Convenient Functions Appendix Function Mode...

Page 66: ...armful interference to radio or television reception which can be determined by turning the equipment off and on the user is encouraged to try to correct the interference by one or more of the followi...

Page 67: ...Operation Guide Panel Descriptions Before You Play Performing Practicing Piano Designer Convenient Functions Appendix Function Mode...

Page 68: ...5 1 0 0 0 3 4 9 2 0 0 1...

Reviews: