background image

15

CHOCOSKETCH User Manual

Start 3D Printing

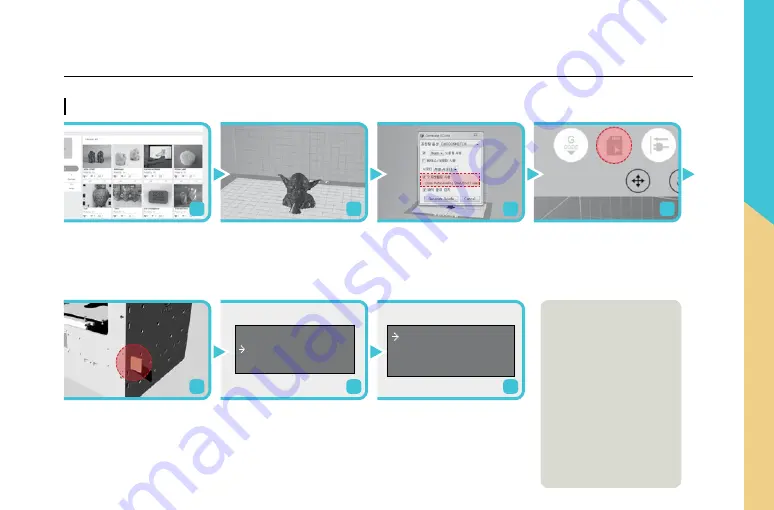
Prepare STL or OBJ file you want
to  print  out.  You  can  also  easily
download STL files from free 3D
file websites.

Insert the SD card on the right of
the printer.

Select File > Open and choose
STL file you want to 3D print out.
you also can drag and drop the 
3D image file to Creator K.

Select  Preheat  from  display 
menu, and preheat your device
to 43℃ for 30mimutes.

Printer > Select CHOCOSKETCH
from  printer  type.  Check  Right 
Nozzle, then click Gcode Gener
ate icon, located on left side of
the icons.

After preheating, start your produ
ction from the file, by selecting
Create from display menu.

* TIP: once production is started,change 
temperature  of  the  nozzle  to  40℃,  by 
selecting  Utilities  >  Change  temperature 
(RECOMMENDED)  You  may  adjust  the
temperature 1~5℃ more or less, depending 
on the room temperature.

SD card icon color will change,
indicating G-Code is has genera
ted  successfully.  And  then  click 
the SD card button to save the file 
in x3g format into SD card.

Print from SD
Preheat
Utilities

Print from SD
Preheat
Utilities

1

5

2

6

3

7

4

※ 

You can also print directly

from your Creator K by conn
ecting your computer to the 
printer  with  the  USB  cable 
without using SD card.

※  You  can  download  this 
software, Creator K, and the 
concerned  manual  on  the 
ROKIT

s website. 

(http://en.3disonprinter.com/)

How to use CHOCOSKETCH

Summary of Contents for CHOCOSTECH

Page 1: ...er manual is described in detail to help your first experience with CHOCOSKETCH The manual will show you how to simply and easily use the printer Please carefully read and follow the manual to fully u...

Page 2: ...rinter Overview How to use CHOCOSKTECH 1 Unpacking your CHOCOSKETCH 2 Filament Loading and Unloading 3 Leveling the Printing Bed 4 Display Menu Introduction 5 Start 3D Printing Additional function 1 F...

Page 3: ...tion on safety health and environment in Korea WARNING 2 Never reach inside the printer while it s operating Safe Information 1 The CHOCOSKTECH generates heats and includes moving parts that can cause...

Page 4: ...Pulley Internal LED Lighting Equip Photo Sensor Auto Leveling Installation Front Door Pause Unpause Material Change While Operation Frame Dimension Product Weight Storage Temperature Extruder Temperat...

Page 5: ...anywhere else Product Function 1 Auto Leveling Before printing Auto Leveling sensor reads gap between Heat Bed and Hot End and level Heat Bed without manual adjustment 2 Cartridge Warmer Heating extra...

Page 6: ...l Hex Wrench Removal Tool Power Cable Power Supply What s in the Box FINGER SKETCH Box Choco Catridge CHOCOSKETCH Printer Welcome Box Accessories CHOCOSKETCH Printer Body Paper Foil Hex Wrench SD Card...

Page 7: ...KETCH User Manual 1 2 3 Printer Overview Power Switch Power Socket USB Drive Port Door Printing Bed Extruder Cartridge Warmer LCD Display Arrows and OK Button SD Cadr Slot 1 6 7 8 9 10 3 4 5 2 4 5 6 1...

Page 8: ...me box Carefully take out the CHOCOSKETCH from the box and put it on a sturdy table After removing the packing buffers surrounding CHOCOSKETCH check the component set 1 2 How to use CHOCOSKETCH Do not...

Page 9: ...irection to loosen the belt and put the cartridge to extruder of CHOCO SKETCH Pull out the cap of syringe and put the plastic needle then put it into the extruder Insert the stopper to the syringe and...

Page 10: ...lament Loading and select Unload Right Pull cartridge out from extruder when the belt is loosened enough after the gear is moved in opposite direction 1 2 Changing New Cartridge is the same as Page 9...

Page 11: ...k Auto Leveling item when generating G Code Auto Leveling function will automatically work Uncheck Auto Leveling if you don t want it 5 Despite of using Auto Leveling function if the gradient of the p...

Page 12: ...Put on the material which you want to print chocolate on it Note that surface of base mate rial should be flat Go to Utilities Height detector and turn on Height detector function Check Height detect...

Page 13: ...ange the settings without any specific explanation because they are only for developers or aftersales service Monitor Mode It shows current temperature of the extruder and printing status Filament Loa...

Page 14: ...To manually level the Heat Bed before starting Auto Leveling Jog Mode To manually control the location of the extruder and the Heat Bed Height Detector When you want to print chocolate on and even su...

Page 15: ...on from the file by selecting Create from display menu TIP once production is started change temperature of the nozzle to 40 by selecting Utilities Change temperature RECOMMENDED You may adjust the te...

Page 16: ...e setting was successful Click doudle 3D on the Wifi list from tablet PC or computer network 5 6 7 Put adapter on the socket after connecting power plug to the power port beside of finger sketch Conne...

Page 17: ...refer to page 9 for detail Access the website www doodl e3d com through tablet PC or computer Check Print connected Draw the picture freely on the screen Click icon to set the expected output value 1...

Page 18: ...until chocolate being pressed a little bit What if the edges of printed chocolate shape are floating The cause is the low temperature of external environment The recommended external temperature is f...

Page 19: ...elling The CHOCOSKETCH support Standard Levelling and Auto Levelling If you want Standard Levelling Level build plate Utilities Level Build Plate Set the levelling manually Left Right Front Back Middl...

Page 20: ...e the chocolate from the market Possible but we recommend you to use the chocolate cartridge provided from Rokit for stable result and product protection Also it can be ruled out of A S when the probl...

Page 21: ...by Rokit Malfunction resulting from not following instruction manual 2 Other cases Malfunction resulting from natural disaster fire salt damage flood lightning In case expendable components are fully...

Page 22: ...compliance with Korea s product safety requirements for electrical and electronic equipment and components that utilise power It is a legally compulsory certification mark that must appear on product...

Page 23: ...N 3D PRINTER c ROKIT Inc B 1106 Kabul Great Valley 60 5 Gasan dong Geumcheon gu Seoul Korea http en 3disonprinter com T 02 867 0182 F 02 865 0182 E mail 3dison rokit co kr Multiple Perfection 3D Print...

Reviews: