background image

CLEANING & DISINFECTING

Cleaning and Disinfecting are two separate processes. To be effective, cleaning must 

precede disinfecting. 

Cleaning the Cover: 

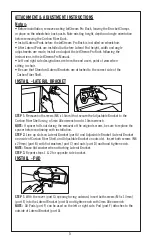
Remove the cover by following instructions on the Attach-

ment & Adjustment Instructions Page. Machine wash in hot water.  No bleach.  
Tumble dry low. 

Cleaning the Brackets and Hardware:

 Using a soft cloth, hand wash the brackets 

and hardware with mild soap and warm water. Rinse thorougly. Towel dry with a 
soft cloth.

Cleaning the Foam:

 Using a soft cloth, hand wash the foam with mild soap and 

warm water. Allow foam to air dry thoroughly.

Note: DO NOT 

attempt to remove the foam from the metal bracket.

Disinfecting all parts:

  Wipe gently with a household disinfectant dampened 

cloth. Air dry thoroughly.

MAINTENANCE

Check screws, bolts, brackets, and hinges for wear, breakage, and tightness daily.  
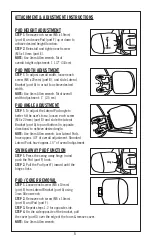
Re-tighten loose screws following the Attachment Instructions in this manual.  

DO NOT 

continue to use the JetStream Pro Lateral Pads if any component cannot 

be tightened or is broken.  ROHO recommends that you have your JetStream Pro 
Lateral Pads thoroughly inspected by a qualified technician every six months, or 
as necessary.

DISPOSAL

When properly used and disposed, none of the components of your JetStream Pro 
Lateral Pads will present an environmental hazard.  Dispose of the product and/ 
or components in accordance with the applicable regulations in your country.

7

Summary of Contents for JetStream Pro

Page 1: ... OF THIS PRODUCT USER BEFORE USING THIS PRODUCT READ THIS ENTIRE MANUAL AND SAVE FOR FUTURE REFERENCE Manuel d utilisation des coussins latéraux JetStream Pro FOURNISSEUR CE MANUEL DOIT ÊTRE REMIS À L UTILISATEUR DE CE PRODUIT UTILISATEUR AVANT D UTILISER CE PRODUIT LIRE CE MANUEL EN ENTIER ET LE CONSERVER POUR CONSULTATION ULTÉRIEURE ...

Page 2: ...c ROHO shape fitting technology and JetStream Pro The ROHO Group Inc has a policy of continual product improvement and reserves the right to amend specifications presented in this manual 1 The ROHO Group Inc 2007 Vous trouverez ci après les marques déposées et enregistrées de ROHO Group Inc ROHO shape fitting technology et JetStream Pro ROHO Group Inc a une politique d amélioration continue de ses...

Page 3: ...s are designed for users who need both trunk support for stability and a removal of the supports for transfers Large Stationary Pads are designed for users who need moderate external support for trunk stability Active Pads are designed for users who need some lateral trunk support for stability with potential to progress beyond the need of lateral support The Lateral Brackets come in a Standard si...

Page 4: ... other than a JetStream Pro Adjustable Back Replacement System DO NOT use if user is over 250 lbs 113 4 kg DO NOT use for heavy duty applications or if user is high tone DO NOT use the Lateral Pads to transfer in or out of the wheelchair The Lateral Brackets are not designed to support the full body weight of the user DO NOT use the Lateral Pads to lift your wheelchair Protect the Lateral Pads fro...

Page 5: ...eral Bracket D Nuts Used to attach Lateral Bracket to carbon fiber shell Qty 2 per Lateral Bracket E M5 x 10mm screws Used to attach Pad to Lateral Bracket Qty 2 per Lateral Pad F Pad Comes in Large Stationary or Swing Away and Active Stationary only sizes Provides positioning and support for user G Cover Fits over the Pad Tools Needed for Assembly Not Included 3 mm 4 mm 5 mm Allen wrenches 10 mm ...

Page 6: ...L BRACKET STEP 1 Remove both screws M6 x 16mm that secure the Adjustable Bracket to the Carbon Fiber Shell using a 5mm Allen wrench and a 10mm wrench NOTE If spacer falls out during the removal of the original screws be sure to replace the spacer before continuing with installation STEP 2 Line up slots on Lateral Bracket part A and Adjustable Bracket Lateral Bracket on inside of Carbon Fiber Shell...

Page 7: ...erall height adjustment 1 1 2 3 8cm PAD WIDTH ADJUSTMENT STEP 1 To adjust overall width loosen each screw M6 x 20mm part B and slide Lateral Bracket part A in or out to achieve desired width NOTE Use 4mm Allen wrench Total overall width adjustment 1 2 5 cm PAD ANGLE ADJUSTMENT STEP 1 To adjust the Lateral Pad angle to better fit the user s torso loosen each screw M6 x 20mm part B and slide the Lat...

Page 8: ...o remove the foam from the metal bracket Disinfecting all parts Wipe gently with a household disinfectant dampened cloth Air dry thoroughly MAINTENANCE Check screws bolts brackets and hinges for wear breakage and tightness daily Re tighten loose screws following the Attachment Instructions in this manual DO NOT continue to use the JetStream Pro Lateral Pads if any component cannot be tightened or ...

Reviews: