ATTACHMENT & ADJUSTMENT INSTRUCTIONS
Notes:
• Before installation, remove existing JetStream Pro Back, leaving the Bracket Clamps
in place on the wheelchair back posts. Note existing height, depth and angle orientation
before removing the Carbon Fiber Back.
• Install Lateral Pads before the JetStream Pro Back is installed on wheelchair.
• After Lateral Pads are installed but before Lateral Pad height, width and angle
adjustments are made, install and adjust the JetStream Pro Back following the
instructions in the JetStream Pro Manual.
• Left and right side designations are from the end user’s point of view when
sitting in chair.
• Be sure that Standard Lateral Brackets are attached to the correct side of the
Carbon Fiber Shell.
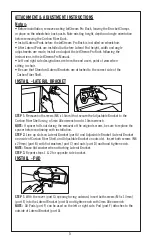
INSTALL - LATERAL BRACKET
STEP 1.
Remove both screws (M6 x 16mm) that secure the Adjustable Bracket to the
Carbon Fiber Shell using a 5mm Allen wrench and a 10mm wrench.
NOTE:
If spacer falls out during the removal of the original screws, be sure to replace the
spacer before continuing with installation.
STEP 2.
Line up slots on Lateral Bracket (part A) and Adjustable Bracket (Lateral Bracket
on inside of Carbon Fiber Shell, and Adjustable Bracket on outside). Insert both screws (M6
x 20mm) (part B) with flat washers (part C) and nuts (part D) and hand tighten each.
NOTE:
Reuse flat washer when attaching Lateral Bracket.
STEP 3.
Repeat steps 1 & 2 for opposite side bracket.
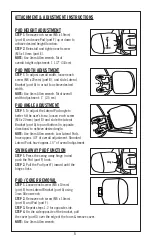
INSTALL - PAD
STEP 1.
With the cover (part G) opening facing outward, insert both screws (M5 x 10mm)
(part E) into the Lateral Bracket (part A) and tighten each with 3mm Allen wrench.
NOTE:
All Pads (part F) can be used on the left or right side. Pad (part F) attaches to the
outside of Lateral Bracket (part A).
5


