Rohde & Schwarz TSMA6 Series Getting Started Download Page 48

Configuring the R&S


TSMA6

R&S

®

TSMA6

48

Getting Started 4900.8040.02 ─ 06

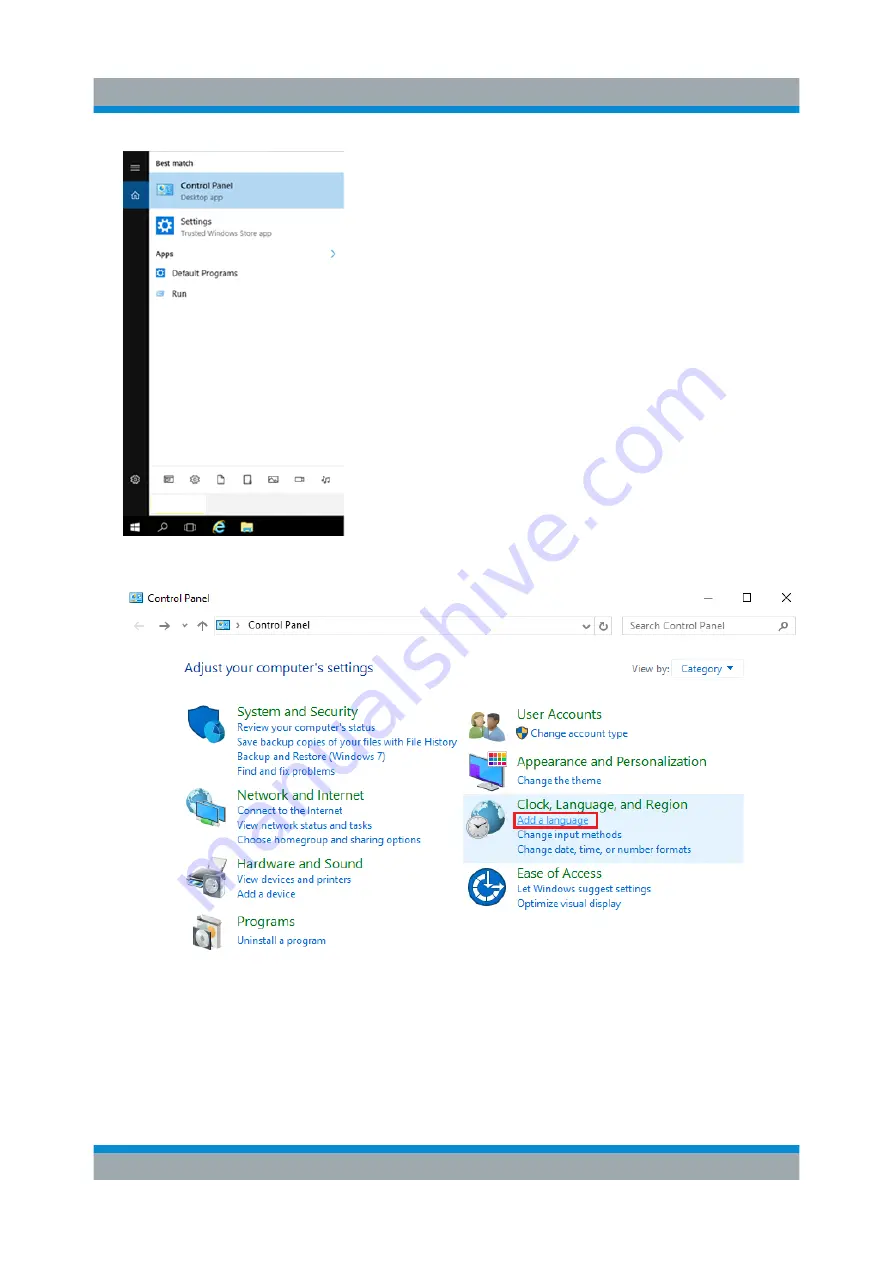
2. Select "Add a language" under "Clock, Language, and Region".

3. The "Language" settings window opens and by default only English is listed

there.
To add a new language, click the "Add a language" tile.

Changing Keyboard Language

Summary of Contents for TSMA6 Series

Page 1: ...R S TSMA6 Autonomous Mobile Network Scanner Getting Started Getting Started Version 06 4900804002 a0 X2...

Page 2: ...thank the open source community for their valuable contribution to embed ded computing 2020 Rohde Schwarz GmbH Co KG M hldorfstr 15 81671 M nchen Germany Phone 49 89 41 29 0 Fax 49 89 41 29 12 164 Ema...

Page 3: ...tures 8 4 Preparing for Use 9 4 1 Unpacking the Instrument 10 4 2 Connecting External Devices 11 4 3 Connecting Power Supply 12 4 3 1 Connecting to a Vehicle DC Power Supply 12 4 3 2 Connecting an AC...

Page 4: ...Remote Desktop Connection 31 6 2 Selecting Measurement Mode 33 6 3 Measurement Modes 33 6 3 1 PC Mode 34 6 3 2 Remote ViCom Server Mode 34 6 3 3 QualiPoc Mode 35 6 3 4 NESTOR and NESTOR Probe Mode 38...

Page 5: ...vironments Use the R S TSMA6 only for its designated purpose Observe the operating conditions and performance limits stated in the data sheet Where do I find safety information Safety information is p...

Page 6: ...structions etc A printed version is delivered with the instrument 2 2 User Manuals and Help Contains the description of all instrument modes and functions Includes the con tents of the getting started...

Page 7: ...Acknowledg ment OSA The release notes list new features improvements and known issues of the cur rent firmware version and describe the firmware installation The open source acknowledgment document pr...

Page 8: ...SB With its ultra broadband front end the integrated scanner measures all supported technologies 350 to 6000 MHz simultaneously The future proof architecture and the in field upgradability for both ha...

Page 9: ...ition read and observe the safety instructions in the following sec tions Notice that the data sheet may specify additional operating condi tions Risk of instrument damage during operation An unsuitab...

Page 10: ...e Instrument The following section describes how to setup the instrument Risk of instrument damage due to inappropriate operating conditions Specific operating conditions are required to ensure accura...

Page 11: ...A6 Z5 Carrying Box 4 2 Connecting External Devices The following external devices must be connected before connecting the power supply The SMA connector is sensitive to mechanical stress Use the follo...

Page 12: ...10 11 4 3 Connecting Power Supply This section describes how to connect the R S TSMA6 to a power supply unit 4 3 1 Connecting to a Vehicle DC Power Supply For 12V Vehicle DC Supply Only The R S TSMA6...

Page 13: ...6 Figure 4 1 Supplied power cable with cigarette lighter adapter 4 3 2 Connecting an AC Power Supply To operate the R S TSMA6 with an AC power supply connect the DC IN connec tor with the AC power sup...

Page 14: ...ure 4 2 R S TSMA6 Z1 Power Supply 4 3 3 Connecting the R S TSMA6 BP Battery Pack Unit Alternatively it is possible to power the R S TSMA6 via the R S TSMA6 BP Bat tery Pack Unit To use the R S TSMA6 w...

Page 15: ...Battery orientation Note The R S TSMA6 may be used only with closed battery cover 2 Remove the cover cap from the docking connector of the R S TSMA6 3 Attach the R S TSMA6 with the bottom side see Fig...

Page 16: ...S TSMA6 Figure 4 5 R S TSMA6 1 Power connector for R S TSMA6 BP On delivery the power connector is protected by a cover cap 4 Set the R S TSMA6 vertically on top of the R S TSMA6 BP 1 5 Slide the R S...

Page 17: ...ply with the R S TSMA6 depends on the system settings on the R S TSMA6 Auto Power On The R S TSMA6 starts automatically when power is applied at the DC IN connector of the R S TSMA6 or at the DC IN c...

Page 18: ...g On R S TSMA6 To switch on the device press the POWER ON OFF button 4 5 Connecting with R S TSMA6 WLAN Access Point 4 5 1 Windows 7 1 Click the Network symbol in the task bar 2 Select the correct WLA...

Page 19: ...ed 4900 8040 02 06 3 Select Connect automatically and click Connect 4 Enter the network security key and click OK Default security key instrument The connection to the WLAN access point is established...

Page 20: ...or Use R S TSMA6 20 Getting Started 4900 8040 02 06 4 5 2 Windows 10 1 Click the Network symbol in the task bar 2 Select the correct WLAN in this example TSMA6 101084 Connecting with R S TSMA6 WLAN Ac...

Page 21: ...arted 4900 8040 02 06 3 Select Connect automatically and click Connect 4 Select Connect using a security key instead 5 Enter the network security key and click Next Default security key instrument Con...

Page 22: ...TSPC USL Currently following LAN adapters are available Dual Gbit LAN port adapter TSPC U2L2 Single Gbit LAN port adapter TSPC U2L For information how to connect an additional adapter and required dr...

Page 23: ...NESTOR or R S ViCom documentation 4 Wait until the used software reports a 3D fix time may vary depending on the configured GNSS 5 To calibrate the instrument the following driving procedures have to...

Page 24: ...S TSMA6 Front Panel 5 2 Rear Panel View The following figure provides an overview of the control elements and the connec tors on the rear panel of the instrument Figure 5 2 R S TSMA6 Rear Panel 1 WLAN...

Page 25: ...increasing bandwidth and measurement rate AUX Connector The AUX connector has two functions IN OUT synchronization with up to 4 connected R S TSME6 requires sync cable R S TSME6 ZC2 R S no 4900 1800...

Page 26: ...anner State Scanner Pwr Mode and Meas indica ted different states of the R S TSMA6 For a detailed description see Chap ter 5 3 Status LEDs on page 28 Power ON OFF The POWER ON OFF button turns on and...

Page 27: ...ecting external devices e g key board mouse or software dongle Power limit max 500 mA port Overall USB current USB C USB 3 0 and USB 2 0 max 3 A LAN Port Remote Control The LAN port provides a high sp...

Page 28: ...f 20 dBm Non compliance destroys the input mixer Battery Pack Connector The battery pack connector is used to connect a battery pack unit R S TSMA6 BP R S No 4900 9001 02 allowing mobile operation 5 3...

Page 29: ...een CONT SW ready green BLINKING 0 5 Hz green CONT green BLINKING SW measuring green blue BLINKING rapidly green CONT green BLINKING SW recording yellow BLINKING 2 Hz SW warning blue BLINK ING 1 Hz Re...

Page 30: ...web GUI of the R S TSMA6 see Chapter 6 1 1 Start the R S TSMA6 Web GUI on page 30 Establish a remote desktop connection via LAN WLAN see Chap ter 6 1 2 Establish a Remote Desktop Connection on page 31...

Page 31: ...t the R S TSMA6 LAN port with the host PC port 2 Use the R S TSMA6 default IP settings that is the DHCP client The R S TSMA6 and the remote host PC automatically negotiate the IP address Alternatively...

Page 32: ...nnection type see the Chap ter 6 1 1 Start the R S TSMA6 Web GUI on page 30 and is as follows WLAN 192 168 137 1 LAN IP address of the R S TSMA6 NOTE If you connect the R S TSMA6 LAN interface with a...

Page 33: ...the desired measurement mode see Chapter 6 3 Measurement Modes on page 33 and adjust your device according to these requirements 2 Start the R S TSMA6 web GUI see Chapter 6 1 1 Start the R S TSMA6 Web...

Page 34: ...mode for installation of software and for the inter active operation of the R S TSMA6 In this mode no software application NES TOR ROMES QualiPoc is started in the background 6 3 2 Remote ViCom Server...

Page 35: ...age 43 WLAN connection only Connect the tablet smartphone with the R S TSMA6 WLAN AP See Chap ter 4 5 Connecting with R S TSMA6 WLAN Access Point on page 18 Measurement with the rViCom Sample App To r...

Page 36: ...he following steps must be performed 1 Turn on the R S TSMA6 scanner 2 In the web GUI set the Mode of Operation to QualiPoc and press Sub mit 3 On the handheld device start the QualiPoc application 4...

Page 37: ...an for NCM 7 Touch Disconnected touch the TSMA6 scanner in the list for example TSMA6 900012 and then touch OK to accept the pairing request Figure 6 3 Pair NCM Figure 6 4 Bluetooth pairing request 8...

Page 38: ...TOR Mode The NESTOR UI engine and the NESTOR measurement engine are hosted on the R S TSMA6 NESTOR Probe Mode The R S TSMA6 hosts only the NESTOR measurement engine The NES TOR UI engine is hosted on...

Page 39: ...R master installation to check the measurement on the R S TSMA6 NESTOR Mode To use the R S TSMA6 in NESTOR mode the following steps must be per formed 1 In the web GUI set the Mode of Operation to NES...

Page 40: ...pidly NESTOR Probe mode 1 On the Mode tab select NESTOR Probe mode 2 Press Submit The R S TSMA6 is switched into NESTOR Probe mode In the status bar the entry is Changing mode of operation in progress...

Page 41: ...connected to a USB port of the R S TSMA6 To control a ROMES measurement via IP from an external host PC the ROMES option ROMES4RCO is required After the installation R S ROMES must be started first ti...

Page 42: ...R S TSMA6 web GUI from the host PC see Chapter 6 1 1 Start the R S TSMA6 Web GUI on page 30 2 Navigate to Configuration System Mode and set measurement mode to NESTOR Probe 3 Press Submit and wait un...

Page 43: ...the remote PC and click Upload File 4 The file is copied by default in the directory C ProgramData Rohde Schwarz My ROMES Workspace Note The target directory for file upload depends on the selected mo...

Page 44: ...with Android versions 5 0 there may be problems with visibility of the device Refer to the R S TSMA6 User Manual chapter 9 13 Bluetooth device not detected by R S TSMA6 4 In the R S TSMA6 web GUI cli...

Page 45: ...of R S TSMA6 proceed as follows After changing the password additional steps has to be performed for Autologin Change Password 1 On R S TSMA6 open the Control Panel 2 Navigate to User Accounts Change...

Page 46: ...hange password 2 Enable Autologin After changing the password change the password also in Autologin settings To change the Autologin settings proceed as follows 1 Open the Registry Editor 2 In the Reg...

Page 47: ...ning Under Value data type in the new password 4 Click OK The changes are accepted After powering the R S TSMA6 auto matically login 6 7 Changing Keyboard Language By default the R S TSMA6 is delivere...

Page 48: ...ing Started 4900 8040 02 06 2 Select Add a language under Clock Language and Region 3 The Language settings window opens and by default only English is listed there To add a new language click the Add...

Page 49: ...t the desired language by double clicking the language tile in the example German is selected 5 Next select the version of the chosen language 6 After successfully adding the language it should be lis...

Page 50: ...R S TSMA6 50 Getting Started 4900 8040 02 06 6 8 Enable Virtual Memory To enable virtual memory on the R S TSMA6 perform the following steps 1 Start the Windows Control Panel 2 Select System and Secur...

Page 51: ...Configuring the R S TSMA6 R S TSMA6 51 Getting Started 4900 8040 02 06 3 Select Advanced System Settings 4 Select the tab Advanced Enable Virtual Memory...

Page 52: ...52 Getting Started 4900 8040 02 06 5 Select Settings in the section Performance 6 Select the tab Advanced 7 Select Change in the section Virtual memory 8 Enable Automatically manage paging file size f...

Page 53: ...Configuring the R S TSMA6 R S TSMA6 53 Getting Started 4900 8040 02 06 9 Click OK to close the dialog 10 Reboot the device Enable Virtual Memory...

Page 54: ...uct contact our customer support center A team of highly qualified engineers provides support and works with you to find a solution to your query on any aspect of the operation program ming or applica...

Page 55: ...8040 02 06 Index B Brochures 6 D Data sheets 6 Dead reckoning 25 G Getting started 6 H HDMI Port 27 Help 6 L LED LAN Connector 27 M Multi GNSS 25 O Open source acknowledgment OSA 7 R Release notes 7...

Reviews: