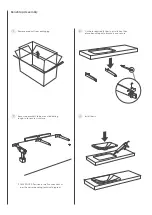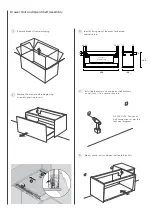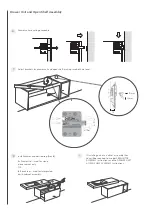
Specifications
It is a requirement of State Plumbing Codes that licensed plumbers carry out all tapware installations.
All installations should comply with the relevant requirements of AS/NZS 3500 and local plumbing codes.
Care and Maintenance
[1] Product should be inspected for surface damage prior to installation. [2]Cleaning and handling of all finishes
must be performed carefully. [3] For all sanitary ware surfaces clean with soapy water or a mild detergent with a
soft cloth and rinse with warm water. [4] Never use harsh detergents or abrasive cleaners as these will damage
the product. [5] Do not use undue pressure when cleaning. [6] For Matt surfaces such as Cristalplant, Ceramilux
and Composite Stone periodical cleaning with an agent containing micro-granules (such as JIF) is recommened.
[7] For Wood finishes, clean with a damp lint free cloth, making sure to dry immediately after each use with no
water left on the surface and in the direction of the grain. [8] Contact with harsh chemicals such as hair dye, hair
bleach etc. will result in damage to the finish. [9] For further cleaning and maintenance instructions for more
stubborn stains or damage please refer to the product specific care and maintenance information. [10] Damage
to finishes arising from improper installation or post installation use or failure to observe the care and cleaning
instructions will void all warranty agreements.
Warranty
[1] All Rogerseller tapware, bathroom fittings and sanitaryware are covered by a five (5) year warranty from date
of purchase. Tapware cartridges are covered by a five (5) year parts and labour warranty plus an additional
five year (5) parts warranty. [2] Due to the manufacturer’s conditions, the warranty on flexible hoses, cistern
mechanisms and soft close seats is 12 months parts and labour from date of purchase. [3] We will repair or
replace free of charge any faulty product due to defects in materials or workmanship within the warranty period.
We, or our nominated agency, reserve the right to assess, repair, replace or service any warranty claims as we
see fit. [4] Claims shall be void where the ceramic cartridge has malfunctioned due to the presence of any of the
below in the water supply:
•
Copper tube pieces
•
Sand, dirt or stones
•
Thread tape
•
Other objects not normally presented in potable water supplies
[5] For full terms and conditions please refer to rogerseller.com.au
Rogerseller Showrooms —
Melbourne
173-177 Barkly Avenue
Burnley VIC 3121
P 03 9429 8888
Sydney
18 Danks Street
Waterloo NSW 2017
P 02 8396 8700
Brisbane
74–76 McLachlan Street
Fortitude Valley QLD 4006
P 07 3251 4333
Concept Stores —
Southern Innovations
(
Fishwick ACT)
P 02 6143 2666
Southern Innovations
(
Mitchell ACT)
P 02 6129 7666
Southern Innovations
(Albury NSW)
P 02 6022 2777
Routleys Plumbing Innovations
(Malvern SA)
P 08 8291 3000
rogerseller.com.au


