Warnings
Read this manual before installing the cabinet. It will only take you a few minutes.
The contents of this booklet are based on the most recent information available about this product. We are entitled to alter any
product characteristic, package or availability at any moment, without previous notice. The illustrations might not correspond to
your actual product. All dimensions are rated. In case of any problem during installation or in terms of performance, do not hesitate
to contact us. Our phone numbers are at the end of this document. Thank you for choosing Falper.
Tools and Materials
IMPORTANT!
The plugs are fundamental for the proper functioning of the cabinet in all safety. For this reason it is important to choose
the most suitable type of plug for the wall on which the cabinet is going to be installed. The material the wall is made of (cement,
brickwork, plasterboard, holed bricks, steel, with air gap etc) will alsoinfluence the type of plug and screws. The plugs must be selected
by a qualified technician.
Before you start
IMPORTANT! At least two people are required to assemble this cabinet, one of which must be qualified for this type of work.
WARNING! Risk of damaging the product and of physical harm. The installation of this product must be carried out by qualified
personnel. No responsibility is accepted for equipment tampering or for the non-observance of these instructions.
• The installation of this product must be carried out by qualified personnel. No responsibility is accepted for equipment
tampering or for the non-observance of these instructions.
• Do not try to lift or install the cabinet without help.
• Always remember to wear protection goggles when using the drill or the electric screwdriver.
• The washbasin is subject to breaking if not perfectly levelled. Make sure the support structure is levelled before installing
the washbasin.
The instructions below are intended for qualified personnel with enough experience to manage the product with absolute safety
• Follow all the local norms regarding hydraulic installation and building in general.
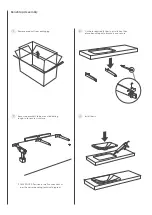
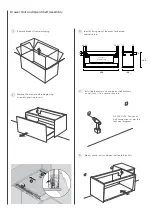
• Unpack the cabinet according to the instructions on the package itself. Inspect the cabinet for eventual damage before
installing it.
• The furniture and accessories are for bathroom cabinet and must only be used for this purpose. Any other use releases Falper
from all responsibility and annuls all warranty terms.
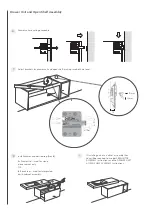
• Select the plugs and screws (not included) most suitable for the type of wall, so that installation is absolutely safe.
• Each unit has been designed to be installed according to its own configuration. Product provided in the “technical specifications” section.
Do not complete the lining/tiling of the wall a structure until the eventual support cross beams have been installed.
WARNING! Make sure the cabinet is not an obstacle to movement inside the bathroom.
Warnings
WARNING! Risk of physical harm and material damage:
• Do not sit or climb on the cabinet. Do not load it excessively.
• Do not use the cabinet for any purpose other than normal use for personal care.
• Do not replace any components of the cabinet, such as the doors or the washbasin, with products not supplied by Falper. Should this
happen the company may not be held responsible for any malfunctioning of the cabinet and all warranty terms are to be considered null.
Pencil
Protection
goggles
Metre
Drill
Level
Screwdriver
Silicone
Plus:
• Cleaning cloth
• Plugs and screws
suitable for the
type of wall
Hammer
Wooden cross
beams


