background image

6

     MP-Series Food Grade Servo Motor Installation Instructions

Publication MP-IN004D-EN-P — April 2009 

Using Couplings and Pulleys

Mechanical connections to the motor shaft, such as couplings and pulleys, require a 
torsionally rigid coupling or a reinforced timing belt. The high dynamic 
performance of servo motors can cause couplings, pulleys, or belts to loosen or slip 
over time. A loose or slipping connection causes system instability and can damage 
the motor shaft. All connections between the system and the servo motor shaft must 
be rigid to achieve an acceptable response from the system. Periodically inspect 
connections to verify their rigidity. 

When mounting couplings or pulleys to the motor shaft, make sure that the 
connections are properly aligned and that axial and radial loads are within the 
specifications of the motor. Refer to 

Shaft Seals

 for guidelines to achieve 20,000 

hours of motor bearing life.   

A shaft key provides a rigid mechanical connection with the potential for 
self-alignment when the key is properly installed. These sections provide additional 
information: 

• Refer to 

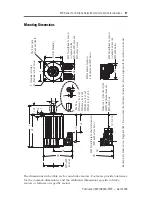
Mounting Dimensions

 for information about the key and shaft 

keyway. 

• Refer to 

Shaft Key

 for recommendations on how to remove and install a 

shaft key. 

ATTENTION

Damage may occur to the motor bearings and the feedback device if sharp impact is applied 
to the shaft during installation of couplings and pulleys. Damage to the feedback device 
may result from applying leverage to the motor mounting face when removing devices 
mounted on the motor shaft. 

Do not strike the shaft, couplings, or pulleys with tools during installation or removal. Use a 
wheel puller to apply pressure from the user end of the shaft to remove any device from the 
motor shaft. 

Failure to observe safety precautions could result in damage to the motor and its 
components. 

Summary of Contents for MPF-A310

Page 1: ...F B320 MPF B330 MPF B430 MPF B4530 MPF B4540 MPF B540 Topic Page Important User Information 2 Catalog Number Explanation 3 Before You Begin 4 Install the Motor 8 Verify Connector O ring and Backshell Seal 8 Change Connector Orientation 9 Mount the Motor 12 Connector Data 15 Mounting Dimensions 17 Motor Load Force Ratings 20 Accessory Kits 22 Specifications 25 Additional Resources 26 ...

Page 2: ...icular installation Rockwell Automation Inc cannot assume responsibility or liability for actual use based on the examples and diagrams No patent liability is assumed by Rockwell Automation Inc with respect to use of information circuits equipment or software described in this manual Reproduction of the contents of this manual in whole or in part without written permission of Rockwell Automation I...

Page 3: ...ousing Shaft Key Shaft Seal FEEDBACK M Multi turn High Resolution Encoder S Single turn High Resolution Encoder RATED SPEED A 500 rpm B 1000 rpm C 1500 rpm D 2000 rpm E 2500 rpm F 3000 rpm G 3250 rpm H 3500 rpm J 3750 rpm K 4000 rpm L 4250 rpm M 4500 rpm N 4750 rpm P 5000 rpm Q 5250 rpm R 5500 rpm S 5750 rpm T 6000 rpm MAGNET STACK LENGTH 80 8 0 INCHES FRAME SIZE IEC 72 1 FLANGE NUMBER 3 100 mm 4 ...

Page 4: ...ze the life of a servo motor within a food processing environment Always provide a drip loop in each cable to carry liquids away from the connection to the motor Avoid spraying liquids under high pressure directly on the junction of the motor shaft housing connectors and the enclosure joints Fluids under high pressure when forced around worn seals can contaminate the motor bearings and significant...

Page 5: ...increases brake wear and reduces brake life Using Shaft Seals A seal is installed on the motor shaft to protect the front bearing from fluids or fine dust that could contaminate the motor bearing and reduce its lifetime An IP66 IP67 rating for the motor requires the use of shaft seals connectors and cables that provide an environmental seal equal to or exceeding the rating Refer to Specifications ...

Page 6: ...ns of the motor Refer to Shaft Seals for guidelines to achieve 20 000 hours of motor bearing life A shaft key provides a rigid mechanical connection with the potential for self alignment when the key is properly installed These sections provide additional information Refer to Mounting Dimensions for information about the key and shaft keyway Refer to Shaft Key for recommendations on how to remove ...

Page 7: ...the effects of EMI Isolate the power transformers or install line filters on all AC input power lines Physically separate signal cables from motor cabling and power wiring Do not route signal cables with motor and power wires or over the vent openings of servo drives Ground all equipment using a single point parallel ground system that employs ground bus bars or large straps If necessary use addit...

Page 8: ...o electrical power restricted locked out Before applying power to the motor remove the shaft key and other mechanical couplings which could be thrown from the shaft Failure to observe safety precautions could result in personal injury ATTENTION Make sure that cables are installed and restrained to prevent uneven tension or flexing at the cable connections Excessive and uneven lateral force on the ...

Page 9: ...TTENTION Connectors are designed to be rotated into a fixed position during motor installation and remain in that position without further adjustment Strictly limit the applied forces and the number of times the connector is rotated to make sure that connectors meet the requirements of IP66 and IP67 Failure to observe safety precautions could result in damage to the motor and its components IMPORT...

Page 10: ...from input power and motor power wiring 3 Separate cables by 0 3 m 1 ft minimum for every 9 m 30 ft of parallel run 4 Ground both ends of the encoder cable shield and twist the signal wire pairs to prevent electromagnetic interference EMI from other equipment ATTENTION If any shield on a power cable is not grounded high voltage can be present on that shield Make sure there is a connection to groun...

Page 11: ...ng the shield that surrounds the signal wires dissipates any induced voltage and reduces the effects of EMI ATTENTION If any shield on a power cable is not grounded high voltage can be present on that shield Make sure there is a connection to ground for all shield wires inside a power cable and for the overall power cable shield Failure to observe safety precautions could result in personal injury...

Page 12: ...motor faceplate The mounting hole diameter is specified in the Mounting Dimensions table 5 Align the motor on the machine using the mounting pilot hole to verify the correct alignment 6 Tighten the stainless steel fasteners within the recommended torque range 7 Rotate the shaft for electrical phasing and encoder alignment The index pulse occurs on a single turn encoder when the shaft key is aligne...

Page 13: ...the effects of vibration at the cable to motor connection and creates a more secure connection for a threaded plug O rings interior to the cable plug provide complete environmental sealing for a cable with a quick lock plug or a cable with a threaded plug ATTENTION Make sure that cables are installed and restrained to prevent uneven tension or flexing at the motor to cable connections Excessive an...

Page 14: ...cable plug with the motor connector If the plug and connector do not go together with light hand force realign the flat surfaces and try again IMPORTANT The motor orientation shown is used to clearly show the alignment marker on each cable socket The recommended motor orientation when installed positions the connectors at the bottom of the motor ATTENTION Keyed connectors and cable plugs must prop...

Page 15: ...ns A B C and D may be labelled U V W and GND respectively Brake pins F and G may be labelled as and positive and negative respectively Reserved pins E and H may be numbered 1 and 2 2 Sin B Phase V 1 3 Cos C Phase W 1 4 Cos D Ground 1 5 Data E Reserved 1 6 Data F MBRK 1 7 Reserved G MBRK 1 8 H Reserved 1 9 5V DC L 10 Common 11 Reserved 12 13 TS 14 TS 15 Reserved 16 17 M23 Feedback Connector M23 Pow...

Page 16: ...and MPF A5xx Pin MPF A5xx and MPF B5xx 1 Sin U Phase U 2 Sin V Phase V 3 Cos W Phase W 4 Cos Ground 5 Data BR 6 Data BR 7 Reserved 1 Reserved 8 2 9 10 11 9V DC 12 Common 13 TS 14 TS 15 Reserved 16 17 M23 Feedback Connector M40 Power Brake Connector 1 2 3 4 5 6 7 8 9 10 11 12 13 14 17 15 16 Intercontec P N AEDC227NN00000012000 V U W 1 2 Intercontec P N CEDE271NN00000051000 ...

Page 17: ...2 MPF x540 8 x 7 x 40 MPF x3xx MPF x4xx and MPF x45xx motors MPF x540 motors 131 0 5 16 MPF x540 only AB AB Pilot Diameter Shaft End Hole Thread and Depth Shaft Key MPF x540 End Cap M23 Power Brake Connector is standard on the Electronic zero Index pulse or Stegmann ABS 0 occurs when the shaft key or dimple not shown is aligned with the connectors as shown M40 Power Brake Connector Dimensions MPF ...

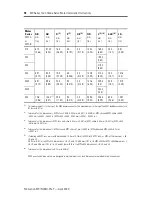
Page 18: ...tor with a brake add 34 5 mm 1 36 in to MPF x310 MPF x320 or MPF x330 dimensions L LB LD and LE 48 5 mm 1 91 in to MPF x430 dimensions L LB LD and LE 48 5 mm 1 91 in to MPF x4530 or MPF x4540 dimensions L LB LD and 48 6 mm 1 91 in to LE and 51 6 mm 2 03 in to MPF x540 dimensions L LB LD and LE 6 Tolerance for this dimension is 0 7 mm 028 in L LB 6 mm in LA mm in 310 67 5 2 66 87 25 3 43 16 0 0 629...

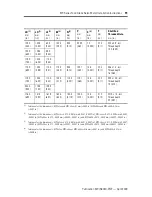
Page 19: ...0 0002 0 0007 in and MPF x540 0 014 0 009 mm 0 0007 0 0002 in P mm in S 4 mm in 4 Tolerance for this dimension is MPF x3xx MPF x4xx or MPF x45xx 0 36 mm 0 007 in and MPF x540 0 43 mm 0 008 in T mm in Shaft End Threaded Hole mm in 128 0 5 04 102 0 4 03 62 0 2 45 100 0 3 94 80 0 3 15 92 39 3 64 7 0 0 283 2 74 0 11 M5 x 0 8 6H Thread depth 12 5 0 49 153 0 6 04 128 0 5 03 88 0 3 45 179 0 7 04 153 0 6 ...

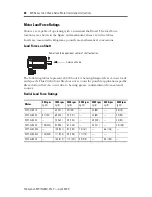
Page 20: ...This 20 000 hour life does not account for possible application specific life reduction that can occur due to bearing grease contamination from external sources Radial Load Force Ratings Motor 500 rpm kg lb 1000 rpm kg lb 2000 rpm kg lb 3000 rpm kg lb 3500 rpm kg lb 4000 rpm kg lb 5000 rpm kg lb MPF A B310 62 137 49 108 40 88 36 79 MPF A B320 87 192 69 152 55 121 45 99 40 88 MPF A B330 74 163 59 1...

Page 21: ...13 29 MPF A B330 27 60 20 44 16 35 13 29 MPF A B430 52 115 39 86 29 64 22 49 19 42 MPF A B4530 34 75 25 55 21 46 19 42 MPF A B4540 49 108 36 79 27 60 22 49 MPF A B540 49 108 36 79 30 66 26 57 Motor 500 rpm kg lb 1000 rpm kg lb 2000 rpm kg lb 3000 rpm kg lb 3500 rpm kg lb 4000 rpm kg lb 5000 rpm kg lb MPF A B310 36 79 27 60 21 46 18 40 MPF A B320 49 108 36 80 27 59 21 46 18 40 MPF A B330 36 80 27 5...

Page 22: ...ts Shaft Seals A shaft seal provides a barrier to moisture and particle entering the motor bearings Motors are shipped with a polytetrafluoroethylene PTFE shaft seal installed Catalog numbers and dimensions for replacement shaft seals are listed in the table Refer to the Shaft seal Kit Installation Instructions publication 2090 IN012 for instructions on how to install a shaft seal Motor Cat No Ins...

Page 23: ...the mating mechanical connection coupling or pulley b Align the front of the key with the front of the motor shaft This prevents interference with the key by the end of cut radius c Support the underside of the shaft with a fixture and use a device to apply a controlled force that presses the key into the keyway ATTENTION Damage can occur to the motor bearings and the feedback device if sharp impa...

Page 24: ...ng and includes installation instructions When designing you motion system consider the following guidelines when installing a sealing air pressure kit Plastic air tubing should be 4 mm 5 32 in OD Teflon FEP tubing Air supplied to the motor should not exceed 0 1 bar 1 45 psi Air Kit Installation on the M23 Feedback Connector ATTENTION Excessive air pressure and improper filtering of air can result...

Page 25: ...g resulting from cables or their plugs 2 Refer to Shaft Seals for the recommended replacement interval and installation instructions IP67 dust tight temporary immersion 4 IP66 dust tight powerful water jets 4 5 IP53 dust protected water spray 60º from vertical IP51 dust protected water dripping vertically IP50 dust protected no protection from water 4 The following are the IPx5 and IPx6 water spra...

Page 26: ...N003 Information on installing configuring startup and troubleshooting a servo drive system with an Ultra3000 drive Kinetix 2000 Multi axis Servo Drive User Manual publication 2093 UM001 Information on installing configuring startup and troubleshooting a servo drive system with a Kinetix 2000 drive Kinetix 6000 Multi axis Servo Drives User Manual publication 2094 UM001 Information on installing co...

Page 27: ...MP Series Food Grade Servo Motor Installation Instructions 27 Publication MP IN004D EN P April 2009 Notes ...

Page 28: ... installation please review the information that s contained in this manual You can also contact a special Customer Support number for initial help in getting your product up and running New Product Satisfaction Return Rockwell Automation tests all of its products to ensure that they are fully operational when shipped from the manufacturing facility However if your product is not functioning and n...

Reviews: