background image

Rockwell Automation Publication 2711P-QS002B-EN-P - April 2022

10

Getting Started

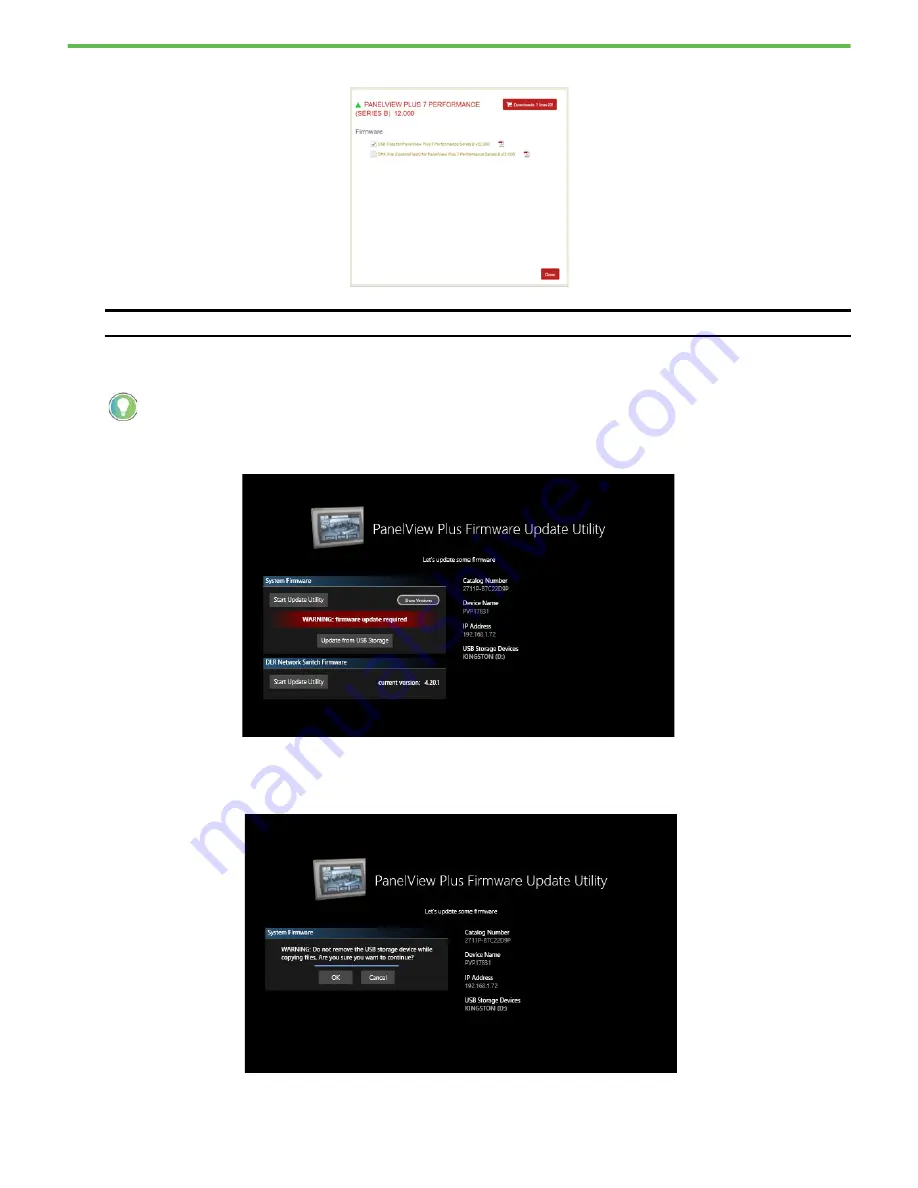
6. Select and download the CAB Files for the desired firmware version.

7. After the .ZIP file has downloaded, extract the contents to the root of the USB Storage Device. 

8. Insert the removable storage device into one of the USB ports located at the bottom of the PanelView terminal. 
9. Tap Update from USB Storage and wait for the firmware update to complete. 

Before the update starts, the terminal displays the warning message shown in the following graphic. As the 
message states, do not remove the USB storage device while the file is being copied. Wait until you are 
prompted to remove the USB storage device. 

10. Tap OK when you are ready to continue.

IMPORTANT

Do not download the DMK file. It does not work to update firmware via a USB Storage Device.

Use a USB Storage Device with at least 8 GB of storage available. Any Windows file system (including FAT32 or NTFS) is 

acceptable. 

Summary of Contents for Allen-Bradley PanelView Plus 7

Page 1: ...Quick Start PanelViewPlus7Performance Series B Terminals...

Page 2: ...ess Steel terminals which run on the Windows 10 IoT Core operating system The startup procedure for these terminals is different than for a Series A terminal Please follow this quick start guide for t...

Page 3: ...ummary of Changes 4 Before You Begin 4 Power up the Terminal 4 Configure the Terminal 5 Update the Firmware 9 USB Storage Device 9 ControlFLASH Client 11 Enter a Password 18 Transfer Runtime Files mer...

Page 4: ...e terminal Stainless steel terminals come with the following items included in the box Mounting clips for panel installation Backing plate Hygienic gasket In addition to these items make sure that you...

Page 5: ...Yes 3 On the first calibration screen calibrate the touch screen boundaries as prompted WARNING Series B terminals are designed for use with DC power only Do not apply AC power or attempt to insert a...

Page 6: ...libration screen calibrate the touch screen as prompted a Carefully tap and hold the center of the target for at least 1 second The target moves after you do this b Repeat as the target moves around t...

Page 7: ...type the password in the Confirm password must match password above field 12 Tap Next The terminal displays the Network Adapters setup screen For all of the following PanelView screens if you do not h...

Page 8: ...specify your own DNS information turn this field Off by tapping the button indicator and sliding it to the left The following fields become active so that you can type your information into them Pref...

Page 9: ...o pcdc 2 On the home page click Available Versions 3 Click the Select a Product link and in the Select a Product dialog box type PanelView Plus 7 Performance in the search field and then click the Sea...

Page 10: ...USB Storage and wait for the firmware update to complete Before the update starts the terminal displays the warning message shown in the following graphic As the message states do not remove the USB s...

Page 11: ...een 12 Continue with Enter a Password on page 18 ControlFLASH Client The following ControlFLASH clients are available to update the firmware ControlFLASH Plus ControlFLASH Before you can use ControlFL...

Page 12: ...RockwellAutomation Firmware Kits 8 On the PanelView terminal under System Firmware tap the Start Update Utility button Using ControlFLASH Plus For details about how to install ControlFLASH Plus softwa...

Page 13: ...cation 2711P QS002B EN P April 2022 13 Getting Started 3 Click Next 4 Confirm that the information is correct and then click Flash A series of status changes occur on the ControlFLASH Plus screen and...

Page 14: ...lFLASH Plus screen the Status field displays the Transmitting update status On the PanelView terminal the status changes to CONNECTED transferring updates Once the firmware file transmission is comple...

Page 15: ...rifying and preparing updates The PanelView terminal reboots and on the ControlFLASH Plus screen the Flash Results dialog box displays a Succeeded message 5 Click Close and then click Done When the fi...

Page 16: ...s B terminal follow these steps 1 Click Start Programs FLASH Programming Tools ControlFLASH 2 Make sure that you know the required information in the Welcome dialog box then click Next 3 Select the ca...

Page 17: ...ell Automation Publication 2711P QS002B EN P April 2022 17 Getting Started 5 Select the firmware revision to install and click Next 6 Read the Danger information in the Summary dialog then click Finis...

Page 18: ...n see the ControlFLASH User Manual publication 1756 UM105 9 Close the ControlFLASH software 10 Continue with Enter a Password on page 18 Enter a Password After the PanelView terminal is updated with t...

Page 19: ...er to the challenge question The response needs to be a minimum of 6 characters 5 Tap OK The terminal displays the FactoryTalk View ME Station startup screen If you do not have a keyboard or mouse con...

Page 20: ...Transfer Utility via ethernet Removable storage device USB drive or SD card Transfer Utility To transfer runtime files mer by using the Transfer utility complete the following steps 1 From the Factory...

Page 21: ...y using a removable storage device complete the following steps 1 Insert the removable storage device in the appropriate port on your work station 2 On your work station browse to the following locati...

Page 22: ...or No 13 Continue with Install the Terminal on page 22 Install the Terminal After you complete all of the previous procedures you are ready to install your PanelView Plus 7 Performance Series B termi...

Page 23: ...12 101 for the PanelView Plus 7 Performance Series B terminals PanelView Plus 7 Performance Terminals User Manual publication 2711P UM008 Describes how to install configure operate and troubleshoot t...

Page 24: ...rok auto knowledgebase Local Technical Support Phone Numbers Locate the telephone number for your country rok auto phonesupport Literature Library Find installation instructions manuals brochures and...

Reviews: