background image

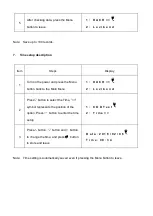
After checking data, press the Menu 

button to leave 

1 :   H A C H < <


2 :   L o v i b o n d  


Note:    Save up to 100 records. 


7. 

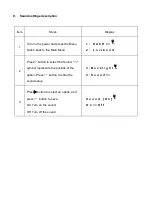
Time setup description 


Item 

Steps 

Display 

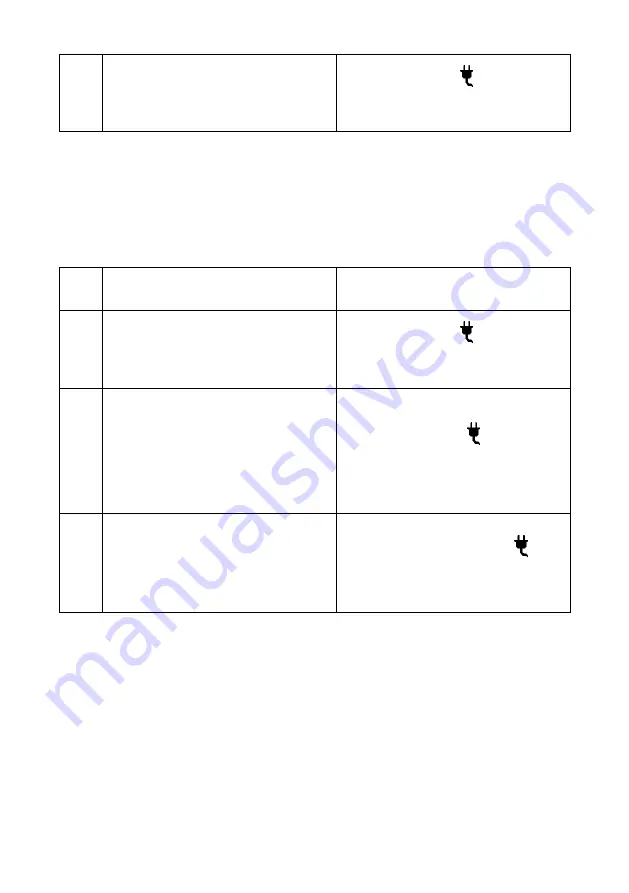
Turn on the power and press the Menu 

button back to the Main Menu 

1 :   H A C H < <


2 :   L o v i b o n d  

Press


button to select the Time, ”<<”


symbol represents the position of the 

option, Press 

    button to enter the time 

setup 

1 :   C O D T e s t


2 :   T i m e < <  

Press

 button , 

 button and 

 button 

to change the time, and press 

    button 

to store and leave 

D a t a : 2 0 1 6 / 0 2 / 0 6


T i m e : 0 9 : 3 4  


Note:    Time setting is automatically saved even if pressing the Menu button to leave. 


Summary of Contents for 198200-01

Page 1: ...CD 200 Chemical Oxygen Demand COD Detector ...

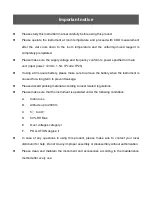
Page 2: ...remove the battery when the instrument is unused for a long term to prevent leakage Please discard packing material according to local related regulations Please make sure that the instrument is operated under the following conditions A Indoor use B Altitude up to 2000 m C 5 to 40 D 80 RH Max E Over voltages category I F POLLUTION degree II In case of any questions in using this product please mak...

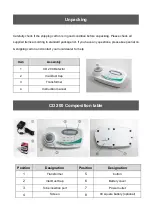
Page 3: ...ns please keep serial no shipping carton and contact your local dealer for help Item Assembly 1 CD 200 Detector 2 Vial Dust Cap 3 Transformer 4 Instruction manual Position Designation Position Designation 1 Transformer 5 button 2 Vial Dust Cap 6 Battery cover 3 Tube insertion port 7 Power outlet 4 Screen 8 9V square battery optional CD 200 Composition table Unpacking ...

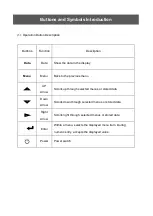
Page 4: ... UP Arrow Scrolls up through selected menus or stored data Down Arrow Scrolls down through selected menus or stored data Right Arrow Scrolls right through selected menus or stored data Enter Within a menu selects the displayed menu item During numeric entry accepts the displayed value Power Power switch Buttons and Symbols Introduction ...

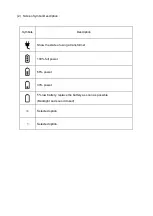
Page 5: ...l Description Symbols Description Show the state of using a transformer 100 full power 66 power 33 power 5 low battery replace the battery as soon as possible Backlight and sound closed Selected option Selected option ...

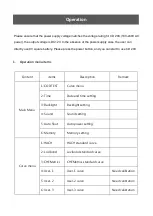
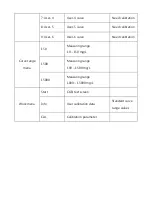
Page 6: ...CD 200 1 Operation menu items Content items Description Remark Main Menu 1 COD TEST Curve menu 2 Time Date and time setting 3 Backlight Backlight setting 4 Sound Sound setting 5 Auto Shut Auto power setting 6 Memory Memory setting Curve menu 1 HACH HACH standard curve 2 Lovibond Lovibond standard curve 3 CHEMetrics CHEMetrics standard curve 4 User 1 User 1 curve Need calibration 5 User 2 User 2 cu...

Page 7: ...on 9 User 6 User 6 curve Need calibration Curve range menu 150 Measuring range 10 150 mg L 1500 Measuring range 100 1500 mg L 15000 Measuring range 1000 15000 mg L Work menu Start COD test screen Info User calibration data Standard curve range values CAL Calibration parameter ...

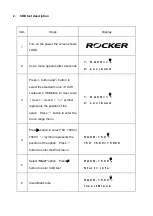
Page 8: ...rve User 1 User 6 symbol represents the position of the option Press button to enter the Curve range menu 1 H A C H 2 L o v i b o n d 4 Press button to select 150 1500 or 15000 symbol represents the position of the option Press button to enter the Work menu H A C H 1 5 0 1 5 0 1 5 0 0 1 5 0 0 0 5 Select Start option Press button to enter COD test H A C H 1 5 0 0 S t a r t I n f o 6 Insert Blank tu...

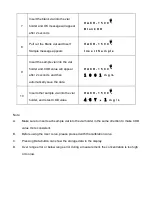
Page 9: ...automatically save the data H A C H 1 5 0 0 1 0 0 1 m g L 10 Insert other sample vial into the vial holder and retest COD value H A C H 1 5 0 0 4 8 7 1 m g L Note A Make sure to insert each sample vial into the vial holder in the same direction to make COD value more consistent B Before using the User curve please proceed with the calibration curve C Pressing Data button can show the storage data ...

Page 10: ...s the position of the option Press button to enter the Curve range menu 3 C H E M e t r i c s 4 U s e r 1 4 Press button to select 150 1500 or 15000 symbol represents the position of the option Press button to enter the Work menu U s e r 1 1 5 0 1 5 0 1 5 0 0 1 5 0 0 0 5 Select CAL option Press button to enter Calibration parameter U s e r 1 1 5 0 S t a r t I n f o C A L 6 Insert Blank message app...

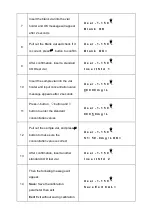
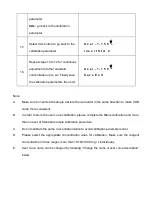
Page 11: ...entration valve message appears after 2 seconds U s e r 1 1 5 0 0 0 0 0 0 m g L 11 Press button button and button to enter the standard concentration values U s e r 1 1 5 0 0 0 0 5 0 m g L 12 Pull out the sample vial and press button to make sure the concentration value is correct U s e r 1 1 5 0 S 1 5 0 0 m g L O K 13 After confirmation insert another standard COD test vial U s e r 1 1 5 0 I n s ...

Page 12: ...l into the vial holder in the same direction to make COD value more consistent B In order to store the user curve calibration please complete the Blank calibration and more than one set of Standard sample calibration procedure C Do not calibrate the same concentration twice to avoid calibration parameters error D Please select the appropriate concentration value for calibration Make sure the reage...

Page 13: ... enter the Curve range menu 5 U s e r 2 6 U s e r 3 4 Press button to select 150 1500 or 15000 symbol represents the position of the option Press button to enter the Work menu U s e r 3 1 5 0 0 1 5 0 1 5 0 0 1 5 0 0 0 5 Select Info option Press button to enter the User calibration data U s e r 3 1 5 0 0 S t a r t I n f o C A L 6 Calibration result OK Calibration parameters are correct NG Calibrati...

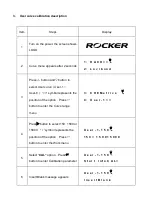
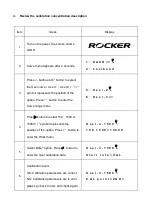
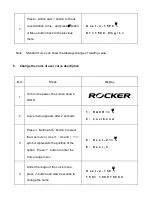
Page 14: ...urve description Item Steps Display 1 Turn on the power the screen shows LOGO 2 Curve menu appears after 2 seconds 1 H A C H 2 L o v i b o n d 3 Press button and button to select the User curve User 1 User 6 symbol represents the position of the option Press button to enter the Curve range menu 5 U s e r 2 6 U s e r 3 4 Under the range of the curve menu press button and wait 2 seconds to change th...

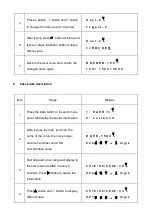
Page 15: ...s Display 1 Press the Data button in the work menu and it will display the stored information 1 H A C H 2 L o v i b o n d 2 Data include the date test time the name of the curve the curve range document number and COD concentration value H A C H 1 5 0 0 0 2 2 4 8 7 1 m g L 3 Test date and curve range will display in the first row and switch in every 2 seconds Press button to switch the information...

Page 16: ...ack to the Main Menu 1 H A C H 2 L o v i b o n d 2 Press button to select the Time symbol represents the position of the option Press button to enter the time setup 1 C O D T e s t 2 T i m e 3 Press button button and button to change the time and press button to store and leave D a t a 2 0 1 6 0 2 0 6 T i m e 0 9 3 4 Note Time setting is automatically saved even if pressing the Menu button to leav...

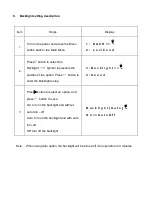
Page 17: ...tion of the option Press button to enter the Backlight setup 3 B a c k l i g h t 4 S o u n d 3 Press button to select an option and press button to save On turn on the backlight and without auto turn off Auto turn on the backlight and with auto turn off Off turn off the backlight B a c k l i g h t A u t o O n A u t o O f f Note When using Auto option the backlight will be turned off if no operatio...

Page 18: ... Menu 1 H A C H 2 L o v i b o n d 2 Press button to select the Sound symbol represents the position of the option Press button to enter the sound setup 3 B a c k l i g h t 4 S o u n d 3 Press button to select an option and press button to save On Turn on the sound Off Turn off the sound S o u n d O n O n O f f ...

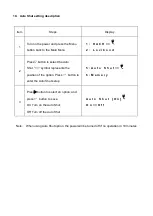
Page 19: ...ect the Auto Shut symbol represents the position of the option Press button to enter the Auto Shut setup 5 A u t o S h u t 6 M e m o r y 3 Press button to select an option and press button to save On Turn on the Auto Shut Off Turn off the Auto Shut A u t o S h u t O n O n O f f Note When using Auto Shut option the power will be turned off if no operation in 10 minutes ...

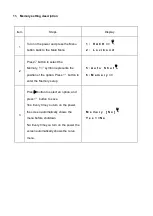
Page 20: ...ry symbol represents the position of the option Press button to enter the Memory setup 5 A u t o S h u t 6 M e m o r y 3 Press button to select an option and press button to save Yes Every time you turn on the power the screen automatically shows the menu before shutdown No Every time you turn on the power the screen automatically shows the curve menu M e m o r y N o Y e s N o ...

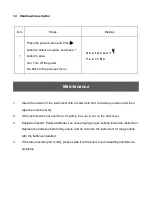
Page 21: ...h and a mild soap solution and then wipe the instrument dry 2 If the instrument is not used for a long time be sure to put on the dust cover 3 Explosion hazard Expired batteries can cause hydrogen gas buildup inside the instrument Replace the batteries before they expire and do not store the instrument for long periods with the batteries installed 4 If the tube insertion port is dirty please swab ...

Page 22: ...acklight 2 Battery error Change a new 9V square battery 3 Internal part failure Contact technical support 4 No button sound 1 Sound setting Turn on the sound 2 Battery error Change a new 9V square battery 3 Internal part failure Contact technical support No response after pressing the button 1 Contact technical support 4 No response after inserting the vial 1 Contact technical support Instrument i...

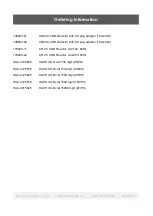
Page 23: ...110V 60Hz 179200 22 CR 25 COD Reactor AC220V 50Hz HAC 2125825 HACH COD vial 150 mg l 25 PK HAC 2125815 HACH COD vial 150 mg l 150 PK HAC 2125925 HACH COD vial 1500 mg l 25 PK HAC 2125915 HACH COD vial 1500 mg l 150 PK HAC 2415925 HACH COD vial 15000 mg l 25 PK Rocker Scientific Co Ltd www rocker com tw 886 2 26033311 EnV2017 5 Ordering Information ...

Reviews: