background image

UK

 ELECTRICAL CONNECTION

ELECTRICAL  REQUIREMENTS

Any permanent electrical installation must comply

with the latest I.E.E. Regulations and local Electricity

Board regulations. For your own safety this should be

undertaken by a qualified electrician  e.g. your local

Electricity Board, or a contractor who is on the roll of

the National Inspection Council for Electrical

Installation Contracting (NICEIC).

ELECTRICAL  CONNECTION

Before connecting to the mains supply ensure that

the mains voltage corresponds to the voltage on the

rating plate inside the cooker hood.
This appliance is fitted with a 2 core mains cable and

must be permanently connected to the electricity supply

via a double-pole switch having 3mm minimum contact

gap on each pole. A Switched Fuse Connection Unit

to BS.1363 Part 4, fitted with a 3 Amp fuse, is a

recommended mains supply connection accessory to

ensure  compliance  with  the  Safety  Requirements

applicable to fixed wiring instructions.

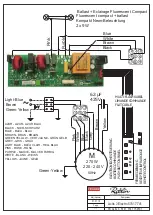
The wires in this mains

lead are coloured in

accordance with the

following code:

Blue

Neutral

Brown

Live

As the colours of the wires

in the mains lead of this

appliance may not

correspond with the

coloured markings

identifying the terminals in

your connection unit,

proceed as follows:-

The wire which is coloured blue must be connected

to the terminal which is marked with the letter ‘N’ or

coloured black.
The wire which is coloured brown must be connected

to the terminal which is marked with the letter ‘L’ or

coloured red.

CH

Fiche de sécurité class 1, 250 V~ 10A

2 poles + terre.

Stecker der Schutzklasse 1, 250 V~ 10A

Zweipolig mit Schutzkontakt (Erde).

Spira di sicurezza classe 1, 250 V~ 10A

2 poli + terra

SEV 1011, SN416534-2, CH-Typ 12

Green & Yellow     Earth

Summary of Contents for Actis 3 Electro 5741

Page 1: ...Actis 3 Electro 5741 7741 FR GB Mode d emploi et installation Hotte de Cuisine Instructions for use and installation Cooker Hood...

Page 2: ...POSE DE L APPAREIL FONCTIONNEMENT CONSEILS D UTILISATIONS ENTRETIEN GARANTIE ET SERVICE APR S VENTE REMARQUES GB CONTENTS ELECTRICAL WIRING INSTALLATION ADVICE FITTING THE APPLIANCE OPERATION USEFUL H...

Page 3: ...au dessus du plan de cuisson Toutefois il est d installer toute hotte ou groupe d aspiration une du plan de travail risque d in ammation des ltres La fum e doit monter naturellement vers la zone de ca...

Page 4: ...ration Evacuation ext rieure ou recyclage Votre hotte est programm e pour fonctionner en mode vacuation ext rieure Si vous souhaitez l utiliser en mode recyclage vous devez imp rativement la con gurer...

Page 5: ...ouveau sur la touche 5 Vitesse intensive A Cette fonction permet apr s l arr t de la cuisson d vacuer les derni res fum es et odeurs r siduelles et en n de cuisson d arr ter totalement la hotte moteur...

Page 6: ...ez amais de ammes libres sous la hotte en fonctionnement Les fritures n cessitent une surveillance permanente l huile surchauff e pouvant s en ammer ENTRETIEN connecter le c ble d alimentation pour to...

Page 7: ...que le produit est couvert par la irective Europ enne 2002 6 EC Votre produit est con u et fabriqu avec des mat riaux et des composants de haute qualit qui peuvent tre recycl s et utilis s de nouveau...

Page 8: ...the room sealed or balanced ue type If other types of ue or appliances are tted ensure that there is an adequate supply of fresh air to the room Ensure the kitchen is tted with an airbrick which shoul...

Page 9: ...licated prior dismounting Retighten the screws if necessary The hood is more effective when used in the extraction mode ducted to the outside hen the cooker hood is ducted to the outside charcoal lter...

Page 10: ...tart cooking To program the complementary function proceed as follows Press LE button 2 to switch N the fan motor and ad ust the speed of the fan by pressing the LE button and You should keep applying...

Page 11: ...hour timer the motor and lights must be switched FF Push the LE button for 10 seconds ne ash of the LE lights 1 2 3 4 and 5 function is switched FF Two ashes of the LE lights 1 2 3 4 and 5 function i...

Page 12: ...he surrounding area and metal grease lters as directed above Insert the replacement lter and ensure the two retaining clips are correctly located Replace the metal grease lters E Check every 6 months...

Page 13: ...d reused Please inform yourself about the local separate collection system for electrical and electronic product Please act according to your local rules and do not dispose of your old products with y...

Page 14: ...installazione Instrucciones de instalacion e utilization Instructies voor het gebruik en installeren FR Mode d emploi et d installation GB DE XXX XXXX XXX XXX XXXX XXX XXX XXXX XXX Instructions for u...

Page 15: ...3...

Page 16: ...5 2 LR03 AAA 1 5V 1 3...

Page 17: ...75 41 318 22 150 381 519 534 272 97 20 218 70 341 367 408 565 414 ACTIS ELECTRO 5741...

Page 18: ...ACTIS ELECTRO 7741 367 150 381 22 318 75 41 734 719 272 218 20 70 97 341 608 414 765...

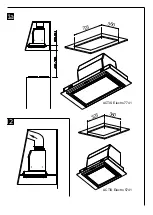
Page 19: ...1a 525 360 725 ACTIS Electro 5741 ACTIS Electro 7741 2 360...

Page 20: ...1b 1 2 3 4...

Page 21: ...RONISCHE STEUERUNG BOITIER COMMANDE PUSH BUTTON PANEL FERNBEDIENUNG RECEPTEUR INFRAROUGE REMOTE CONTROL 7 6 5 4 3 2 1 8 9 50Hz Light Blue Brown Green Yellow Black Grey Pink White Y e l l o w Blue M 27...

Page 22: ...onnection Unit to BS 1363 Part 4 fitted with a 3 Amp fuse is a recommendedmains supply connectionaccessoryto ensure compliance with the Safety Requirements applicable to fixed wiring instructions The...

Page 23: ...Lumi re Lighting Beleuchtung Illumonazione Iluminaci n Licht 4...

Page 24: ...Plaque Signal tique de la hotte Rating plate of the cookerhood Typenschild im Inneren der Dunstesse Etichetta all interno della cappa Etiqueta de la campana Typeplaatje van de afzuigkap...

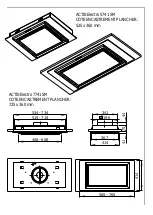
Page 25: ...ACTIS Electro 5741 SM COTE ENCASTREMENT PLANCHER 525 x 360 mm ACTIS Electro 7741 SM COTE ENCASTREMENT PLANCHER 725 x 360 mm 196 341 367 44 75 41 534 734 519 719 408 608 414 565 765 414...

Page 26: ...A S 25 Rue des Rosiers Sainte C cile B P 60056 50800 VILLEDIEU LES PO LES France T l 02 33 91 26 50 Fax 02 33 51 54 79 e mail com france roblin fr For outside France Tel 33 0 2 33 91 26 57 Fax 33 0 2...

Reviews: