background image


6


Operating instructions


1. 

Remove the sink drain plug. 

2. 

Turn on the cold water to a medium-high flow, allowing the water to flow into the waste disposer. 

3. 

Turn on the waste disposer (Air switch if provided). 

4. 

Put all the food waste into the disposer while the disposer is operating and the water is running. Use the 
extrusion attached to the drain plug to push the food down the disposer. Do not put your hand into the 
disposer. 

5. 

Cut or break up large bones, rinds and cobs in order to speed up the waste disposal process. The 
disposer may slow down while grinding in order to increase torque (grinding power) which is part of 
normal operating conditions. 

6. 

Let the disposer continue to run for about half a minute after the grinding has stopped. 

7. 

Turn off your disposer (Air switch if provided). 

8. 

Turn off the water once the impellers have stopped spinning. 


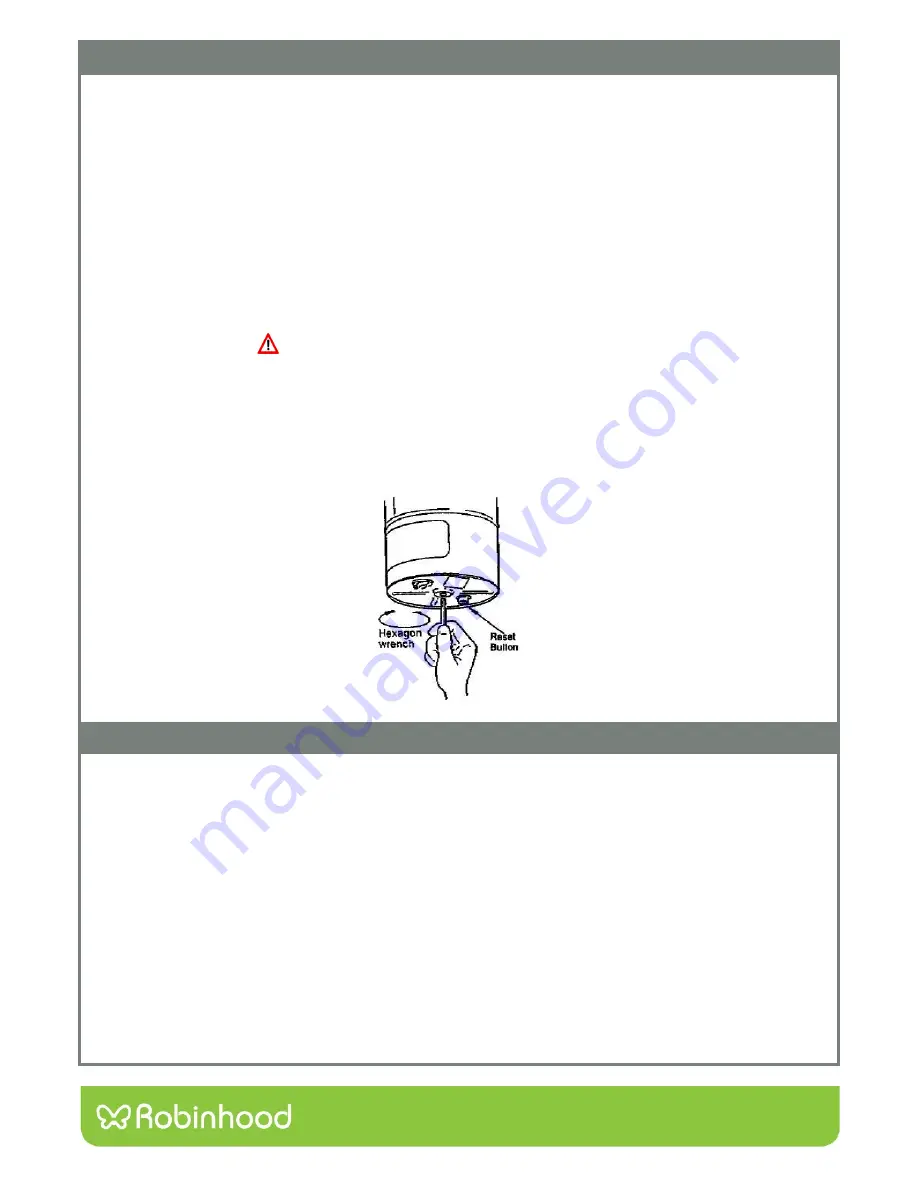
Safety features:  


Your  disposer  is  equipped  with  an  overload  protector  which  prevents  the  disposer  from  running  should 
it overload.  Overload  generally  occurs  when  a  foreign  object  has  fallen  into  the  disposer  and  jammed 
the impellers,  thus  preventing  the  motor  from  turning.  Overload  may  also  occur  if  you  have  put  too  much 
food  waste  into  the  disposer  at  a  time.  If  overload  occurs,  turn  off  the  disposer  and  remove  the  foreign 
matter  or  food  waste  from  the  disposer.  Insert  the   8mm  hex  wrench  supplied,  into  the  opening  at  the 
bottom  of  the motor shaft and rotate the tool clockwise. Wait five minutes before pushing the red reset button 
on the bottom of the disposer. Then run water through the unit, switch it on and check for normal operation. 


Cleaning and Maintenance


With normal usage your disposal should not require any special care. 


1. 

The motor is permanently lubricated and should not require oiling under normal usage conditions. 


2. 

If used according to the operating instructions above, your disposer should not require cleaning. 
However, should it start to smell, grinding a tray of ice cubes in the disposer will help clean all the inner 

components. Grinding a lemon, cut into quarters, will also give your disposer a fresh, clean smell. 


3. 

Mineral deposits resulting from stagnant water droplets may cause the appearance of rust on your 
stainless steel turntable. However, the turntable is made of non corrosive material and will NOT rust. 


4. 

Spare plug seal is including in the packaging, this is not required until the unit starts to leak water 
through the rubber seal. (In most situations this will not need replacing). 


Summary of Contents for SE390

Page 1: ...1 Issue B Description ROBINHOOD WASTE DISPOSAL SCRAPEATER Model Number SE390 SE390Q SE390QA SE520Q SE520QA Model may vary slightly from image pictured ...

Page 2: ...al please read through the entire instruction manual thoroughly The set of instructions provided is general local building codes take precedence over the instructions in this guide and your installation must conform to the building codes in your area Be sure to retain this set of instructions for future reference Typical equipment required 1 Philips and flat blade screwdrivers 2 Hammer 3 Channel l...

Page 3: ... this the two gaskets should fall out as well To ease the installation process make sure to leave the rubber splash baffle attached onto the main body 1 When installing the unit place the rubber gasket over the sink flange s threaded ring Insert the flange and rubber gasket into the sink drain opening from the top side of the sink It is not necessary to use plumber s putty when installing the sink...

Page 4: ...ube in place with a hose clamp Mounting the Disposer 1 The rubber splash baffle should be attached to the main body of the waste disposal and not the sink flange Using two hands push the main body upwards so that the inner groove of the splash baffle locks onto the sink flange If necessary use cooking oil or similar products to lubricate the inner rim on the exposed side of the splash baffle Once ...

Page 5: ...itch then tighten the locking ring until the washer is held firmly against underside of the worktop or sink 5 Unscrew the black hexagen adapter on the underside of the switch 6 Insert one end of clear tube through the adapter and then over the male connector of the switch and tighten the two together 7 Insert the other end of clear tube through the adapter and then over the male connector on the u...

Page 6: ... may also occur if you have put too much food waste into the disposer at a time If overload occurs turn off the disposer and remove the foreign matter or food waste from the disposer Insert the 8mm hex wrench supplied into the opening at the bottom of the motor shaft and rotate the tool clockwise Wait five minutes before pushing the red reset button on the bottom of the disposer Then run water thr...

Page 7: ... Objects falling into the disposer The appliance must be installed so that the reset button is readily accessible Do not use hot water when grinding food waste Cold water helps in solidifying the waste allowing the disposer to effectively grind the waste This appliance is not intended for use by young children or infirm persons unless they have been adequately supervised by a responsible person to...

Page 8: ...cleaning products such as abrasive cream or powder cleansers furniture polish bleach mentholated spirits drain cleaners sugar soap metal pads and strongly alkaline or acidic cleaners Heat damage including from washing the product at high temperatures Impact or mishandling the product including the impact caused by objects scraped along thrown or dropped on the product surface or excessive weight b...

Reviews: