background image

21

Make a recording cont.

Files that have been written to the USB memory device are held in a folder called 

'REC'.

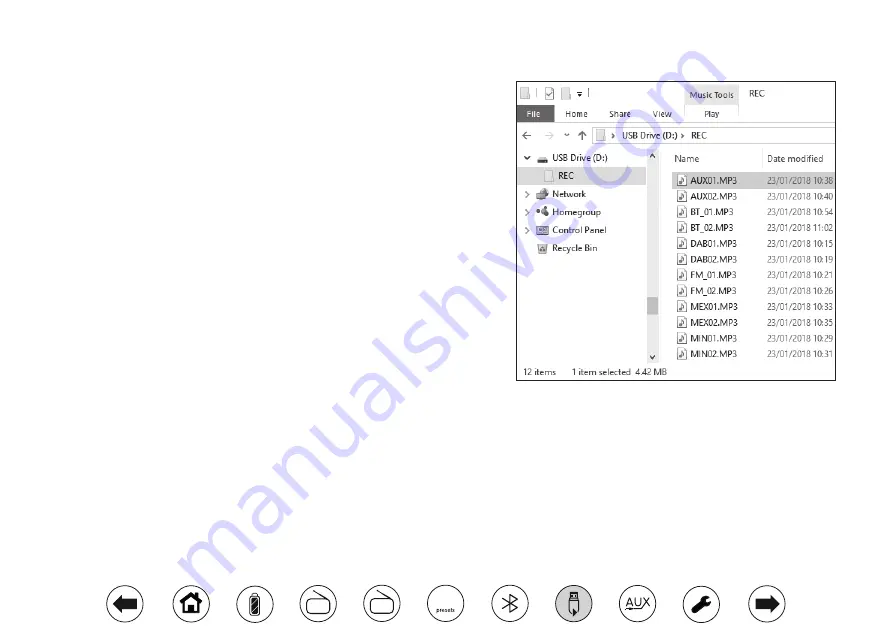
 Recordings are given filenames according to the source used for the recording. 

The files are named as listed below. Two digits are added to the filename to allow 

recordings to be numbered from 00 to 99 for each recorded source. The illustration 
to the right shows the folders as they may appear on a PC running Windows with 

files in the REC folder.

AUXnn - for recordings from the Auxiliary input

BT_nn - for recordings from Bluetooth devices

DABnn - for recordings from DAB radio

FM_nn - for recordings from FM radio

MEXnn - for recordings from external microphone

MINnn - for recordings from internal microphone

The filenames are created automatically by the radio when recording. In the event 

that the filename matches a file already on the USB memory device, then the new 

file will be named RECnn.mp3 instead to prevent overwriting the existing file. 

Note: 

The USB memory device should only be removed when recording is stopped. 

Removing media while recording is in progress may corrupt data on the USB device 

leading to the loss of files previously written.
The USB connection is intended to be used to allow the Opus radio to play files 

from solid-state flash memory devices. The USB connection is not intended to be 

connected to other USB devices such as computers or hard disk drives.

If you wish to make recordings from radio, we recommend recording from DAB 
radio if possible since it is generally less susceptible to interference than FM radio. 
If you need to record from FM radio, some interference may be picked up from the 
memory device unless you have a strong signal.  

DAB

FM

10

Summary of Contents for Opus

Page 1: ...Please read this manual before use DAB DAB FM RDS Bluetooth portable digital radio with USB recording and playback Opus ...

Page 2: ...tooth mode 14 Connecting and reconnecting a Bluetooth device 14 Bluetooth information 15 Using USB memory devices 16 Playing files from USB memory devices 17 Controlling playback 18 USB Bookmark 18 To skip to another folder 18 USB Repeat function 19 USB Intro function 19 USB playback information 19 Recording to USB memory device 20 Make a recording 20 Make a recording cont 21 Recording from Blueto...

Page 3: ...x Bluetooth USB Opus Info Select Time Set Repeat Intro 10 Tuning Album Up button 11 Select Info button 12 Loudspeakers x 2 13 Tuning Album Down button 14 Time Set Repeat Intro button 15 Preset buttons 1 5 16 Zoom button 17 Volume control 18 Internal microphone 1 8 2 3 4 5 6 7 21 10 11 9 13 15 14 16 22 23 24 25 17 12 12 19 20 19 Microphone socket 20 Tone control 21 Stop button 22 Previous button 23...

Page 4: ...valent Aux In DC In 7 5V 2A Email info blind org uk Telephone 01622 754 757 27 Auxiliary Input socket 28 USB socket for service use only 29 DC Input socket 30 Battery compartment see pages 4 and 5 27 28 29 30 Controls Rear DAB FM 10 ...

Page 5: ... sound are all signs that the batteries may need replacing When the batteries have full charge the full battery indicator will be shown on the display If the radio is not to be used for any extended period of time it is recommended that the batteries are removed from the radio We would recommend for economy that the Opus is used via the AC adaptor whenever possible with battery operation for occas...

Page 6: ...ll show full and stop flashing when the battery charging is complete Note You should never attempt deliberately to recharge alkaline batteries in the radio Attempted recharging of alkaline batteries can be dangerous Important when using rechargeable batteries the battery switch must be placed in the NiMH position down Whenthebatteriesareexhausted thelowbatteryindicator willshow on the screen for a...

Page 7: ...er reception You should then carry out a scan to find stations see Finding new stations on page 8 The AC adaptor should be disconnected from the mains supply and from the radio when not in use IMPORTANT The mains adaptor is used as the means of connecting the product to the mains supply The mains socket and any multi way mains block used for the product must remain accessible during normal use In ...

Page 8: ...e first time the radio has been used a scan of the Band III DAB channels will be carried out depending on whether scanning was already completed in standby mode During the scanning process the display will show the progress of the station search The number on the display is the number of stations that have been found 4 When the scan is completed the first station in numeric alpha order 0 9 A Z wil...

Page 9: ...ppear immediately after the main station as you press the Tuning Up button To tune to the selected service press Select Finding new stations DAB As time passes new stations may become available or you may have moved your radio to a different part of the country In this case you may need to cause your radio to scan for new stations 1 Press On Off to switch on the radio 2 Repeatedly press the Tuner ...

Page 10: ...nal which has been found If RDS information is available after a few seconds the display will show the radio station name If you only hear hiss or interference simply apply a long press on the Tuning Up button to scan further 6 To scan down in frequency apply a long press on the Tuning Down button The tone will decrease in pitch Your radio will scan the FM band in a downwards direction high freque...

Page 11: ...t may be preferable to force the radio to play the station in mono in order to reduce the level of background hiss 1 Ensure your radio is in FM mode and tune to the required FM station 2 To reduce the hiss apply a long press on the Select Info button to switch your Opus radio to mono mode Mono will show on the display 3 To return to stereo mode apply a long press on the Select Info button to switc...

Page 12: ...onal text when provided by the broadcaster and where the radio signal is sufficiently clear Your radio can display the following in FM mode Frequency station name scrolling text signal strength preset number time and date Bluetooth display options If your connected device is able to provide information from the track being played your radio can display the following in Bluetooth mode Title Album A...

Page 13: ...ong press more than 8 seconds on the required Preset button 1 5 until a beep is heard The station will be stored using the chosen preset button Repeat this procedure as needed for the remaining presets 5 Stations that are already stored in the presets may be over written by following the procedure described above Note The radio station presets are retained in memory when the radio is switched off ...

Page 14: ...the display If the radio is already connected to another device to cause the radio to become discoverable apply a long press on the Select Info button Your Opus will become discoverable by other devices and Not connected will show on the display 4 Using the Bluetooth settings of your phone tablet or PC direct it to search for discoverable devices Afterafewseconds youshouldseeadevicenamed Opus Just...

Page 15: ...th device You can only have one Bluetooth device connected to the radio at any one time although it may be paired with several devices Once you have a Bluetooth enabled device connected to your radio it cannot be interrupted by another Bluetooth device unless you choose to break the connection 1 To connect to a different device apply a long press on the Select Info button Not connected will show o...

Page 16: ...ordlessphonesgenerallyusesimilarradiofrequencies to Bluetooth and may interfere with one another If any interference is noticed then try relocating the radio or one of the other devices TheBluetoothcapabilitiesofyourradioenableittoreceiveaudiofrommany Bluetooth capable devices including mobile phones personal computers and tablets Only one Bluetooth device can be connected to your radio at a time ...

Page 17: ...ssional nor files of any format which have DRM protection Recommendations Unless you have only a few files on the USB memory device do not place all files in the root folder The number of items files sub folders in any folder should be less than 2000 Searching and playback will be more responsive if the number of files in any one folder is limited we suggest not more than 250 It is recommended tha...

Page 18: ... there are many files or folders this may take a few seconds 5 The number of files and folders will be displayed Files are played in the order in which they exist in the filing system of the USB memory they are not sorted by file name or track number Note The USB memory device should not be removed during playback or recording as damage or corruption of files may occur Note If the unit is in USB m...

Page 19: ... time Even if you change the mode or put the unit into standby the next USB operation will start from the point where playback was previously stopped Note If the mains power is removed and restored the Bookmark setting will be cancelled and the USB will then play from the beginning 1 Tostopplayback presstheStopbuttononce Thecurrentfilenumberand Resume will show on the display You can then select a...

Page 20: ... so that the display shows the number of Files and Folders on the USB memory device 2 Press the Repeat Intro button to play the first 10 seconds of each of the tracks on the USB memory device Int will show on the display 3 When the radio plays the required file press the Intro button or the Play Pause button once This will cancel the Intro function The radio will then play the rest of the current ...

Page 21: ...2 Set the volume to the required listening level the volume of the recording will not be affected by this 3 Carefully insert the USB memory device on to which the recording is to be made into the USB socket on the top of the radio 4 Apply a long press on the Record button The display will show Record init and a double beep will be heard Recording will start after a few seconds and a second double ...

Page 22: ...cally by the radio when recording In the event that the filename matches a file already on the USB memory device then the new file will be named RECnn mp3 instead to prevent overwriting the existing file Note The USB memory device should only be removed when recording is stopped Removing media while recording is in progress may corrupt data on the USB device leading to the loss of files previously...

Page 23: ...orded file will have been written to the USB memory device Recording from the Auxiliary input 1 Press On Off to switch on your radio 2 Ensure that nothing is plugged in to the microphone socket 3 Connect a stereo or mono audio source e g CD player MP3 player etc to theAuxiliary input socket Also see Auxiliary input socket page 25 4 Press the Aux button to enter the Auxiliary in mode 5 Insert a USB...

Page 24: ... that nothing is plugged in to the auxiliary input socket 3 Press the Aux button to enter the Auxiliary in mode 4 Insert a USB memory device into the USB socket on the top of your radio 5 Plug the external microphone into the Microphone socket just above the volumecontrol Theinternalmicrophonewillbeautomaticallydisconnected 6 Adjust the volume to your required listening level the volume of the rec...

Page 25: ... once more to return to the normal display Setting the clock Normally your radio will set its clock automatically using the DAB radio signal If no DAB signal is available and you need to set the time manually please follow the procedure shown below 1 Press On Off if needed to switch your radio into standby 2 Apply a long press on the Time Set button until the hour digits flash on the display 3 Pre...

Page 26: ...re that nothing is plugged in to the microphone socket 2 Connect a stereo or mono audio source e g CD player MP3 player etc to the Auxiliary input socket located on the back of the radio 3 Press the On Off button to switch on your radio The radio will beep to confirm that it is now switched on 4 Press the Auxiliary button The display will show Aux in 5 AdjusttheVolumecontrolonyourplayerandontherad...

Page 27: ...rt interruptions reset the product as above to resume normal operation If you are not able to perform the reset operation as above removal and reconnection of the power supply and batteries may be required If the product is used in an environment with any ESD Immunity Radiated Immunity ConductedImmunitydisturbance theproductmaymalfunction It will automatically recover to normal when the ESD Immuni...

Page 28: ...etc No naked flame sources such as lighted candles should be placed on the product It is recommended to avoid using or storing the product at extremes of temperature Avoid leaving the unit in cars on window sills in direct sunlight etc There are no user serviceable parts inside this product Do not attempt to disassemble any part of the product The radio and AC DC adaptor must be used in a moderate...

Page 29: ...ctly replaced Rechargeable batteries Your Opus radio uses a range of methods to ensure correct and safe charging of Rechargeable Nickel Metal Hydride batteries These work to protect your batteries from excessive charge and discharge These protections can only work properly if the advice above is followed In particular the radio will not be able to correctly charge batteries if they are a mixture o...

Page 30: ...the eyes and can be harmful if swallowed 1 Keep batteries out of the reach of children 2 Do not heat open puncture mutilate or dispose of batteries by burning 3 Do not mix different battery types or old and new batteries Always replace all the batteries at the same time 4 Do not carry or store batteries such that metal objects may contact the end caps 5 Remove batteries from the radio if they are ...

Page 31: ...s sec FLAC 1 1 5 Mbits sec MP3 320 kbits sec WAV 2 1 536 Mbits sec WMA 3 320 kbits sec Ogg Vorbis 320 kbits sec All codecs support 2 channel stereo coded files only All codecs support sample rates up to 48 k samples sec includes 32 k and 44 1 k samples sec Files which have Digital Rights Management DRM protection applied will not be playable on your radio 1 16 bit samples only are supported in FLA...

Page 32: ...N B Damaged or broken telescopic aerials will not be replaced under guarantee Procedure Any claim under this guarantee should be made through the dealer from whom the product was purchased It is likely that your Roberts dealer will be able to attend to any defect quickly and efficiently but should it be necessary the dealer will return the product to the company s service department for attention ...

Reviews: