background image

If you need any further advice, please call our Technical Helpline on :-
020 8758 0338 (Mon-Fri)

SD / USB                 .

Using SD cards or USB memory devices

Secure Digital (SD or SDHC) cards or USB memory devices can be used 

with the MP-53 for playback of MP3 or WMA files. The MP-53 can also 

record to SD, SDHC or USB media in MP3 format.

The MP-53 has been tested with a range of SD cards and USB memory 

devices. SD cards up to 2GB and SDHC cards up to 16GB are supported. 

However, there are many different card variants available and not all cards 

can be guaranteed to work in the MP-53. Memory must use the FAT or 

FAT32 filing system in order to operate with the MP-53.

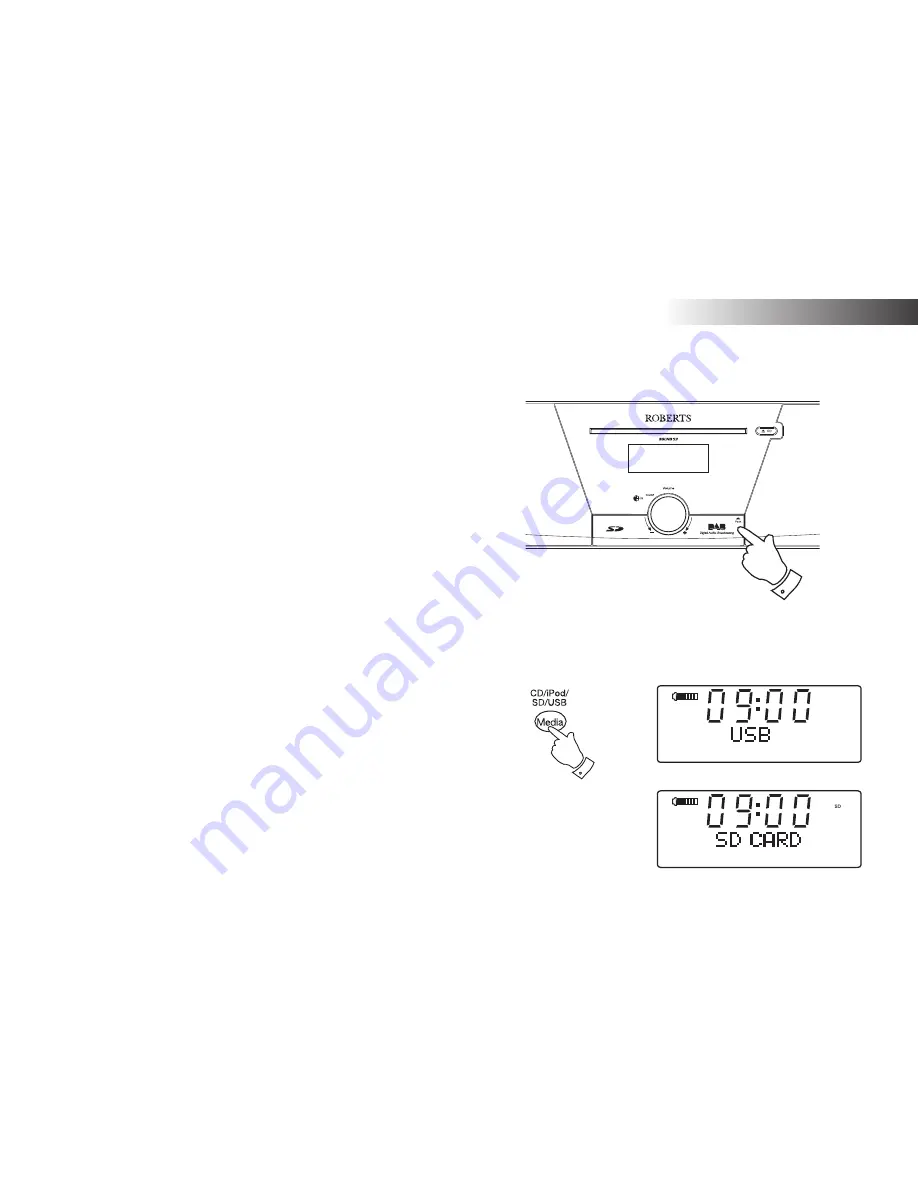
SD card and USB slots are located behind the panel beneath the volume 

control. This is opened by pushing and releasing the right hand top corner 

of the panel. To close the panel, press the right-hand side of the panel 

door until it clicks back into place.

Do not attempt to open or close the panel door using the left hand 

edge as this may distort or damage the panel.

Inserting and removing memory devices

1.  To insert an SD card into your radio push the card label side upward 

and gold contacts first into the card slot on the front of your radio until 

it clicks. To remove the card push the card in so that it clicks once 

more. It will then be pushed out slightly allowing removal.


USB memory devices plug into the rectangular slot on the right hand 

side, under the panel.

2.  To select either SD card or USB mode press the 

Media button 

until 

the desired mode is shown on the display.

2

31

1

USB

Summary of Contents for MP-SOUND 53

Page 1: ...CD USB SD DAB FM RDS Digital Sound System with dock for iPod ROBERTSSound for Generations Please read this manual before use...

Page 2: ...for iPod means that an electrical accessory has been designed to connect speci cally to iPod and has been certi ed by the developer to meet Apple performance standards Apple is not responsible for the...

Page 3: ...ning FM 20 FM stereo mono 20 Display modes FM 21 Presetting stations 22 CD MP3 WMA 23 Compact discs 23 Playing a CD 24 25 CD search and repeat 26 CD track programming 27 Contents MP3 WMA CD mode 28 30...

Page 4: ...gital audio or MP3 WMA les which have previously been recorded to CD R or CD RW The section for SD USB media describes playback and record using SD card and USB memory devices The section for iPod doc...

Page 5: ...standby Two alarm timers with snooze feature to wake you to either buzzer radio CD SD card USB memory device or iPod with humane wake system on buzzer alarm 3 Adjustable sleep timer which can be set...

Page 6: ...4 Controls and connections 1 Infra red sensor 2 Loudspeakers 3 LCD display 4 CD slot Front 6 7 2 1 3 4 5 2 5 CD eject button 6 SD card USB device door 7 On Standby Volume control...

Page 7: ...Technical Helpline on 020 8758 0338 Mon Fri 5 Controls and connections Rear 8 Telescopic aerial 9 Mains input socket 10 Optical output socket Toslink 11 Auxiliary input socket 12 Line output socket 13...

Page 8: ...on 9 Media button 10 Sleep Clock set button 11 Equaliser button 12 Alarm button 13 Radio button 14 Auto tune button 15 Random button 16 Play Pause button 17 Folder down button 18 Tuning Fast forward b...

Page 9: ...es are positioned as shown inside the compartment 3 Close the battery cover by inserting the retaining lugs rst then apply pressure to the free end such that the catch latches the cover securely 4 If...

Page 10: ...not attempt to open or close the panel door using the left hand edge as this may distort or damage the panel Remote control functions All functions of the MP 53 sound system can be operated using the...

Page 11: ...for the sound system must remain accessible during normal use In order to disconnect the sound system from the mains completely the mains plug should be removed from the mains socket outlet completel...

Page 12: ...The display will show the station name on the upper line of the text display and broadcast information on the lower line 6 If the station list is still empty after the scan operation or if the select...

Page 13: ...lease the Select button to cause the radio to tune to the chosen station The display may show Now tuning while your radio nds the new station The use of memory presets is described on page 22 4 Adjust...

Page 14: ...as artist track name phone in number etc b Programme type Displays the type of station being listened to e g Pop Classic News etc c Multiplex Name Displays the name of the multiplex to which the curr...

Page 15: ...e To nd new stations proceed as follows 1 With the unit in DAB mode see page 10 press and release the Auto tune button The display will then show Fast scanning The radio will perform a scan of the UK...

Page 16: ...he display Press and release the Select button 3 Press the Tuning Up or Down buttons to select the required DAB channel 4 Press and release the Select button to select the channel A signal strength di...

Page 17: ...pears on the display Press the Select button to enter the station order selection menu 2 Press the Tuning Up or Down buttons to choose between favourite station alphanumeric and active station Favouri...

Page 18: ...you may change location and then not be able to receive a station In order to remove such stations from the DAB station list the Prune stations function will delete the DAB stations from your station...

Page 19: ...version display cannot be altered and is provided for reference only 1 To view the DAB software version installed in your sound system press and release the Menu button so that Station order appears o...

Page 20: ...nd release the Select button to enter the DRC adjustment mode 5 Press and release the Tuning Up or Down buttons to select the required DRC setting the default is 0 DRC 0 DRC is switched off Broadcast...

Page 21: ...will update The display will show the frequency of the signal found If the signal is strong enough and there is RDS data present then the radio will display the station name 6 To nd additional statio...

Page 22: ...4 When the end of the waveband is reached the radio will recommence tuning from the opposite end 5 Set the Volume to the desired setting 6 To switch off your sound system press the On Standby button...

Page 23: ...ay is used to show the radio station name as well as a stereo and RDS indicator St and RDS 1 Press the Info button to cycle through the various modes a Radio Text Displays radio text messages such as...

Page 24: ...quired Preset button 1 to 10 until the display shows for example Preset 1 saved The station will be stored using the chosen preset number Repeat this procedure for the remaining presets as you wish 4...

Page 25: ...pe it with a soft lint free cloth in a straight line from the centre towards the edge Cleaning agents may damage the CD Do not expose the CD to rain moisture sand or to excessive heat e g from heating...

Page 26: ...that has just been ejected press the Eject button a second time 4 Insert a disc with printed side facing up into the CD slot The disc will be loaded automatically The unit will check the CD type and...

Page 27: ...standby mode Selecting a track 1 Whilst the CD is playing press either the Fast forward or Rewind buttons to change to the desired track The updated track number is shown in the display 2 You can als...

Page 28: ...s symbol appears in the display All of the tracks on the CD will be played repeatedly Play tracks introduction 4 While the CD is playing press the Repeat button until the track introduction symbol app...

Page 29: ...s the Menu button to enter the selected track into the programme 5 Choose another track using the Fast forward or Rewind buttons and enter it into the programme using the Menu button track 6 in exampl...

Page 30: ...software or by the hardware settings of the PC s CD writer or by the CD being used Should such problems arise contact the customer services of your CD writer or software manufacturer or look in their...

Page 31: ...he CD press the CD Eject button The display will show EJECT In order to protect the disc if it is not removed the unit will reload the disc after 10 seconds and then enter standby mode To reload a CD...

Page 32: ...15 will play the fth le in the second folder Search function 1 While the MP3 WMACD is playing press and hold the Fast forward or Rewind buttons Release the button when the desired part of the current...

Page 33: ...are located behind the panel beneath the volume control This is opened by pushing and releasing the right hand top corner of the panel To close the panel press the right hand side of the panel door un...

Page 34: ...e Stop button then the next time the unit is switched on it will return to the previously played le Selecting a le 1 While the SD card USB memory device is playing press either the Fast forward or Rew...

Page 35: ...each contain 10 les then entering 15 will play the fth le in the second folder Search function 1 While the SD card USB memory device is playing press and hold the Fast forward or Rewind buttons Relea...

Page 36: ...be added to those already present on the media Making a recording 1 Selectthedesiredsourcefortherecording DAB FM CD etc AUX IN is shown in the illustration Set the volume to the required listening lev...

Page 37: ...r recordings from CD COP_xxxx for recordings from SD USB LINEIN for recordings from DAB FM Aux etc The illustration shows the folders as they may appear on a PC running Windows with les in the LINEIN...

Page 38: ...by this 3 Insert the media that the les will be recorded on to SD or USB 4 Press the Record button on the remote control The display will show Record init 5 If only one media type is present the audio...

Page 39: ...ect button to enter the Delete Format menu The display will show Delete as the default option 3 In order to delete a single le the le which is currently displayed press the Select button once more The...

Page 40: ...If you do not wish to delete all of the les on the media press the Select button with Cancel displayed Alternatively to delete all of the les press one of the Tuning Up or Down buttons to display OK...

Page 41: ...ndby Carefully remove the iPod dock connector cover from the top of your sound system 2 Place the iPod docking adaptor types 1 7 supplied with the MP 53 into the iPod docking recess so that it is secu...

Page 42: ...y Pause button but see note below 2 Adjust the volume to the required setting using the Volume control on your sound system 3 TopauseplaybackpressthePlay Pausebutton Toresumeplayback press the Play Pa...

Page 43: ...tly playing item will be repeated Repeat all 2 While the iPod is playing press the Repeat button until the repeat all les symbol appears in the iPod display All les in the current album or playlist wi...

Page 44: ...ll show on the upper line of the text display 4 Press the Tuning Up or Down buttons to choose whether to set the alarm to On or Off 5 Press and release the Select button If the previous selection was...

Page 45: ...ttons to select the required day option and then press the Select button to con rm the setting Your alarm can be set to the following options Once will sound once in the next 24 hours only Daily will...

Page 46: ...can be set to turn off after a preset time has elapsed The sleep setting can be adjusted between 15 and 120 minutes 1 To use the sleep timer press and release the Sleep Clock set button to enter the s...

Page 47: ...ays in 24 hour format If it becomes necessary to set the clock manually please follow these steps 1 Press and hold the Clock Set button The hour digits on the display will ash 2 Press the Tuning Up or...

Page 48: ...th is set Keep the button pressed to cause the month to change more quickly 9 Press and release the Select button to con rm the month setting The day number will ash on the display 10 Press the Tuning...

Page 49: ...ress and hold the Menu button so that the display shows Set Brightness on the lower line of the text display 2 Press and release the Select button to show the current setting 3 Press and release the T...

Page 50: ...ic e Pop f News g Treble tone setting may be adjusted h Bass tone setting may be adjusted Treble control 2 Press the Equalizer button to cycle through the modes until Treble appears on the upper line...

Page 51: ...level is displayed 7 Press the Select button to revert to the play mode display To quickly cancel the effect of the treble or bass settings press the Equaliser button until Flat appears on the upper l...

Page 52: ...socket 3 Adjust the volume setting on your iPod MP3 or CD player to ensure an adequate signal level from the player and then use the Volume control on the sound system as needed for comfortable listen...

Page 53: ...pment with a digital optical input This feature is only available for CD SD and USB playback It is not active in iPod DAB or FM modes Aerial removal The tted telescopic aerial is suitable for most app...

Page 54: ...con rm the reset operation 5 Afterasystemreset allradiostationpresetswillbesettoempty Alarms will be cancelled audio equaliser and display brightness settings will have been set to their default value...

Page 55: ...distance 10cm recommended to adjacent objects in order to ensure good ventilation The ventilation of the product should not be restricted by covering it or its ventilation openings with items such as...

Page 56: ...ispose of the plug immediately to avoid a possible shock hazard by inadvertent connection to the mains supply If this product is not supplied with a mains plug or one has to be tted then follow the in...

Page 57: ...If you need any further advice please call our Technical Helpline on 020 8758 0338 Mon Fri 55 Information Notes...

Page 58: ...Notes 56...

Page 59: ...e 3 Receivers with removed or defaced serial numbers N B Damaged or broken telescopic aerials will not be replaced under guarantee Procedure Any claim under this guarantee should be made through the d...

Page 60: ...TS RADIO TECHNICAL SERVICES 97 99 Worton Road Isleworth Middlesex TW7 6EG Technical Helpline 020 8758 0338 Mon Fri during of ce hours Website http www robertsradio co uk 2008 Roberts Radio Limited Iss...

Reviews: