background image

2

3

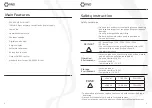
Main Features 

30VX2,5V/3.3V/2/SVX1

l0MVlmA hight accuracy resolution dc


power


supply

Low noise

Heatsink temperature

Constant voltage

Digital panel control

4 digits display

Software calibration

Button lock function

Output ON/OFF control

standard interfaces: USB, RS232 & LAN 

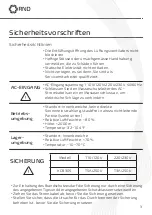
Safety Instruction 

Safety Guidelines


• Do not block or obstruct the cooling fan vent opening.
• Avoid severe impacts or rough handling that leads to

damage.

• Do not discharge static electricity .

• Do not disassemble unless you are qualified as

service personnel.

• AC I nut Voltage: 110V / 120V / 220V / 230V ,

50 / 60 Hz

• Connect the protective grounding conductor of AC

power cord to an earth ground, to avoid
the electrical shock.

• Location: Indoor, no direct sunlight, dust free, almost

non-conductive pollution (note below)

• Relative Humidity:< 80%
• Altitude:< 2000m
• Temperature: 32 - 104° F

AC INPUT

!

Operation
Environment

Storage
Environment

FUSE

!

Model

110/120V

220/230V

KD3305

T5A/250V

T3A/250V

• To ensure fire protection, replace the fuse only with the specified type

and rating.

• Disconnect the power cord before fuse replacement.

• Make sure the cause of fuse blowout is fixed before fuse replacement.

• Location: Indoor
• Relative Humidity: <70%
• Temperature:-10-70 C

Summary of Contents for 320-KD3305P

Page 1: ...1 USER MANUAL BEDIENUNGSANLEITUNG RND 320 KD3305P Programmable DC Power Supply...

Page 2: ...qualified as service personnel AC I nut Voltage 110V 120V 220V 230V 50 60 Hz Connect the protective grounding conductor of AC power cord to an earth ground to avoid the electrical shock Location Indoo...

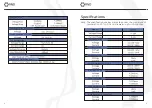
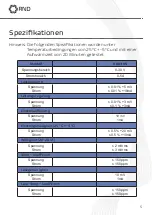
Page 3: ...ies supplied Weight and Dimensions mm Note The specifications below are tested under the conditions of temperation 25 C S C and the warm up for 20 minutes Model Load Regulation Line Regulation Setup R...

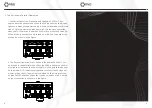
Page 4: ...ting knob of CH 1 or CH2 and then the according digit indicator will blink At this time rotate the knobs and then the volt age or current will increase or decrease progressively on the adjust ed digit...

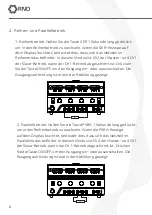
Page 5: ...the button ON OFF and then the output can be turned on or off And the output con nection is as shown in the figure 2 The Parallel Operation Press and hold the button PARA for 1 sec onds to be in the p...

Page 6: ...g mit hoher Genauigkeit und Aufl sung Geringes Rauschen L fter gesteuert von K hlk rpertemperatur Konstante Spannung konstant Digitales Steuerpanel 4 stelliges Display Softwarekalibrierung Tastensperr...

Page 7: ...hindern Standort Innenbereiche keine direkte Sonneneinstrahlung staubfrei nahezu nichtleitende Partikel siehe unten Relative Luftfeuchte 80 H he 2000 m Temperatur 32 104 F AC EINGANG Betriebs umgebung...

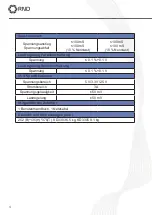
Page 8: ...lschaltung Spannung 0 1 0 1 V Lastregelung Reihenschaltung Spannung 0 1 0 1 V Ch3 Spezifikationen Spannungsbereich 5 V 3 3 V 2 5 V Strombereich 3 A Spannungsgenauigkeit 50 mV Lastregelung 50 mV Mitgel...

Page 9: ...h 0 5A Lastregelung Spannung Strom 0 01 5 mV 0 01 10mA Leitungsregelung Spannung Strom 0 01 3 mV 0 1 3mA Einstellaufl sung Spannung Strom 10 mV 1mA Einstellgenauigkeit 25 C 5 C Spannung Strom 0 5 20 m...

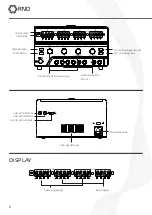
Page 10: ...allel Taste Reihe Einstellknopf f r Spannung Einstellknopf f r Strom Ch3 Spannungsauswahl Ch1 Ch2 Ausg Aus LAN Schnittstelle USB Schnittstelle Rs232 Schnittstelle L ftungs ffnung Netzsteckdose DISPLAY...

Page 11: ...ung oder die Stromst rke entsprechend der Anzeige zu erh hen oder zu verringern Halten Sie die Kn pfe gedr ckt um die Einstellung zu ndern Die entsprechende Ziffernanzeige beginnt zu blinken Zur Einst...

Page 12: ...e die Taste ON OFF um den Ausgang ein oder auszuschalten Die Ausgangsverbindung ist wie in der Abbildung gezeigt 2 Parallelbetrieb Halten Sie die Taste PARA 1 Sekunde lang gedr ckt um in den Reihenbet...

Page 13: ...9...

Reviews: