background image

8. STATE Section

The 

STATE

 section contains states and settings that are unrelated to audio I/O and clock. It can be used

to configure power supply warnings, presets, dark mode, level meters, and remote control.

warning

 (red) is shown when PSU redundancy is activated but only one power supply is active. A

notification

 (orange) is shown when a preset is modified, no IP address was assigned to the web remote

or any dark mode is active.

8.1. Power State

This icon in the 

STATE

 section informs the user which of the two IEC inlets

receive power. It is a realtime representation of the current power state, with
an inactive power supply shown in grey.

When facing the front panel, the left power plug corresponds to the left IEC inlet at the
rear.

Representation of the power states on the device

1. Open the 

power

 tab in the 

STATE

 section

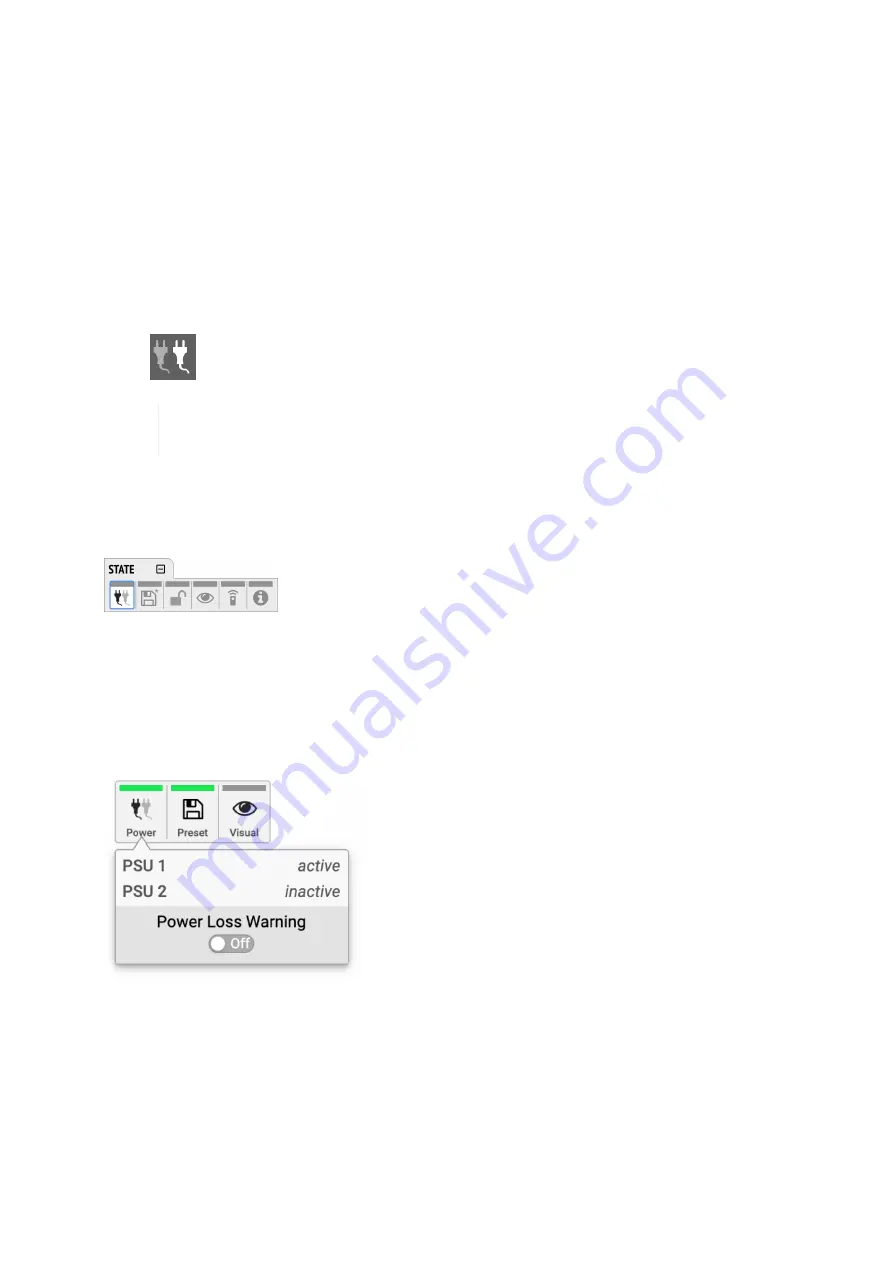
2. The state of each PSU is shown as 

active

 if it receives power.

Representation of the power states on the web remote

1. Connect the device by USB or network cable and open the web remote.

2. A click on the Power icon reveals the current state of the power supplies.

8.1.1. Notification of Single Power Failure

A warning can be displayed when one of two connected power sources fails.

RME M-1610 Pro User’s Guide

8. STATE Section | 

26

Summary of Contents for M-1610 Pro

Page 1: ...AD DA Converter User s Guide M 1610 Pro 16 Channel A D 10 Channel D A Converter with ADAT AVB MADI ...

Page 2: ...RME M 1610 Pro User s Guide ...

Page 3: ...10 3 11 Analog Line Levels 10 3 11 1 AD Converter Specifications 11 3 11 2 DA Converter Specifications 11 3 12 MADI Coaxial and SFP 12 3 13 ADAT Outputs 13 3 14 Network Connection 13 3 15 Word Clock 14 3 16 USB 2 0 Type B Jack 15 3 17 Mounting the Rack Adapter Brackets 16 4 Accessories 17 5 AVB Connectivity 18 5 1 Identifying a Device Remotely 18 5 2 Changing the Device Name 19 5 3 AVB Stream Size...

Page 4: ... 9 3 1 Change AVB Input Stream Size 42 10 OUTPUT Section 44 10 1 Routing Signals to the Outputs 44 10 2 Analog Outputs 45 10 2 1 Adjusting the Output Line Level 46 10 2 2 Mute Analog Outputs 47 10 2 3 Adjusting the Headphone Volume 47 10 2 4 Muting the Phones Output 48 10 2 5 Using Phones Out as a Balanced Line Output 49 10 3 MADI Outputs 49 10 3 1 Setting the Output Channel Format and Frame Patte...

Page 5: ...12 1 Regulatory Compliance 61 12 1 1 CE Compliance 61 12 1 2 FCC Compliance 61 12 1 3 Note on Disposal 62 ...

Page 6: ...e Do not use this product near water i e swimming pool bathtub or wet basement Danger of condensation inside do not turn on before the device has reached room temperature ENSURE PROPER VENTILATION Do not cover the vents on the side of the unit Ensure proper ventilation to avoid overheating MAINS The device must be earthed when using AC voltage to power the device Never use it without proper ground...

Page 7: ... 128 audio channels over a single network cable Various remote control protocols allow the device to be configured seamlessly via IEEE 1722 1 AVDECC JSON OSC and a web interface accessible by network or USB connection with a browser 2 1 About This Manual This printed document was created for firmware 2 0 0 on 2020 08 05 For an updated version please check https www rme audio com The following manu...

Page 8: ...by screen is shown highlights one of four sections Pushing the encoder when the screen is idle activates the previously active tab Pushing the encoder when a section is highlighted opens the corresponding section 2 3 1 Sections All control items are categorized into four sections STATE for general settings INPUT for audio input related settings OUTPUT for audio output related settings and routing ...

Page 9: ...nd include a color bar that indicates the current state at a glance The following table shows the possible status indicator colors for reference Status Color Description Warning red Requires a configuration change or matching external signal Notice yellow There is a potential issue Notice in progress yellow with dots There is a temporary issue that should resolve automatically No Routing light gre...

Page 10: ...15 Word Clock Section 3 13 ADAT Outputs Section 3 12 MADI Coaxial and SFP Section 3 10 Analog Line Output Connectors Section 3 9 Analog Line Input Connectors Section 3 14 Network Connection MADI SFP Option Section 3 16 USB 2 0 Type B Jack Section 3 8 Power Supplies RME M 1610 Pro User s Guide 5 3 Hardware ...

Page 11: ...itch at the rear and a standby switch at the front Perform the following steps to power on the M 1610 Pro 1 Ensure either or both power inlets are properly connected to a power source 2 Toggle the mains switch at the back of the device to position I down The power indicator will light up in red Standby or white On This depends on the state of the device before the rear switch was toggled or the po...

Page 12: ... 3 5 Ring Illumination The following illumination patterns are possible No illumination There is no power at either of the two AC inlets The power switch at the rear of the device is set to Off Dark mode has been activated Permanent red illumination The device is powered off but is receiving power at either one of the AC inlets Permanent white illumination The device is powered on and all systems ...

Page 13: ...A Frequency response 44 1 kHz 0 5 dB 9 Hz 22 kHz Frequency response 96 kHz 0 5 dB 9 Hz 45 kHz Frequency response 192 kHz 1 dB 8 Hz 75 kHz THD N 100 dB 0 001 Channel separation 110 dB Output 6 3 mm TRS stereo unbalanced or mono balanced jack Maximum output level at 0 dBFS 13 dBu unbalanced 19 dBu balanced Output impedance 100 Ω 3 7 Control Section The M 1610 Pro can be configured completely at the ...

Page 14: ...ains interference The inlets are labeled in the sequence they appear when looking from the front of the device This helps identifying the active power source on the display The power switch next to the two inlets internally disconnects the line connection of the C14 inlets to the power supplies Ground and neutral will remain connected Lockable IEC plugs The inlets can be used with special IEC powe...

Page 15: ...higher distortion and increased power consumption In addition the first two analog output channels are available on separate TRS connectors These outputs have their own driver stage and can be used in combination with the corresponding D Sub channels Analog Out 1 2 in the output routing controls both the two TRS output channels and the D Sub channels 1 and 2 The TRS output stages have a servo bala...

Page 16: ...118 3 dBA Frequency response 44 1 kHz 0 1 dB 5 Hz 20 5 kHz THD 1 dBFS 111 dB 0 00029 THD N 1 dBFS 108 dB 0 00039 Channel separation 110 dB 3 11 2 DA Converter Specifications Line Out 1 8 Resolution 24 bit Output level switchable per channel 24 dBu 19 dBu 13 dBu 0 dBFS Output level at TRS 1 2 max 19 dBu 0 dBFS Outputs DC coupled fully symmetrical signal path truly balanced Output impedance 200 Ohm ...

Page 17: ...unlocking the SFP Unlock and remove by pulling its integrated wire latch outward The wire latch of the SFP module is color coded Black stands for the most common multimode module blue stands for single mode which allows longer distance transmissions It is possible but not reliable to connect single mode transceivers with multi mode transceivers Avoid this by always confirming that connected device...

Page 18: ...ry preset does not route any signal to ADAT outputs 3 14 Network Connection On the rear of the M 1610 Pro two RJ45 connectors labeled NET PRI and NET SEC provide ethernet connectivity The supported link speed is 1 Gb s for AVB A green LED left signals network traffic blinking A yellow LED right signals a successful link Both straight and crossover cables can be used Auto MDI X Cable lengths of up ...

Page 19: ...oint Link with speed of 100 MBit s not supported for audio streams Successful link with speed of 1 GBit s 3 15 Word Clock Word clock can be sent and received via 75 Ω coaxial cabling at the corresponding BNC connectors The cable length should not exceed 100 m 330 ft The input is terminated with 75 Ω internally To pass on the word clock to other devices use the word clock output Do not connect a T ...

Page 20: ...sen one 3 16 USB 2 0 Type B Jack The USB jack at the rear of the M 1610 Pro provides an alternative connection method for web remote control when a network connection is not available When connecting the M 1610 Pro with a standard printer USB 2 0 cable to a current Microsoft Windows or Apple macOS operating system a network adapter will be automatically installed This does not require additional d...

Page 21: ...irst Mount each bracket with two screws using a Philips PH 1 screwdriver Do not use screws other than the ones included Using longer screws can damage the device internally Never insert the screws without the rack adapter bracket This could damage of the device RME M 1610 Pro User s Guide 3 17 Mounting the Rack Adapter Brackets 16 ...

Page 22: ...8XPro10 Analog breakout cable 25 pin D sub to 8 x XLR male 10 m 33 ft 19 XLR breakout panels DTOX 16 I 16x XLR Input to 2x D sub DTOX 16 O 2x D sub to 16x XLR Output SFP Modules MADI SFP MM MADI optical multi mode module 2 km LC MADI SFP SM MADI optical single mode module 20 km LC Third party accessories available from independent global retailers Optional power cords with locking mechanism Manufa...

Page 23: ...ain 1 8 12 or 16 audio channels in AAF or AM824 format or 0 audio channels in CRF format In order to establish a connection stream between two AVB devices the following conditions must be fulfilled 1 There must be a physical connection between the devices 2 All switches between the devices must be certified AVB switches or compatible 3 An AVDECC Controller is required to find the devices and to co...

Page 24: ...ocal the link to the device changes along with the change of the device name and must be re entered The previous URL will not work 5 3 AVB Stream Size and Format In an AVB network a stream describes a connection between a talker and one or more listeners It consists of a fixed number of audio channels at a fixed sample rate The stream port of the talker and the listener must be configured to have ...

Page 25: ...le of a sample length 1 second divided by sampling rate For example given a requirement of 1ms latency with a sampling rate of 44100 Hz calculate the number of samples for the given latency in this example 44 1 samples and then multiply the rounded value 44 with the sample length 1s 44100 Rounded to the next 100ns the result is 997700ns Table 1 Recommended presentation time offsets 2ms in nanoseco...

Page 26: ...t the configuration within the AVB output port to open the outgoing stream settings 4 Adjust the presentation time offset by entering a value in nanoseconds OK Values will be rounded to the nearest 100ns Changing the presentation time offset briefly interrupts all incoming and outgoing AVB streams RME M 1610 Pro User s Guide 21 5 4 AVB Network Latency ...

Page 27: ...k source is in sync 3 After connecting an analog signal adjust its reference level as needed in the INPUT section 4 Open the tab of the preferred digital output in the OUTPUT section and choose Analog 1 16 as source 5 Set the preferred reference level in the analog configuration tab of the OUTPUT section 6 Choose a digital input source for the analog outputs in the OUTPUT section RME M 1610 Pro Us...

Page 28: ...are Update Input Section 9 1 1 Adjusting the Input Line Level Section 9 2 2 Connecting Two Identical MADI Signals for Redundancy Section 9 3 1 Change AVB Input Stream Size Output Section 10 2 2 Mute Analog Outputs Section 10 1 Routing Signals to the Outputs Section 10 4 1 Change AVB Output Stream Size and Format Section 10 3 1 Setting the Output Channel Format and Frame Pattern RME M 1610 Pro User...

Page 29: ...ny case warranty does not cover damage caused by improper installation or maltreatment replacement or repair in such cases can only be carried out at the owner s expense No warranty service is provided when the product is not returned to the local distributor in the region where the product had been originally shipped The distributor does not accept claims for damages of any kind especially conseq...

Page 30: ...port assistance Europe Audio AG Germany support rme audio de Synthax U K info synthax co uk Asia Australia RME Trading Ltd Hong Kong support rme trading hk Americas Synthax Inc U S A tech support synthax com Global support rme audio de RME M 1610 Pro User s Guide 25 7 3 Support Contacts ...

Page 31: ...eive power It is a realtime representation of the current power state with an inactive power supply shown in grey When facing the front panel the left power plug corresponds to the left IEC inlet at the rear Representation of the power states on the device 1 Open the power tab in the STATE section 2 The state of each PSU is shown as active if it receives power Representation of the power states on...

Page 32: ...tate Additionally the M 1610 Pro can save fifteen states in presets numbered 1 15 After a preset is loaded any change in the configuration will result in an unsaved changes state Representation of an unsaved preset on the device The internal preset storage is not affected when the device firmware is updated to a newer firmware version Moreover recalling the factory default preset does not delete a...

Page 33: ...e preset To save a preset using the web remote 1 Open the web remote and locate the preset tab Status Indicator Current preset and state Preset drop down menu Load and save buttons 2 Use the drop down menu to select a preset 3 Press the Save button 8 2 2 Loading Presets Up to 15 custom presets can be loaded from the internal storage of the M 1610 Pro RME M 1610 Pro User s Guide 8 2 Presets 28 ...

Page 34: ...y Preset Loading the factory defaults does not delete any saved presets It also does not affect the lock settings in the STATE section 8 3 Device Lock The M 1610 Pro can be secured against both accidental and intentional changes to its configuration Locking the device with or without code protects against changes on the device itself When locked the display shows a lock symbol The device lock does...

Page 35: ...Device Now to lock immediately Remember or write down the code shown in SET CODE It is not possible to unlock the device without this code A unique secondary code PUK can be obtained from RME Support upon request with a proof of purchase and device serial number To delete the code move the cursor on the code and push the encoder No code will be displayed The device can only be locked and unlocked ...

Page 36: ...o delete it The device can only be locked and unlocked at the front panel These controls are not accessible remotely 8 4 Front Panel Illumination The M 1610 Pro front panel consistst of A ring illumination around the standby switch that shows the overall state of the device A display with standby screen that shows categorized warnings They have been designed to give the user thorough status feedba...

Page 37: ...o off to turn off the display When any item is turned off a notification orange is shown in the STATE section To turn panel illumination back on 1 Open the same menu and set the corresponding switches to to On To turn the front panel lighting on temporarily just rotate or push the encoder The panel will turn back off after five seconds RME M 1610 Pro User s Guide 8 4 Front Panel Illumination 32 ...

Page 38: ...ches on the web remote to switch off device lighting 8 4 2 Changing the Meters to Peak or RMS Mode Depending on the application instantaneous peak level metering or a slower averaged RMS metering may be preferred To change the metering mode on the device 1 Open the visual feedback tab in the STATE section 2 Push the encoder on the current Metering value to activate selection 3 Change the value to ...

Page 39: ...s both the remote control and the device On the device an over notification is shown above the level meters on the display To switch over notifications on or off 1 Open the visual feedback tab in the STATE section 2 Change OVR Hold to either 5s to notify for five seconds On to notify until manually reset Off to deactivate over notifications To reset infinite full scale notifications 1 Open the vis...

Page 40: ...DECC operate simultaneously Two or more controller instances are synchronized The MIDI control can read commands that are embedded into either one of the MADI signals Both network and MIDI control can be used at the same time The remote control protocols are not protected against malicious use When activated the remote control server allows anyone on the network to make changes to the configuratio...

Page 41: ...d 3 Enter the IP address in the address bar Connecting to the Remote Interface without IP address Instead of using the IP address the device name can be entered in the browser window followed by local By default the name is m1610 pro and the corresponding URL is therefore http m1610 pro local The length of the custom name should not exceed 63 characters Spaces in the device name should be written ...

Page 42: ...ble browsers Chrome 83 Safari 13 Firefox 76 Edge 83 or newer The browser must support WebGL Web Remote Overview Section 2 2 Firmware Update Section 5 1 Identifying a Device Remotely Section 8 1 Power State Section 8 2 Presets Section 8 4 Front Panel Illumination Section 10 1 Routing Signals to the Outputs Section 11 CLOCK Section Section 9 INPUT Section RME M 1610 Pro User s Guide 37 8 5 Remote Co...

Page 43: ...n 8 6 Device Information The information tab is located in the STATE section It shows the current firmware version and gPTP Grandmaster ID The information tab is only available on the device itself RME M 1610 Pro User s Guide 8 6 Device Information 38 ...

Page 44: ... the entire audible range At higher sample rates a short delay slow filter is used to additionally optimize the impulse response The latency increases to six samples at quad speed 176 4 kHz 192 kHz In its default state no routing exists between the analog inputs and the digital outputs The analog signals can be routed to two MADI ports ADAT ports and eight AVB streams at the same time 9 1 1 Adjust...

Page 45: ...ent ways Manufacturers can implement one or both modes usually referred to as 96k frame and S MUX 2 or legacy mode It is important to use the same mode on both sender and receiver side because S MUX 2 and legacy mode are not compatible Both modes transport the audio signal transparently 96k frame The so called 96k frame pattern AES10 can be detected at the receiver side automatically In this mode ...

Page 46: ...icon changes to reflect the feature The failover is seamless if the active input loses lock abruptly e g one of the cables is unplugged The user is notified of the lost signal with a warning and redundancy can be re established For a seamless failover the two MADI signals must be identical However only the SYNC and LOCK states are evaluated to confirm the current input state It is therefore possib...

Page 47: ...ker to be ready Talker Fail red Verify proper talker configuration No Bandwidth red Use faster network speed 1 GBit s instead of 100 MBit s Domain Boundary red Reconnect all devices and reboot switch ensure only AVB switches are used Internal Error red Reboot device 9 3 1 Change AVB Input Stream Size Each of the eight AVB streams can have a size of 1 8 12 or 16 channels in AM824 and AAF stream for...

Page 48: ...an AVB port in the routing area and use the up and down arrows to adjust the stream size 3 Use the stream format dropdown to select the format to be used 4 Click Apply Changing a stream size briefly interrupts all incoming AVB streams Incoming streams can contain less than the specified amount of channels RME M 1610 Pro User s Guide 43 9 3 AVB Input Streams ...

Page 49: ...te to find out quickly which outputs are receiving a specific input signal The web remote provides a thorough representation of all active routing connections at a glance Device Output Section The device allows full inspection and configuration of outgoing signals including routing with the use of the encoder Web Remote Output Section The web remote integrates the output ports with a visual routin...

Page 50: ...or MADI optical output port 3 Select individual or consecutive channels by clicking or dragging The channels are highlighted in blue and an arrow handler is revealed 4 If the input ports are closed drag the handle onto an input port it opens automatically 5 Drag the handle onto the source channel strips to select a range of channels as signal source 10 2 Analog Outputs The line level outputs of th...

Page 51: ...ursor current channel Input Reference Level 4 Move the cursor to the current line level and push it 5 Rotate the encoder to change the setting and confirm by pushing the encoder again To adjust the output line level on the web remote 1 Select an analog output channel by clicking the corresponding channel strip The channel strip turns blue 2 optional Click and drag left or right to select multiple ...

Page 52: ...ove the cursor to Mute Toggle and push it To mute an output channel using the web remote 1 Select an analog output channel by clicking the corresponding channel strip The channel strip turns blue 2 optional Click and drag left or right to select multiple channels 3 Toggle the Mute switch The status is reflected with a red M in the corresponding level meters 10 2 3 Adjusting the Headphone Volume Th...

Page 53: ...l strip 2 Use the encoder to adjust the gain in the PHONES channel strip Press the Shift key while dragging the knob for finer adjustments Clicking twice on the encoder knob opens a text field that can be used to input a value using the keyboard To separate the left and right headphone channels 1 Press the Button labeled Stereo The button turns grey and a second channel strip opens with its own ga...

Page 54: ... both tip and ring of a TRS connector the phase being inverted on the ring To toggle balanced output mode using the web remote 1 Open the phones output channel 2 Press the BAL button to switch the channel to balanced out The channel that was routed to the left phones output will now be applied to both tip and ring of a TRS connector the phase being inverted on the ring 10 3 MADI Outputs The MADI o...

Page 55: ...affect the outgoing signal It is not possible to select separate settings for each MADI port Both ports will be affected regardless which output tab is used to change the setting 10 3 2 MADI Daisy Chains MADI is a uni directional protocol with a fixed number of channels When more than two MADI devices are connected a serial connection is required This is also referred to as a daisy chain The outpu...

Page 56: ...ams leaving the M 1610 Pro are described as output streams In this case the device acts as a talker The talker defines the presentation time and therefore the latency across the network This is set per default to 2 ms See Section 5 4 AVB Network Latency for details on AVB latency The output streams of the M 1610 Pro are by default empty containing a clock signal but no audio signal To send audio w...

Page 57: ...current AVB stream size and press the encoder 3 Rotate the encoder to configure a new stream size and stream format and confirm by pressing the encoder again To change the amount of channels of the outgoing AVB streams 1 Connect the device by USB or network cable and open the web remote 2 Open one of the outgoing AVB Ports 3 Select the configuration within the AVB output port to open the outgoing ...

Page 58: ...ossible notifications are not shown Those signals are not relevant to the current device state 11 2 Master Clock In its default state the M 1610 Pro uses an internal clock signal master This means that any connected device must synchronize to it slave Alternatively one of the digital inputs word clock MADI optical MADI coaxial and each of the four AVB streams can be chosen as clock reference This ...

Page 59: ...lock MADI optical MADI coaxial and internal seamlessly when the MADI optical coaxial or word clock inputs fail and the other port is locked or to internal ICC will not fall back to an AVB sync source and also will not affect a chosen AVB master clock RME M 1610 Pro User s Guide 11 2 Master Clock 54 ...

Page 60: ...peed based on an incoming rate Intelligent Clock Control ICC Input Clock at input Selected Sample Rate Resulting Sample Rate MADI 44 1 44 1 44 1 MADI 44 1 48 44 1 with warning MADI 44 1 88 2 88 2 MADI 44 1 96 88 2 with warning MADI 44 1 176 4 176 4 MADI 44 1 192 176 4 with warning MADI 48 44 1 48 with warning MADI 48 48 48 MADI 48 88 2 96 with warning MADI 48 96 96 MADI 48 176 4 192 with warning M...

Page 61: ...le rate than the current sample rate because two devices could choose different edges of the incoming clock signal ICC does not affect outgoing AVB streams Outgoing AVB streams will always correspond to the sample rate set in the CLOCK section If the reference clock changes its frequency outgoing AVB streams will be interrupted 11 3 2 Number of Channels The supported number of channels per port or...

Page 62: ...te is shown 5 Push the encoder again to activate the setting 11 3 4 Effects of Sample Rate Changes on Existing Routing The M 1610 Pro saves one routing table per preset regardless of sample rate A change of sample rate or MADI frame mode can reduce the number of input and output channels available for routing This does not alter the routing table Any existing routing is hidden until another change...

Page 63: ... kHz 176 4 kHz 44 1 kHz 192 kHz 192 kHz 48 kHz To set the Word Clock output to single speed on the device 1 Open the CLOCK section 2 Move the cursor onto the toggle switch Word Out Single and push the encoder to change the value To set the Word Clock output to single speed on the web remote 1 Locate the CLOCK section 2 Move the cursor onto the Word Out Single switch and push the encoder to change ...

Page 64: ...ontrol and Digiface are trademarks of RME Intelligent Audio Solutions Microsoft Windows Windows 7 8 10 are registered trademarks of Microsoft Corp Apple and macOS are registered trademarks of Apple Inc Copyright 2020 m2lab Ltd This manual is licensed under a Creative Commons Attribution NonCommercial NoDerivatives 4 0 International License http creativecommons org licenses by nc nd 4 0 RME M 1610 ...

Page 65: ...88 2 kHz or 96 kHz compare single speed and quad speed AVB talker An AVB endpoint that streams audio to one or more listeners AVB listener An AVB endpoint that receives an audio stream from a talker DHCP server A DHCP Server hands out IP addresses to network devices Every consumer oriented WiFi Router has a default DHCP Server handing out private addresses usually 192 168 0 x The IP address of a n...

Page 66: ...nd to comply with the limits for a Class B digital device pursuant to Part 15 of the FCC Rules These limits are designed to provide reasonable protection against harmful interference in a residential installation This equipment generates uses and can radiate radio frequency energy and if not installed and used in accordance with the instructions may cause harmful interference to radio communicatio...

Page 67: ...ts lifetime In case a disposal of electronic waste is not possible the recycling can also be done by Scheck Audio GmbH the manufacturer of this device For this the device has to be sent free to the door to Scheck Audio GmbH 3 Industriestr 5 68804 Altlussheim Germany Shipments not prepaid will be rejected and returned on the original sender s costs RME M 1610 Pro User s Guide 12 1 Regulatory Compli...

Reviews: